Less hangry moments (they do occur if I don’t time out my meals properly)
Less body pain in the morning (if you don’t count my butt hurting from doing Turbo Jam)
Less cravings for all things formally known as “my diet” (aka Cheetos, Whatchamacallit Candy, MochaChocaLattes, and any form of beef)
Less pounds to carry everywhere I go (down 14 pounds since Day 1 – not even trying to lose weight, people)
More energy (sudden bursts of dance moves, butt squeezes, and/or squats while waiting at the microwave = more energy)
More sleep (actually getting 6 hours on average which is a record for me)
And, the most important thing I have to report on Day 21 is I’m eating everything I love and don’t feel like I’ve done much but somehow program myself to feel better through better choices. It’s not rocket surgery. Lo and behold, all it takes is moving my booty at least four times a week for 20 minutes and not shoveling copious amounts of M&Ms into my pie hole every time I pass a bowl full of them.
I have to admit that I’ve always felt nothing good came from eating sad little salads, and I was right. They totally suck!
But, cleaner eating or healthier, better choices doesn’t have to mean eating sad little salads. Kids, I’m eating bacon on a daily! I grew up eating breakfast tacos and bacon, eggs, and toast for breakfast. That ain’t gonna change. What did change was that instead of eating two pieces of toast, a tablespoon of butter for my two eggs, plus my three strips of bacon, and butter and jelly on my toast (don’t judge), I now have one egg cooked in the renderings from my one slice of bacon, and I enjoy one piece of toast lightly buttered. Eat what you love! Love what you eat! And, most importantly, love yourself and make simple, better choices so you can continue reading my blog!
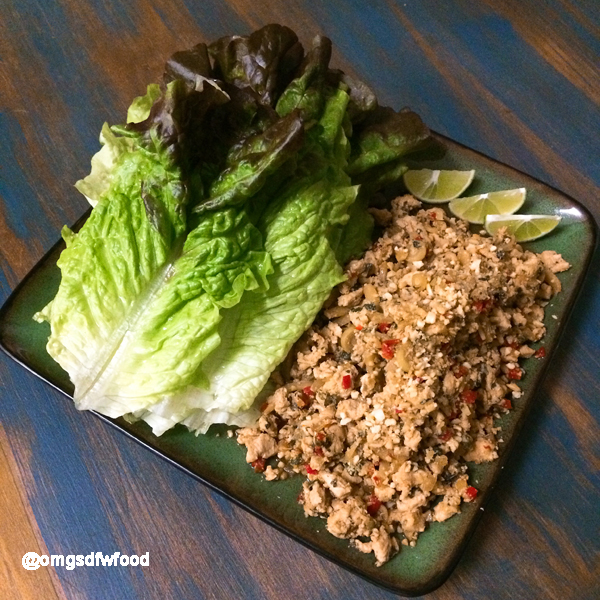
Throw a protein and some colorful things (preferably vegetables and herbs) together, and enjoy! That’s honest to goodness all I have been doing – nothing fancy. Every meal I make is filling, delicious, flavorful, and happy – just like these Chicken Lettuce Wraps! They are flavor bombs in a nice little lettuce wrapper and super easy to throw together. Check it out, follow my blog, subscribe to my YouTube channel, and keep making better choices! I know I will!
I’m a sucker for a beautiful plate. When the vibrant colors dance visually, you can practically guarantee they will dance on your palate, right? So, when I was first introduced to Moussaka, a traditional Greek dish featuring eggplant and ground beef or lamb, covered in a creamy bechamel cheese sauce, I did not visualize Zorba the Greek fervently strutting about my taste buds.
Moussaka ain’t the prettiest at the party. It’s a heap of brown and white assembled in a lasagna-like pattern – not particularly “Opa!” inspiring.
Then, I tasted it.
What I adore, even more than a beautiful plate and certainly more important than aesthetics, is an amazingly memorable plate that transports me to another world or embraces me with comfort and happiness through taste and texture. Moussaka does just that. I’m not Greek, but it’s comfort food to me. And, why wouldn’t it be!? I mean, it’s meaty, hearty, and loaded with creamy, cheesy goodness!
The minor obstacle I had to overcome was the fact that most of the time “meat, hearty, and loaded with creamy, cheesy goodness” does not jive with my whole “better choices” mantra for this year.
I could ignore that, but I did write about it on the ol’ interwebs for everyone to see. Not to mention, I’ve actually lost 10 pounds in the first 14 days of 2017 just by making better choices. So, who says I can’t eat what I love and still make better choices?? We can balance it all out. I’m all about harmony (mostly harmony between my taste buds and my tummy, but harmony nonetheless).
Enter My Moussaka! (I really like saying that.)
As I walked through the list of ingredients, I thought about how I could make a faux bechamel topping and how I could keep that comforting aspect even if I took out most of the stuff that makes it comforting.
The idea hit me while we were driving to the store and I was under serious hangry duress. I had not timed my day out properly and was about an hour into a Snickers commercial. Thus, I was craving something hearty and comforting.
Well, with a few minor tweaks, I got this bad boy under 400 calories per heaping serving. Plus, I got through the nearly hourlong cooking process without my hangry hurting anyone! High five!
I drank tons of water while cooking this dish that feeds six, and I was so proud that I stuck to the “better choices” plan because this version was so good! Bear is a big eater, and he absolutely loved it and said it was very filling. While I’m not an authority on Moussaka by any means, for us, this Moussaka recipe is, dare I say, “Opa!” worthy.
Note: You can add an egg to the creamy mixture right before using it to layer. It will help stabilize and create a fluffier layer, but it’s not necessary.
Preheat oven to 375°.
Peel the eggplant and slice lengthwise to make 1/4 inch oblong-like slices. Place the slices on a baking sheet, trying not to overlap. Drizzle olive oil over both sides of the eggplant and season with 1 TBS of Greek seasoning. The C&J Farms brand of Greek seasoning includes salt. If you use a brand of Greek seasoning that doesn’t contain salt, season the eggplant on both sides with salt. Place in the oven and bake until the eggplant is roasted, approximately 15 minutes. It’s okay if the thinner slices get a little charred, but watch them carefully so charred doesn’t turn into burned. Once the eggplant is roasted, remove from oven and set aside for assembly.
While the eggplant is baking in the oven, in a medium saucepan, break up the head of cauliflower and add almond milk.
Add chicken stock to the cauliflower, season with a dash of salt, and then cover with a lid and allow to simmer on medium heat while everything else is cooking.
Finely chop the mushrooms, onions, and garlic. Add coconut oil to a large skillet or dutch oven and saute the onion, garlic, and mushrooms on medium high until the onions are translucent and the mushrooms have cooked down.
Create a small well in the center of the mushroom mixture, and add the tomato paste. Cook the tomato paste in the center until it has a darker color. Then, incorporate the tomato paste fully with the onion and mushroom mixture. Add the ground turkey and the remaining Greek seasoning, and cook thoroughly. Set aside.
Once the cauliflower has cooked through and is softened, use a hand blender or transfer to a blender to blend into a smooth consistency. Add the mozzarella shreds and blend until well combined. (I’ve never been a huge fan of vegan cheese, but Bear got me hooked on this particular brand. So, it’s the only one I really use when I’m trying to cut down on dairy.)
In a casserole dish, add a layer of the ground turkey mixture. Top with eggplant as if you’re layering lasagna noodles.
Cover the eggplant with a portion of the creamy cauliflower mixture and continue to build, alternating turkey, eggplant, and cauliflower until the last layer is the creamy mixture.
Bake at 375° for 20 minutes. Broil for another 5 minutes to char the top of the Moussaka. Then, grab a bowl, get comfy on the couch, and indulge without that pesky indulgence guilt.
Now, not my norm, but I’m going to throw a quick and easy Greek Lamb Chop recipe in here at the end because… well… it’s quick and easy! And, it’s delicious and uses the same Greek seasoning I use for the Moussaka.
Season four lamb chops with Greek seasoning that has salt. Same as above; if your Greek seasoning doesn’t have salt, season the chops with salt. Cube one sweet potato, french one medium onion, and slice one lemon. Heat up a cast iron skillet on medium high, add the lamb chops to sear until browned on all sides but not cooked through. Remove the chops from the skillet. Add the potato and onion to the skillet and saute briefly. Add the seared lamb chops back to the top of the onions and potatoes. Place the slices of lemon on top of the chops. Add a splash of chicken stock or beef stock to the skillet to deglaze. Transfer the entire skillet to the oven and bake in a preheated oven at 375° for 20 minutes.
Opa!
LET’S KEEP IT REAL: First and foremost, I do everything for the love of food. Most of what I write about is because I love it! If I don’t love it, I tell you about that, too. From time to time, I may receive monetary or product compensation for mentioning products, offering recommendations, providing endorsements, or including links to products or services when I blog. While that may be the case for some posts, it is not the case for all. When it’s sponsored, you’ll see #sponsored when I post. When I’m just sharing the love, I won’t use that particular tag or hashtag. What you need to know is that I only give shout outs when I actually use the product or love it so much it deserves a shout out, sponsored or not.
If you’re anything like me, the start of the new year usually means the end of eating all things that make you happy and the start of New Year Punishment, a ritual that includes the pushing around of sad-looking salads and the unenthusiastic motion of swinging mud-bars to and from your face with a half-grimace during every bite, otherwise known as eating protein or meal replacement bars.
New Year Punishment usually ends somewhere around the fourth or fifth day when a surge of hangry washes over you. This part results in the ceremonial hiding of the empty Cheeto bag just underneath the upside down Chips Ahoy box that’s been strategically placed beneath the brown paper bag from Five Guys that looks very similar to the brown paper bag from Whole Foods.
New year, new you, right?
Well, for me, the idea of “diet” and making drastic changes to my day and expecting my taste buds to suddenly enjoy things I don’t ever dream about eating (I can say with full confidence) doesn’t work. So, this year, I’ve replaced New Year Punishment with New Year Choices – same taste buds, different approach.
I mean, for Pete’s sake (sorry, Pete), I love food. And, the only reason why junk food was ever the last hoorah when the hangry took over was because I’d denied myself so much happiness (otherwise known as cheese, bacon, and chocolate) that I was desperate for anything that remotely resembled the things I love to eat.
Why in the heck was I repeatedly denying my love of food when there are plenty of flavor-packed choices I could have, and guess what, folks??? I can cook!
Geesh. So, I’ve decided to challenge myself. I will create healthier versions of everything I love to eat, and sometimes I’ll just make things I love that don’t need a healthier twist. I am simply making better New Year Choices because I deserve to be around for a long time.
Better choices that celebrate my love of food, remember? Not denial and tasteless choices that make me psychotic.
And, I’ll tell you another thing. I have every friggin’ exercise guru’s VCR (yes, VCR), DVD, BlueRay, poster, flipchart, and dance chart one could possibly imagine. And, I’ve taken just about every class that’s offered by anyone peddling a “fun” workout and been in every gym within a 20 mile radius of my home. In all the years I’ve been wasting money buying crap I don’t use or stopping doing whatever class after the hangry stage, there’s only one exercise that has ever made me happy.
So, Chalene has officially come out of retirement, and we’re gettin’ our Turbo Jam back on.
Want to know why I love me some Turbo Jam?
Because it’s only 20 minutes, has fun music, includes Chalene telling me how awesome I am for making better choices, and I don’t want to kill her. She’s got me jammin’ and jumpin’ and movin’ and shakin’ for 20 minutes, and I don’t feel like I want to seek and destroy, much like many other programs in which I’ve participated. That’s why I love me some Turbo Jam. That’s it. No health aspect. No variety of cardio and strength training blah, blah, blah. No. I don’t want to kill her. I can stand it for 20 minutes. It makes me happy. Ahí esta.
And, this kick-off week to making better choices has been exactly what it should be, flavor-packed and fun. At no point did I find myself crying in a corner while hoarding Ding Dongs. It was good.
Here’s one of the many super-easy and tasty recipes that made the week successful.
Ingredients:
2 Zucchini
1/2 Onion, frenched
2 Cups Asparagus
1/2 Cup Red Bell Pepper
4 Green Onion
6 Grape Tomatoes
1/4 Cup, Plain Panko Japanese Style Bread Crumbs
1 TBS Whole Grain Mustard
1 TBS Fresh Dill
1 TBS Fresh Chives
1 TBS Fresh Parsley
2 6oz Portion of Fresh Salmon
1 TBS Spanish Extra Virgin Olive Oil
1 TBS C&J Farms Scarborough Fair Herb Blend
Salt/Pepper
Preheat oven to 375°.
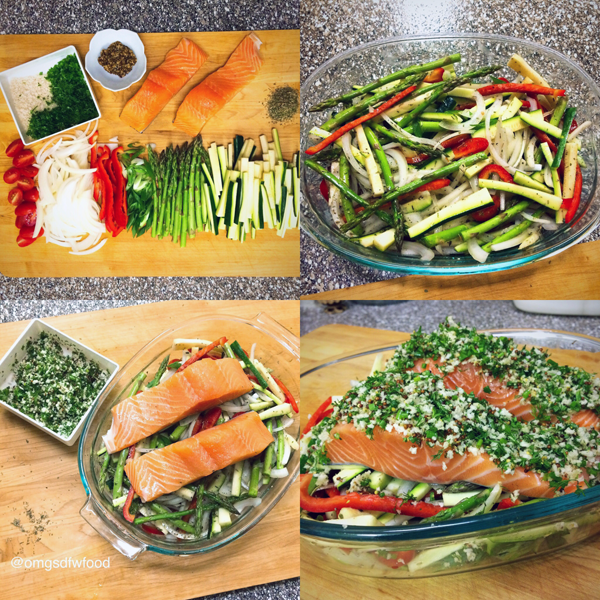
Take one asparagus and bend it in half until it breaks on its own. Use that broken asparagus as your guide to trim the rest of your asparagus into a similar length. Set aside.
Cut zucchini and red bell pepper into matchsticks or long slices, and set aside. Slice the green onion on the bias, and set aside. French the onion and slice the grape tomatoes in half, and set aside. Finely chop the dill, chives, and parsley and place in a small bowl. Add the mustard and panko to the herb mixture and set aside.
In a large baking dish, add the zucchini, onion, asparagus, red bell pepper, green onion, and tomatoes. Drizzle with 3/4 TBS of olive oil, reserving the rest for later. Salt and pepper the vegetables, add the Scarborough Herb Blend, and toss everything together to coat evenly with oil and seasoning. Place the two salmon portions directly on top of the seasoned veggies. Salt and pepper each salmon portion.
Stir together the panko, herb, and mustard mixture. Add the rest of the olive oil to the panko mixture. Using a spoon or your fingers, crust the top of the salmon with the panko and herb mixture, ensuring the top of the salmon is completely covered. Bake at 375° for 20-30 minutes, depending on how well-cooked you prefer your salmon. And, enjoy every single flavorful bite – that dill and mustard pop makes every mouthful dance – I’m telling you.
So, here’s to making better choices! I look forward to sharing my adventures with you in 2017, and may you also journey through your own best adventure this year – because you deserve it.
Sometimes you just need fajitas a la pajamas. In other words, you don’t have to get all doodied up to head out to your local Tex-Mex joint to have grito-inspired fajitas. You are 100% capable of delivering superstar, melt-in-yo-mouth steak, chicken, and shrimp fajitas from the convenience of your own kitchen in the convenience of your own chones pajamas (dangerous to cook in chones – let’s not be that lazy).
We’ve all been there. Sometimes ya just don’wanna. And, that’s okay! Because I have the hook up for you, and it doesn’t even involve going outside to start up the grill. Plus, it’s much cheaper, and the margaritas are endless when you’re making them at home. And, while I don’t usually promote shortcuts, this definitely does the trick for a lazy day.
First, if you’re having a super lazy day and you don’t even have any groceries, have no fear. Favor is here. While it’s not available everywhere yet, it covers most major cities, including the DFW metroplex and far North Dallas. It’s a magical button that lives in your phone as an app that you download, and when you ask it to do you a favor and pick up groceries, guess what??? Someone shows up a while later with all of the groceries you’ve asked for and no cash to exchange because you set up your account when you downloaded the app! I discovered this app back in July, and truth be told, because we love it so much, Bear decided to start running for Favor. No one is paying me for this, by the way. I’m just sharing the love because everyone deserves to have the option to stay at home in their pajamas every now and again while someone else does their grocery shopping. It works for food delivery and all sorts of things, but we’re focusing on the grocery hook up today.
Grocery List:
1 Large Tomato
1 Medium Onion
1 Red Bell Pepper
1 Large Avocado
2 Limes
1 12oz Ribeye Steak
1 Large Boneless Skinless Chicken Breasts
8 Peeled and Deveined Shrimp (cooked or raw works)
Now, if you do not have salt, garlic powder, cumin powder, and olive oil as part of your pantry staples, I’m very disappointed, but we’ll talk about that later. Just add those to the list if you don’t have them on hand.
If you also do not have quality tequila in your freezer, that’s okay. Not everyone is as awesome as I am. Not to mention, you don’t actually needthe tequila for the recipe, but if you have it, HIGH FIVE! You’ll need about four splashes (4 Tablespoons) to make the fajitas.
Once you have everything, get your prep work done.
French the onion and slice the bell pepper into thin strips and set both aside in a bowl. Slice the tomato into 1/4 inch discs, salt, and set aside.
Don’t know how to french an onion? No problem. I got you:
Now, cut the avocado in half. Take the pit of the avocado out, then using a spoon, scoop out the avocado meat, mash up with a fork, add salt, a squeeze of lime, zest of 1/2 lime, and a dash of garlic powder and ground cumin. Stir. Holy guacamole, Batman! Set aside.
This is when you start up your cast iron comal (flat griddle) or cast iron skillet on medium high heat.
Butterfly or pound out the chicken breast to ensure it is similar in thickness across the whole breast. If I lost you at “butterfly,” just pound out the chicken breast and don’t worry about being Michael Phelps.
Season the onions and bell peppers, chicken breast, steak, and shrimp in separate bowls using the following ingredients for EACH bowl:
At this point, the cast iron comal should be screaming hot. Cook the ribeye first. Be sure to turn on your vent fan unless you want the fire department to show up while you’re in your pajamas. It will likely smoke but not for long. Cook the ribeye for approximately 6-7 minutes each side for medium-rare to medium. Once the steak is cooked to your preference, remove from the heat and let it rest.
Next up, chicken! Cook the chicken for 7-8 minutes each side. If you did not pound or butterfly the chicken, you’ll have to cook it longer until it comes to 160-165 degrees using a thermometer in the thickest portion of the chicken breast. Once the chicken is cooked thoroughly, remove from heat and set aside to rest.
Add the shrimp to the comal in a single layer. If you are using cooked shrimp, just heat through and flip to ensure you create a little char on the seasoned shrimp. If you’re using raw shrimp, cook for about 2-3 minutes each side or until the shrimp begin to curl into a c-shape. If it curls too much, you’ve overcooked the shrimp. So, keep watch and remove from heat when ready.
Then, add the onions and bell peppers to the comal and cook until the onions become tender but not translucent. This will leave a little bite to the veggies but keep that nice charred flavor in the mix. Remove the veggies from the comal. Lastly, add the tomato discs to the comal and char on each side, approximately 1-2 minutes each side.
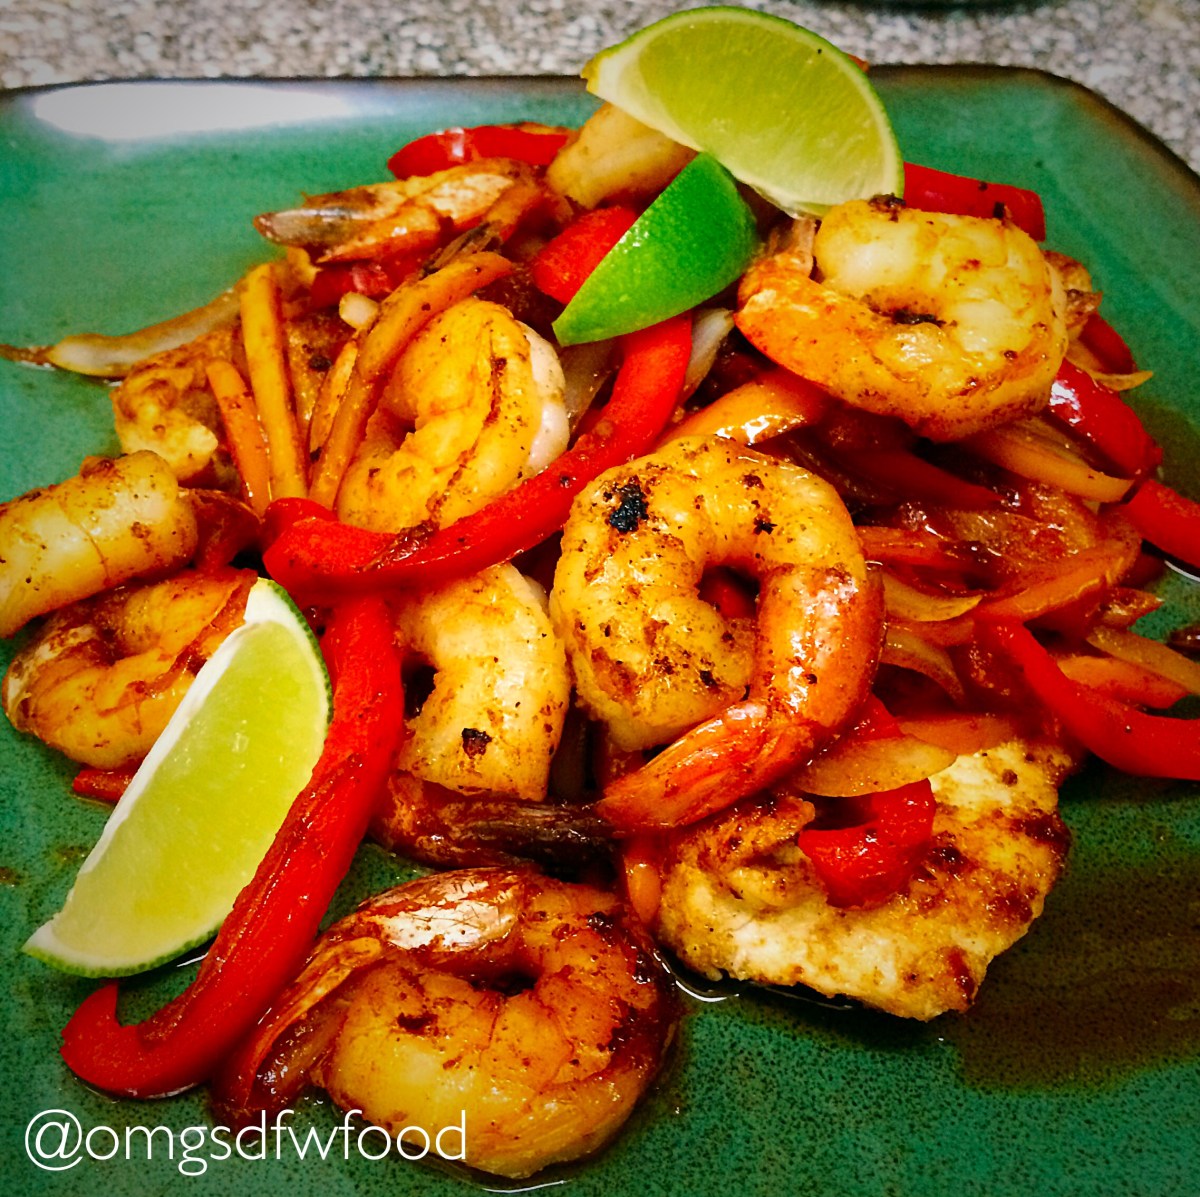
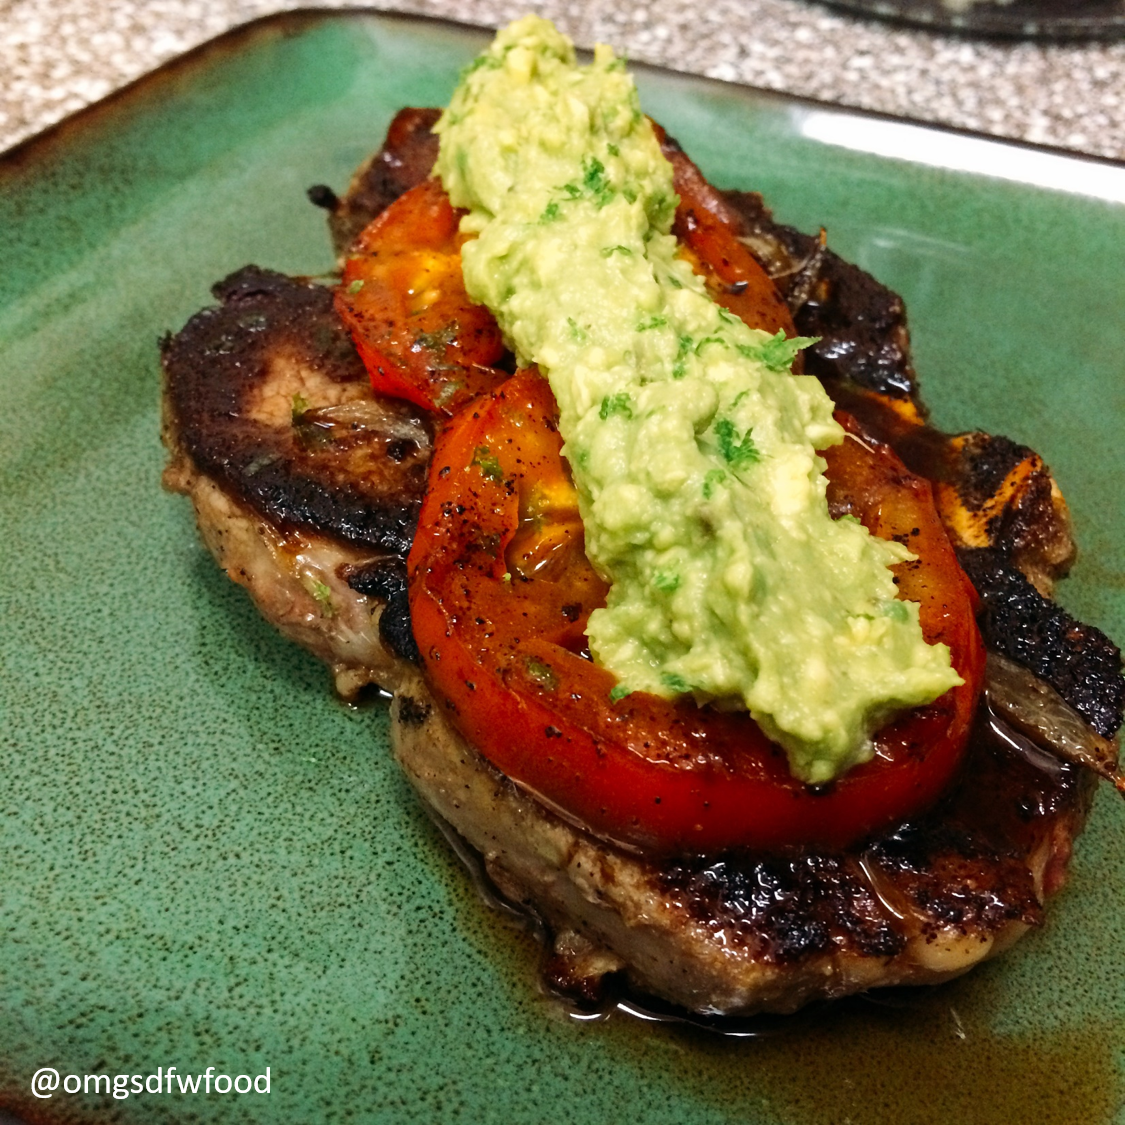
Dress your ribeye with some grilled onions, tomato discs, and guacamole. Slice the chicken or serve whole with the shrimp and veggies, along with slices of lime.
You now have the most amazing meal, all done in your jammies! The best part is that you also have tequila and lime at the ready; so, you can even enjoy some margaritas along with your lazy fajitas!