In the spirit of doing everything possible to win a sandwich making contest, here’s another entry I submitted, and it is SOOOOOOOOOO GOOOOOOOOOOD! Plus, I got to do my best Giada impression when I made my recipe video. “SO-pre-SSA-ta!” Continue reading “Italian Basil Bomb Sammy”
Every year, D Magazine puts out a “Best of Big D” list – it’s basically a “where to find the shiznit” list of anything and everything in Dallas. It was no surprise this year when Empire Baking Company was named Best of Big D Bakery for Bread. Having run full-production bakeries in a past life and having been schooled on more than one occasion by some of the most passionate, tattoo-covered, lovable, foul-mouthed, “bread is life,” under cover of night, master baker beasts, I can tell you, Empire has some killer bread.
So, as you can imagine, when Empire’s blog posted a Back to School Sandwich contest focused on using their bread, I was all over it. The contest ends Friday, August 19th; so, I still have another day to submit more sammies, but this one deserves to be shared even if I don’t win. The rules are: 10 ingredient limit, serve cold/room temp, and make it simple, nice, and tasty. Here’s what I came up with…
Servings: Yours and Only Yours
Time: 10 mins
Difficulty: Easy
Ingredients
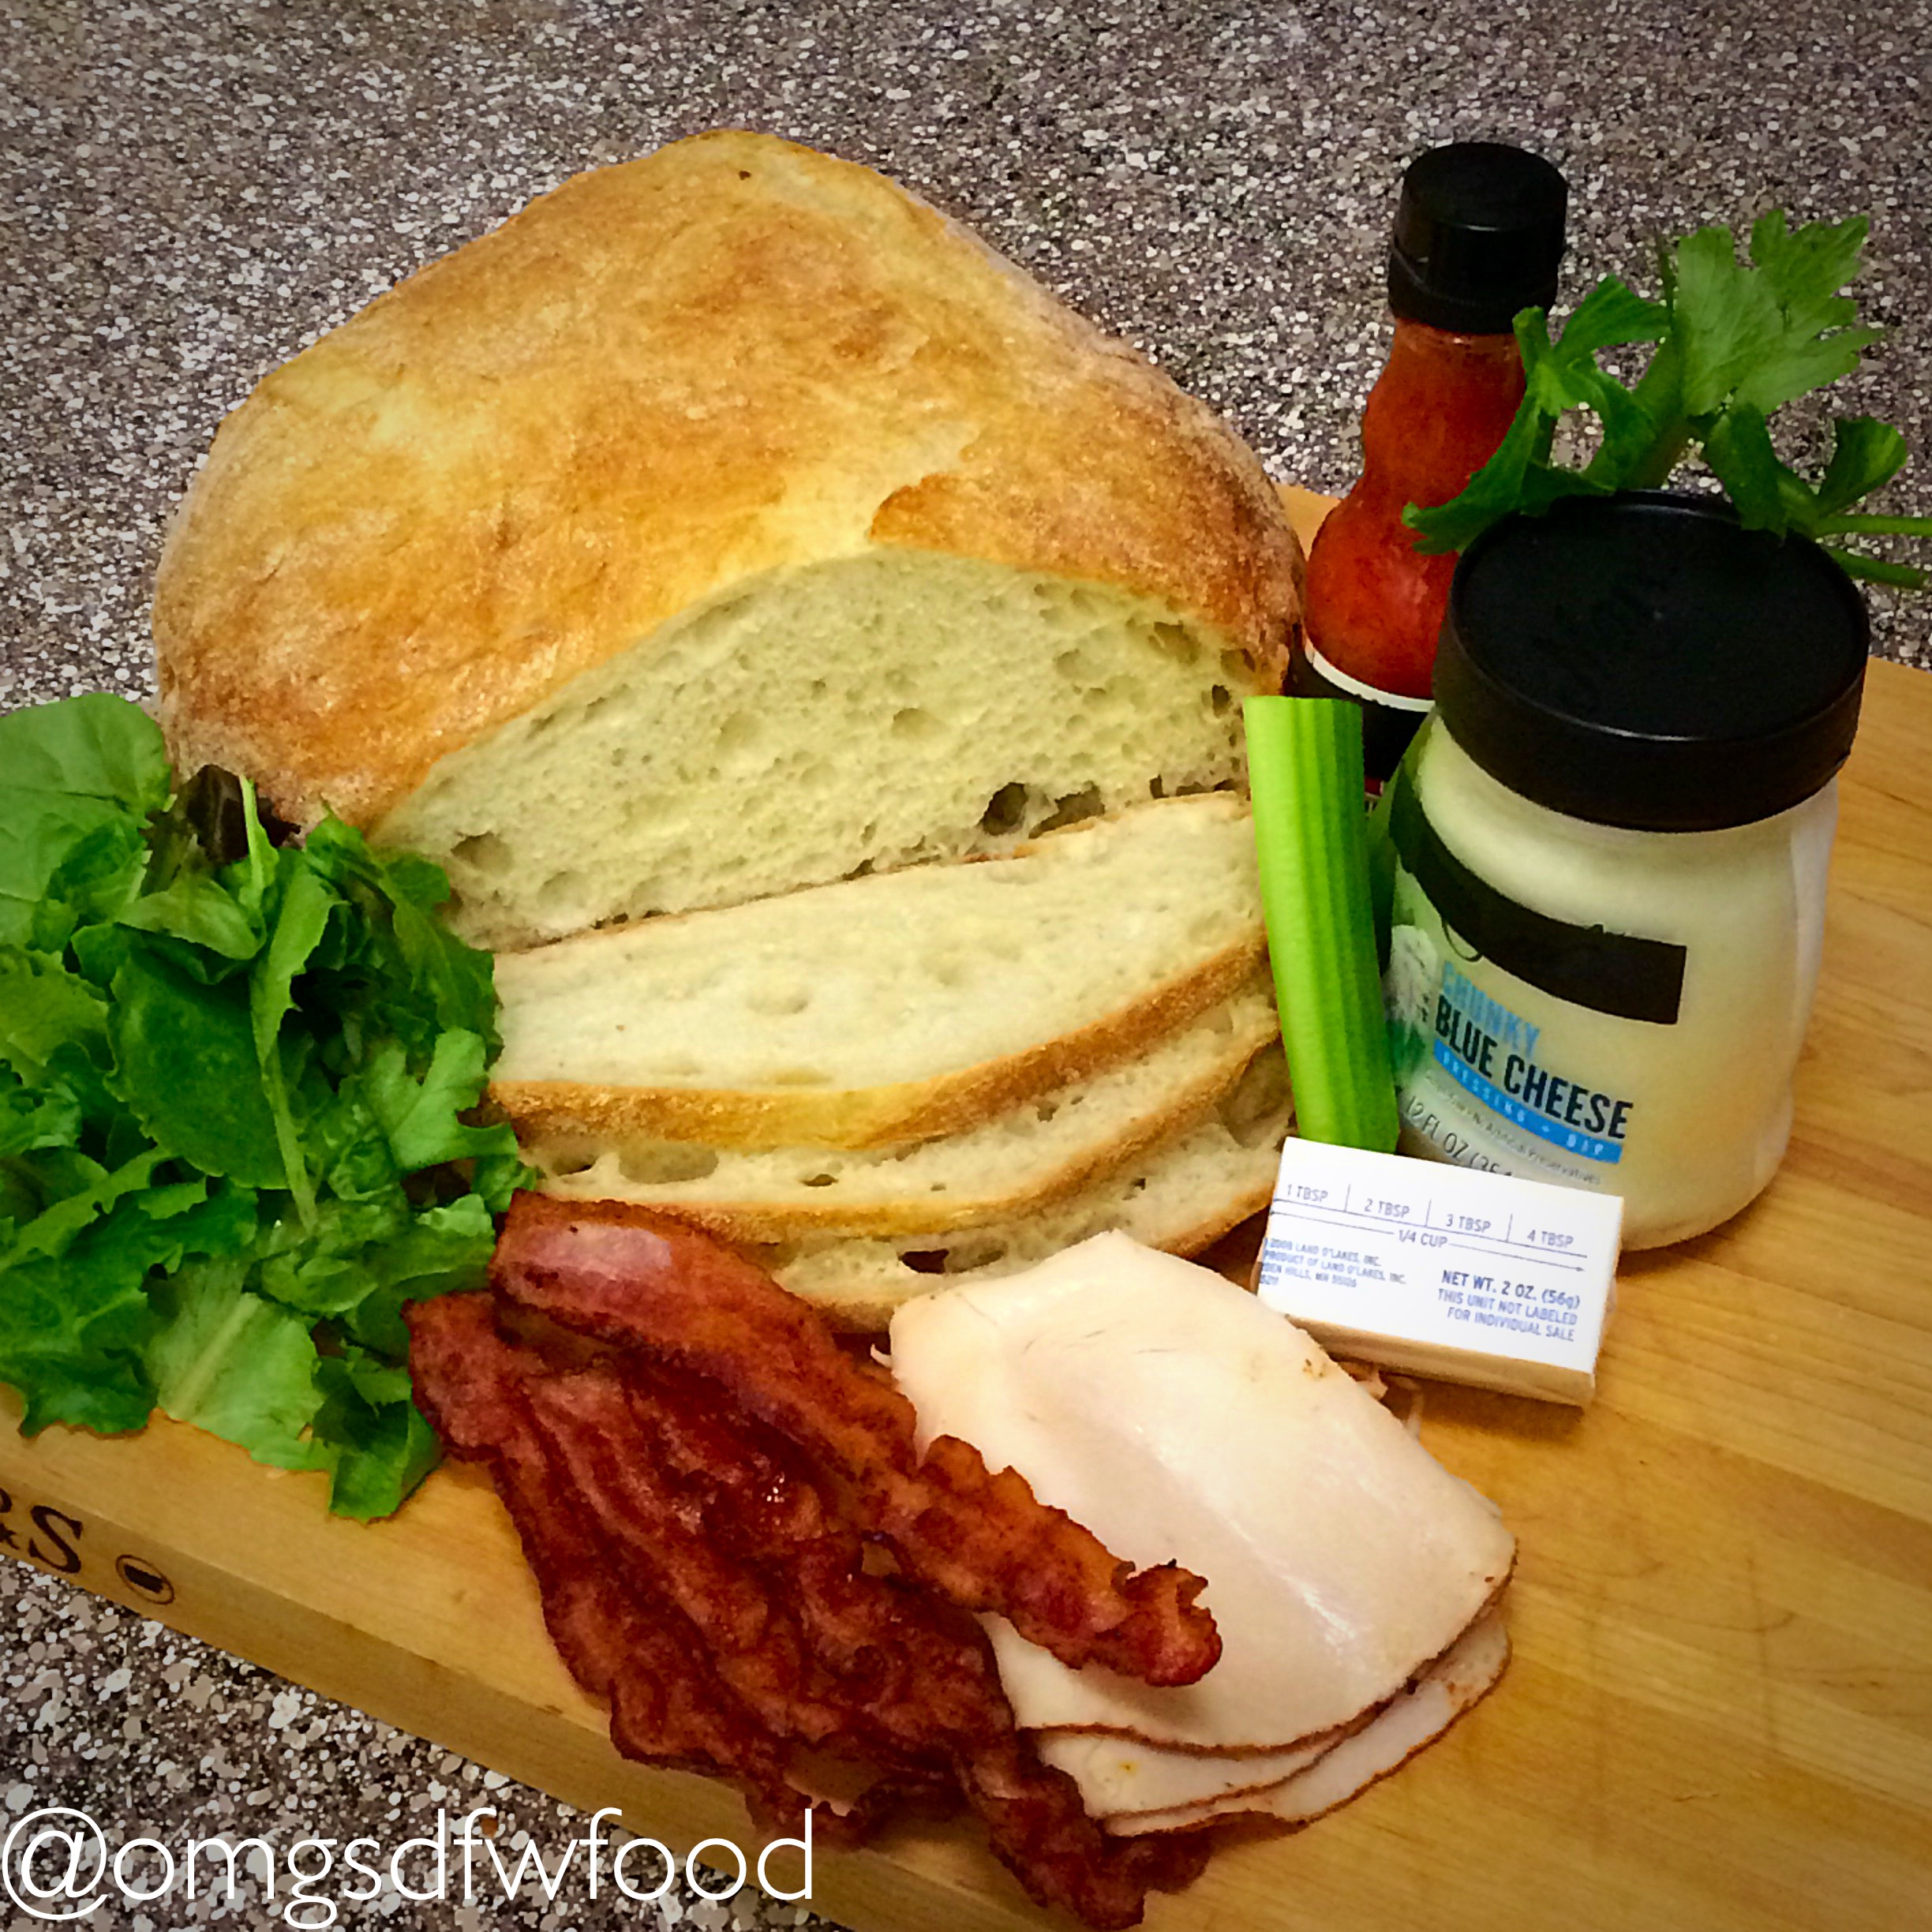
– 2 Tablespoons Butter (softened)
– 1 Teaspoon Buffalo Hot Sauce
– 2 Slices Empire Baking Company Pane Paisano
– 1 Celery Stalk
– 2 Tablespoons CHUNKY Blue Cheese Dressing
– 3 Slices Bacon (that fourth one can be used as a snack; that’s what I did)
– 4-6 Deli Slices Buffalo Chicken Breast
– 1/2 Cup Baby Spring Mixed Greens
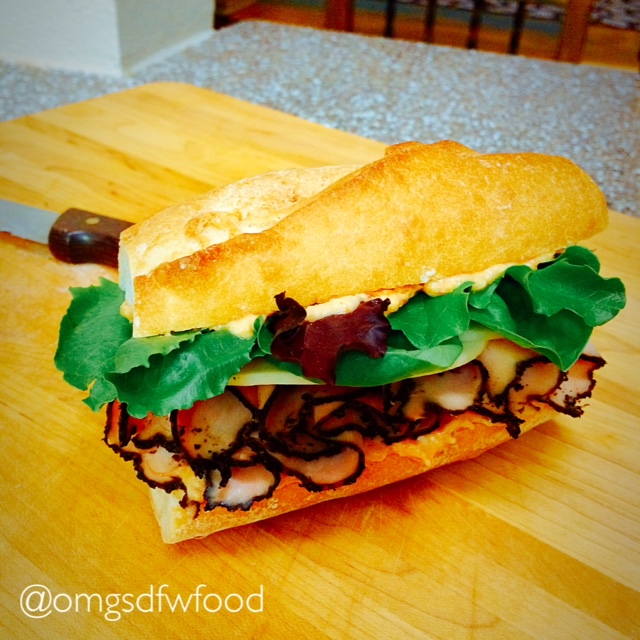
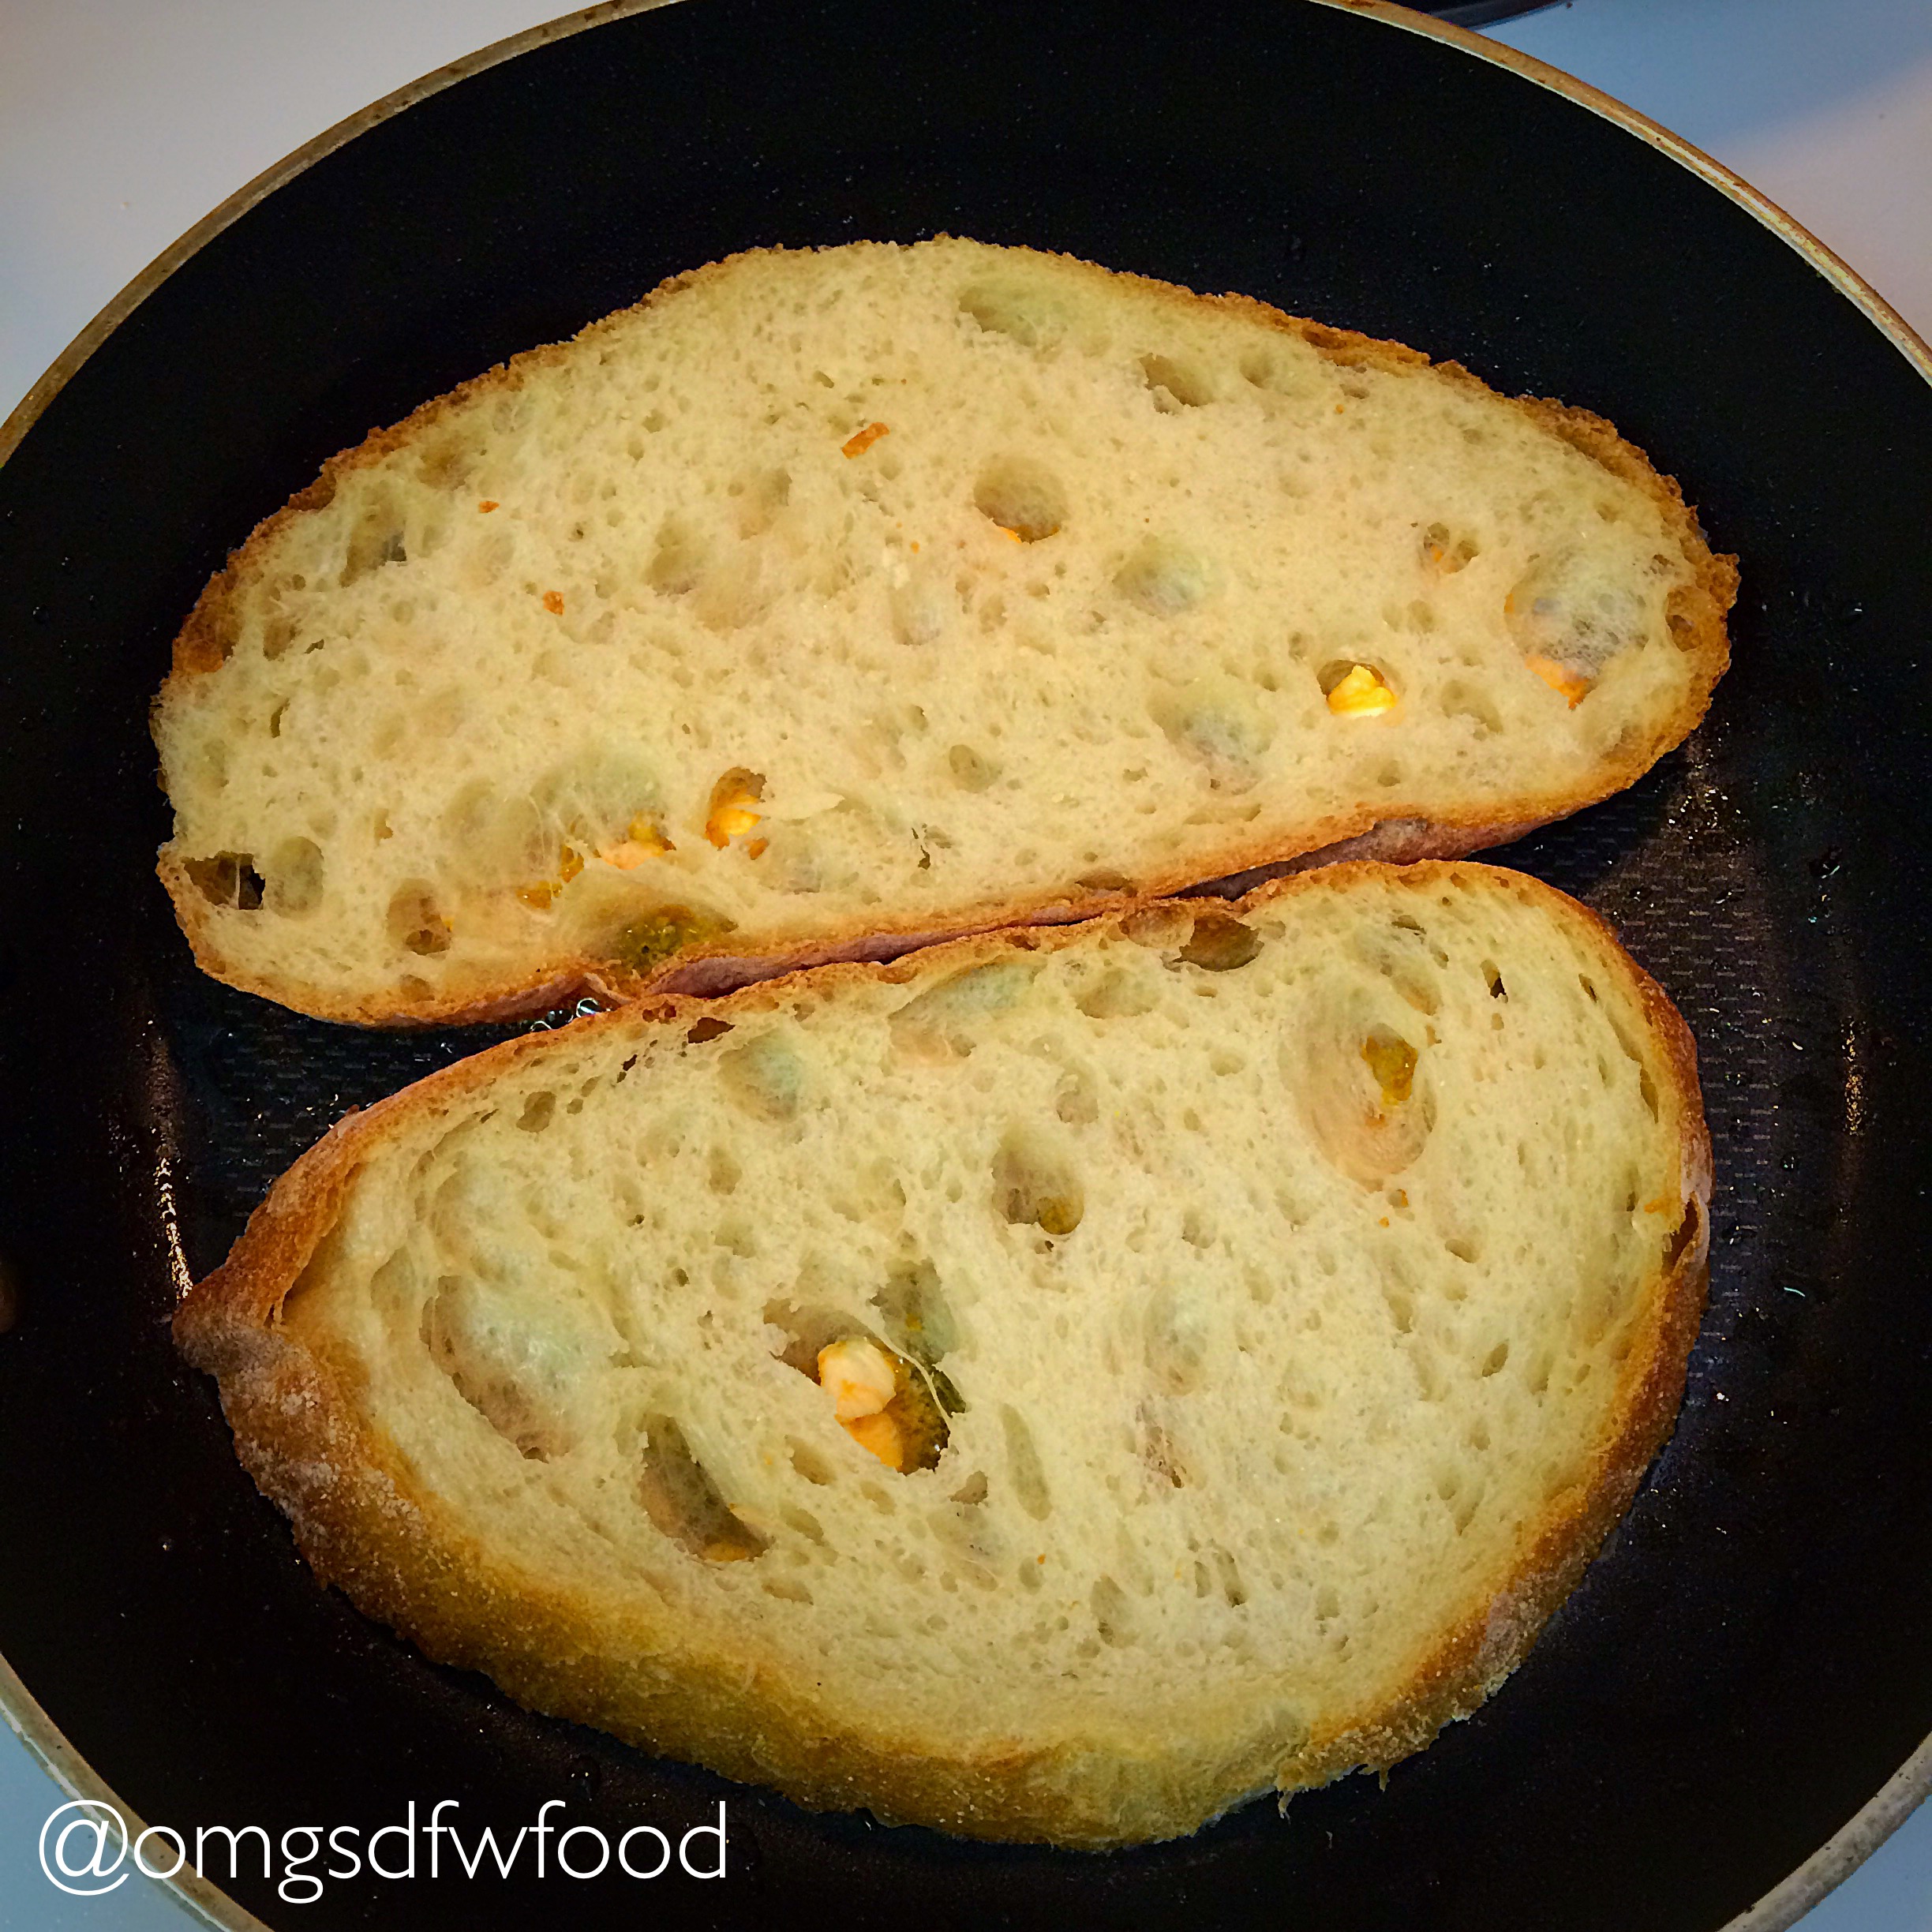
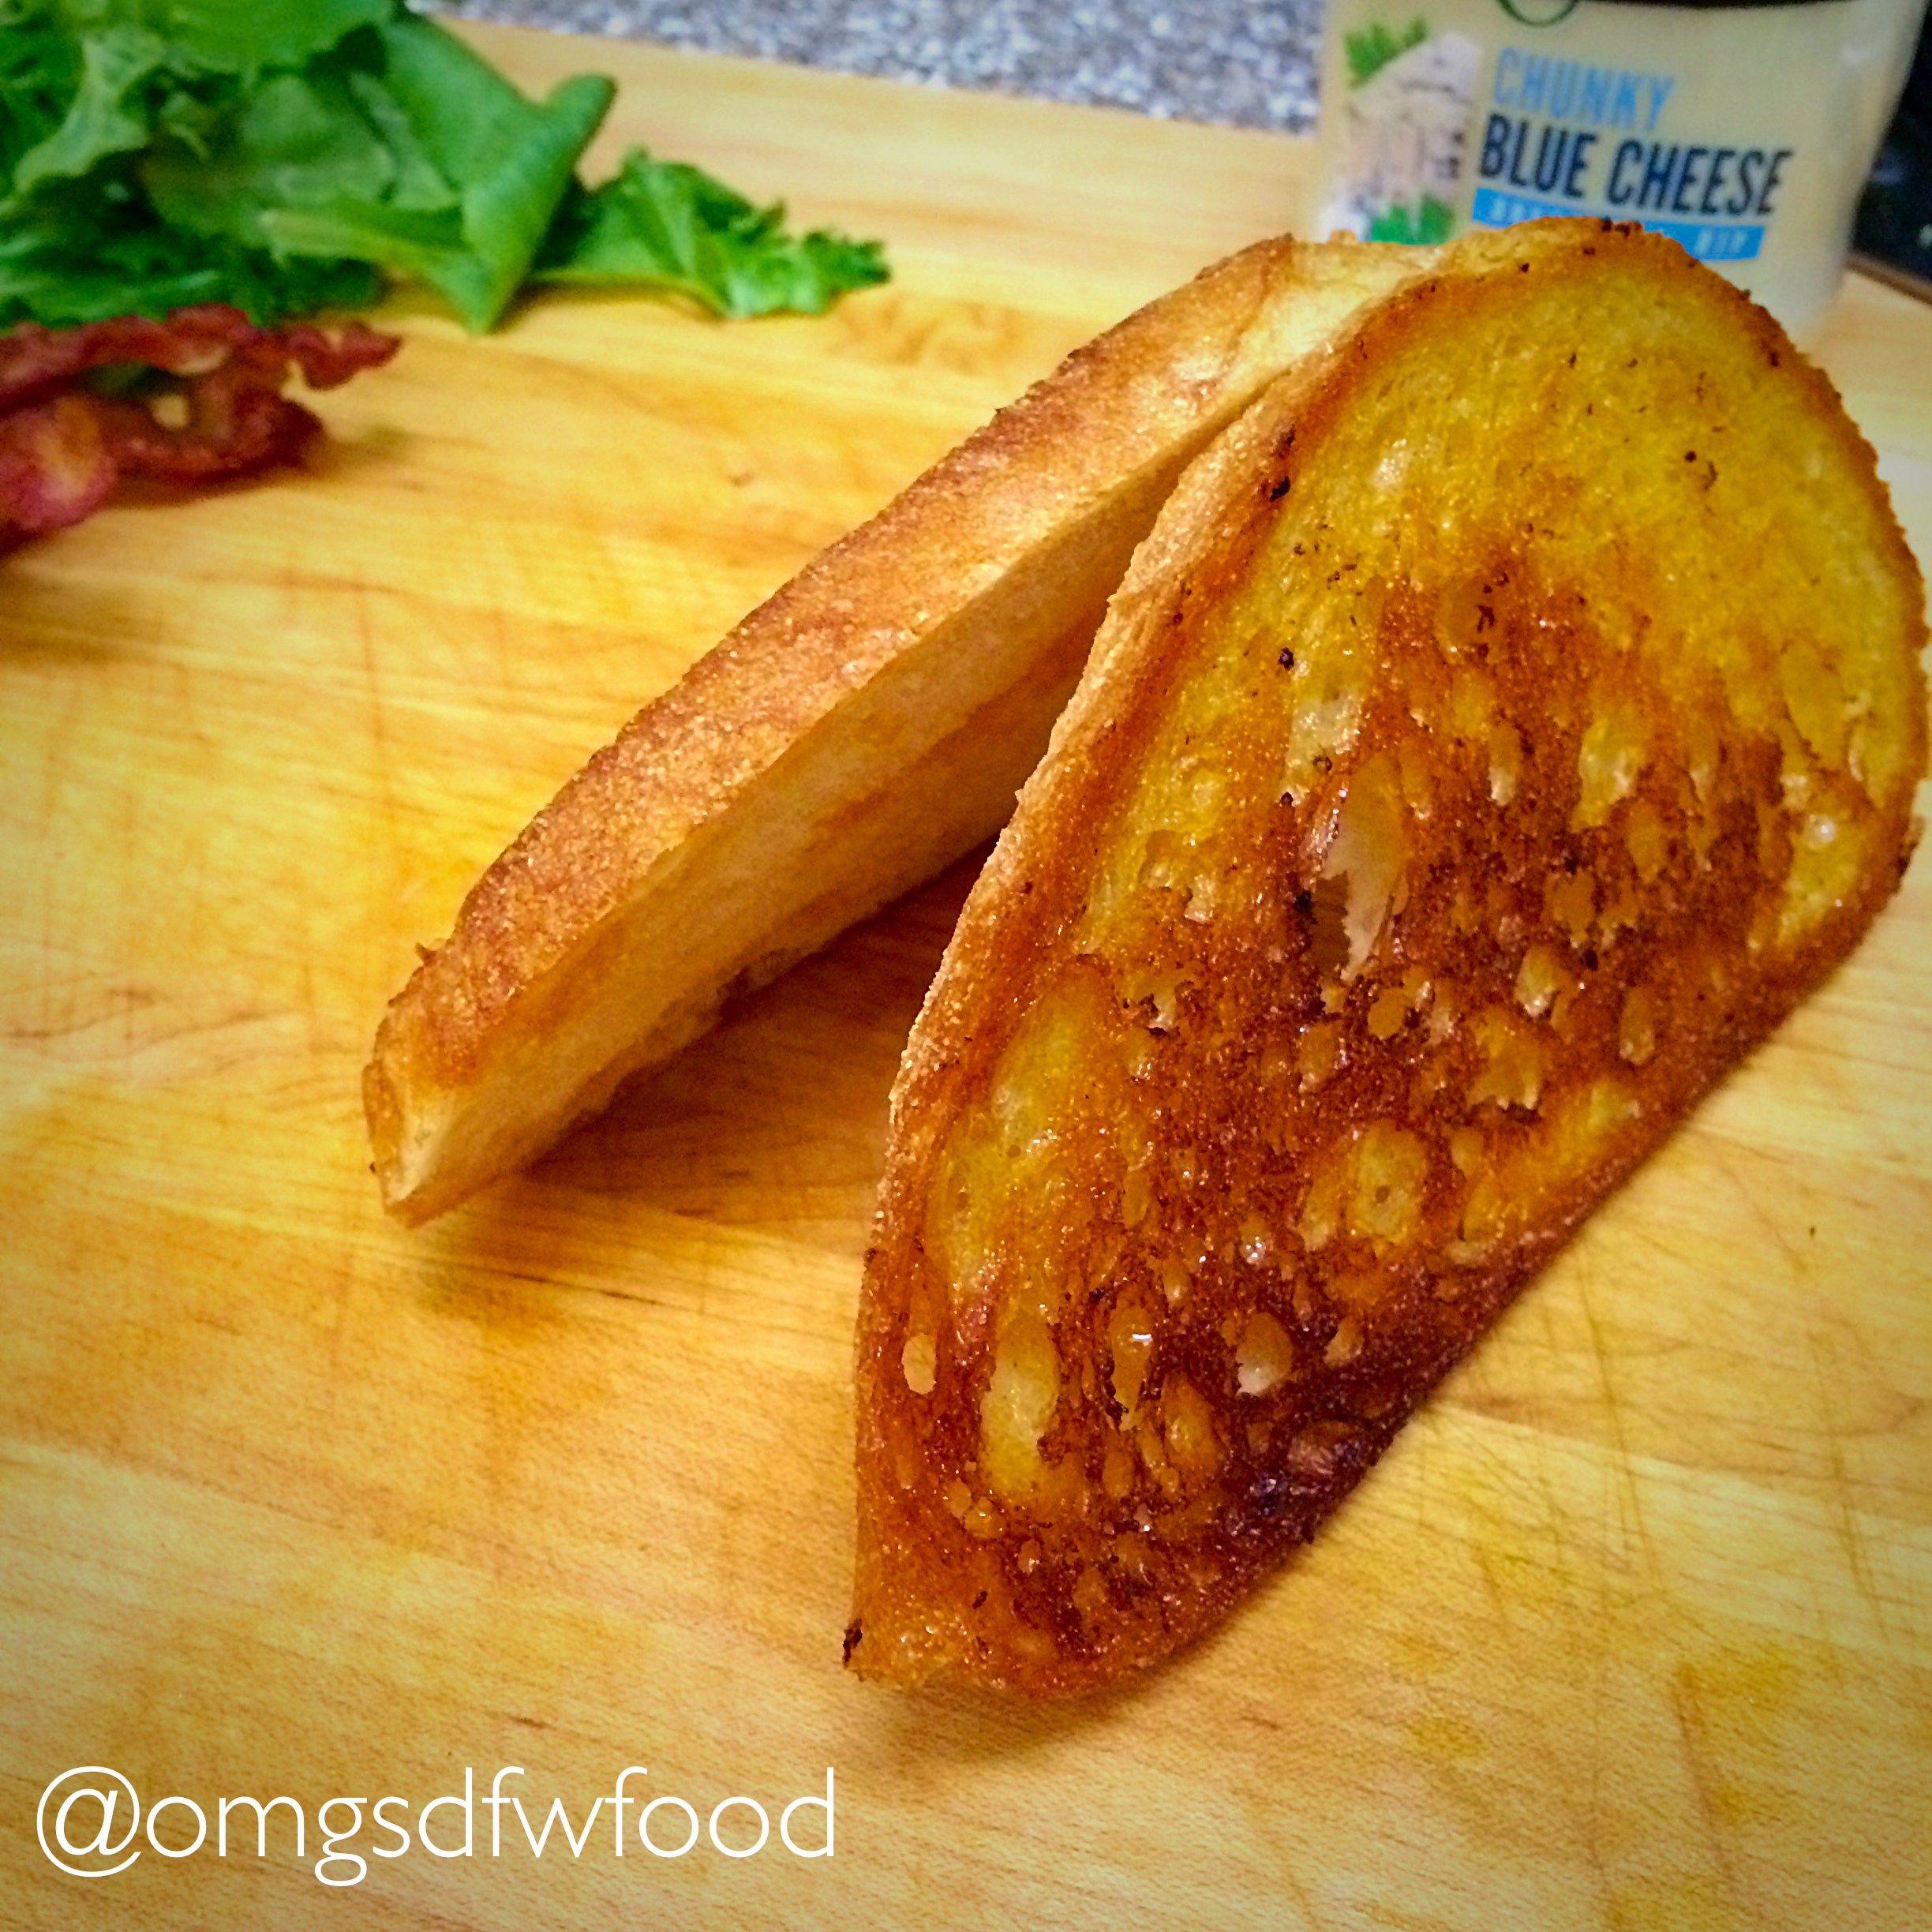
Cook your bacon until it’s crisp, set aside the bacon, and discard the bacon renderings. Or, save the renderings if you know what’s good for you. Don’t wipe out the skillet! Just be patient, my friends. Glorious deliciousness awaits you. Take the skillet off the heat for this next part. Mix the Buffalo sauce and the softened butter together just to combine. Don’t freak out when the vinegar doesn’t play nice with the butter. Just keep stirring around to incorporate most of the sauce. Then, take a butter knife and slather one side of each Pane Paisano slice with the Buffalo butter (I like that – “Buffalo butter”), then place the buttered side down in the skillet where you cooked the bacon. Then, return the skillet to medium-high heat to toast up only that one side of bread. That’s right. I said one side only. You’ll see…
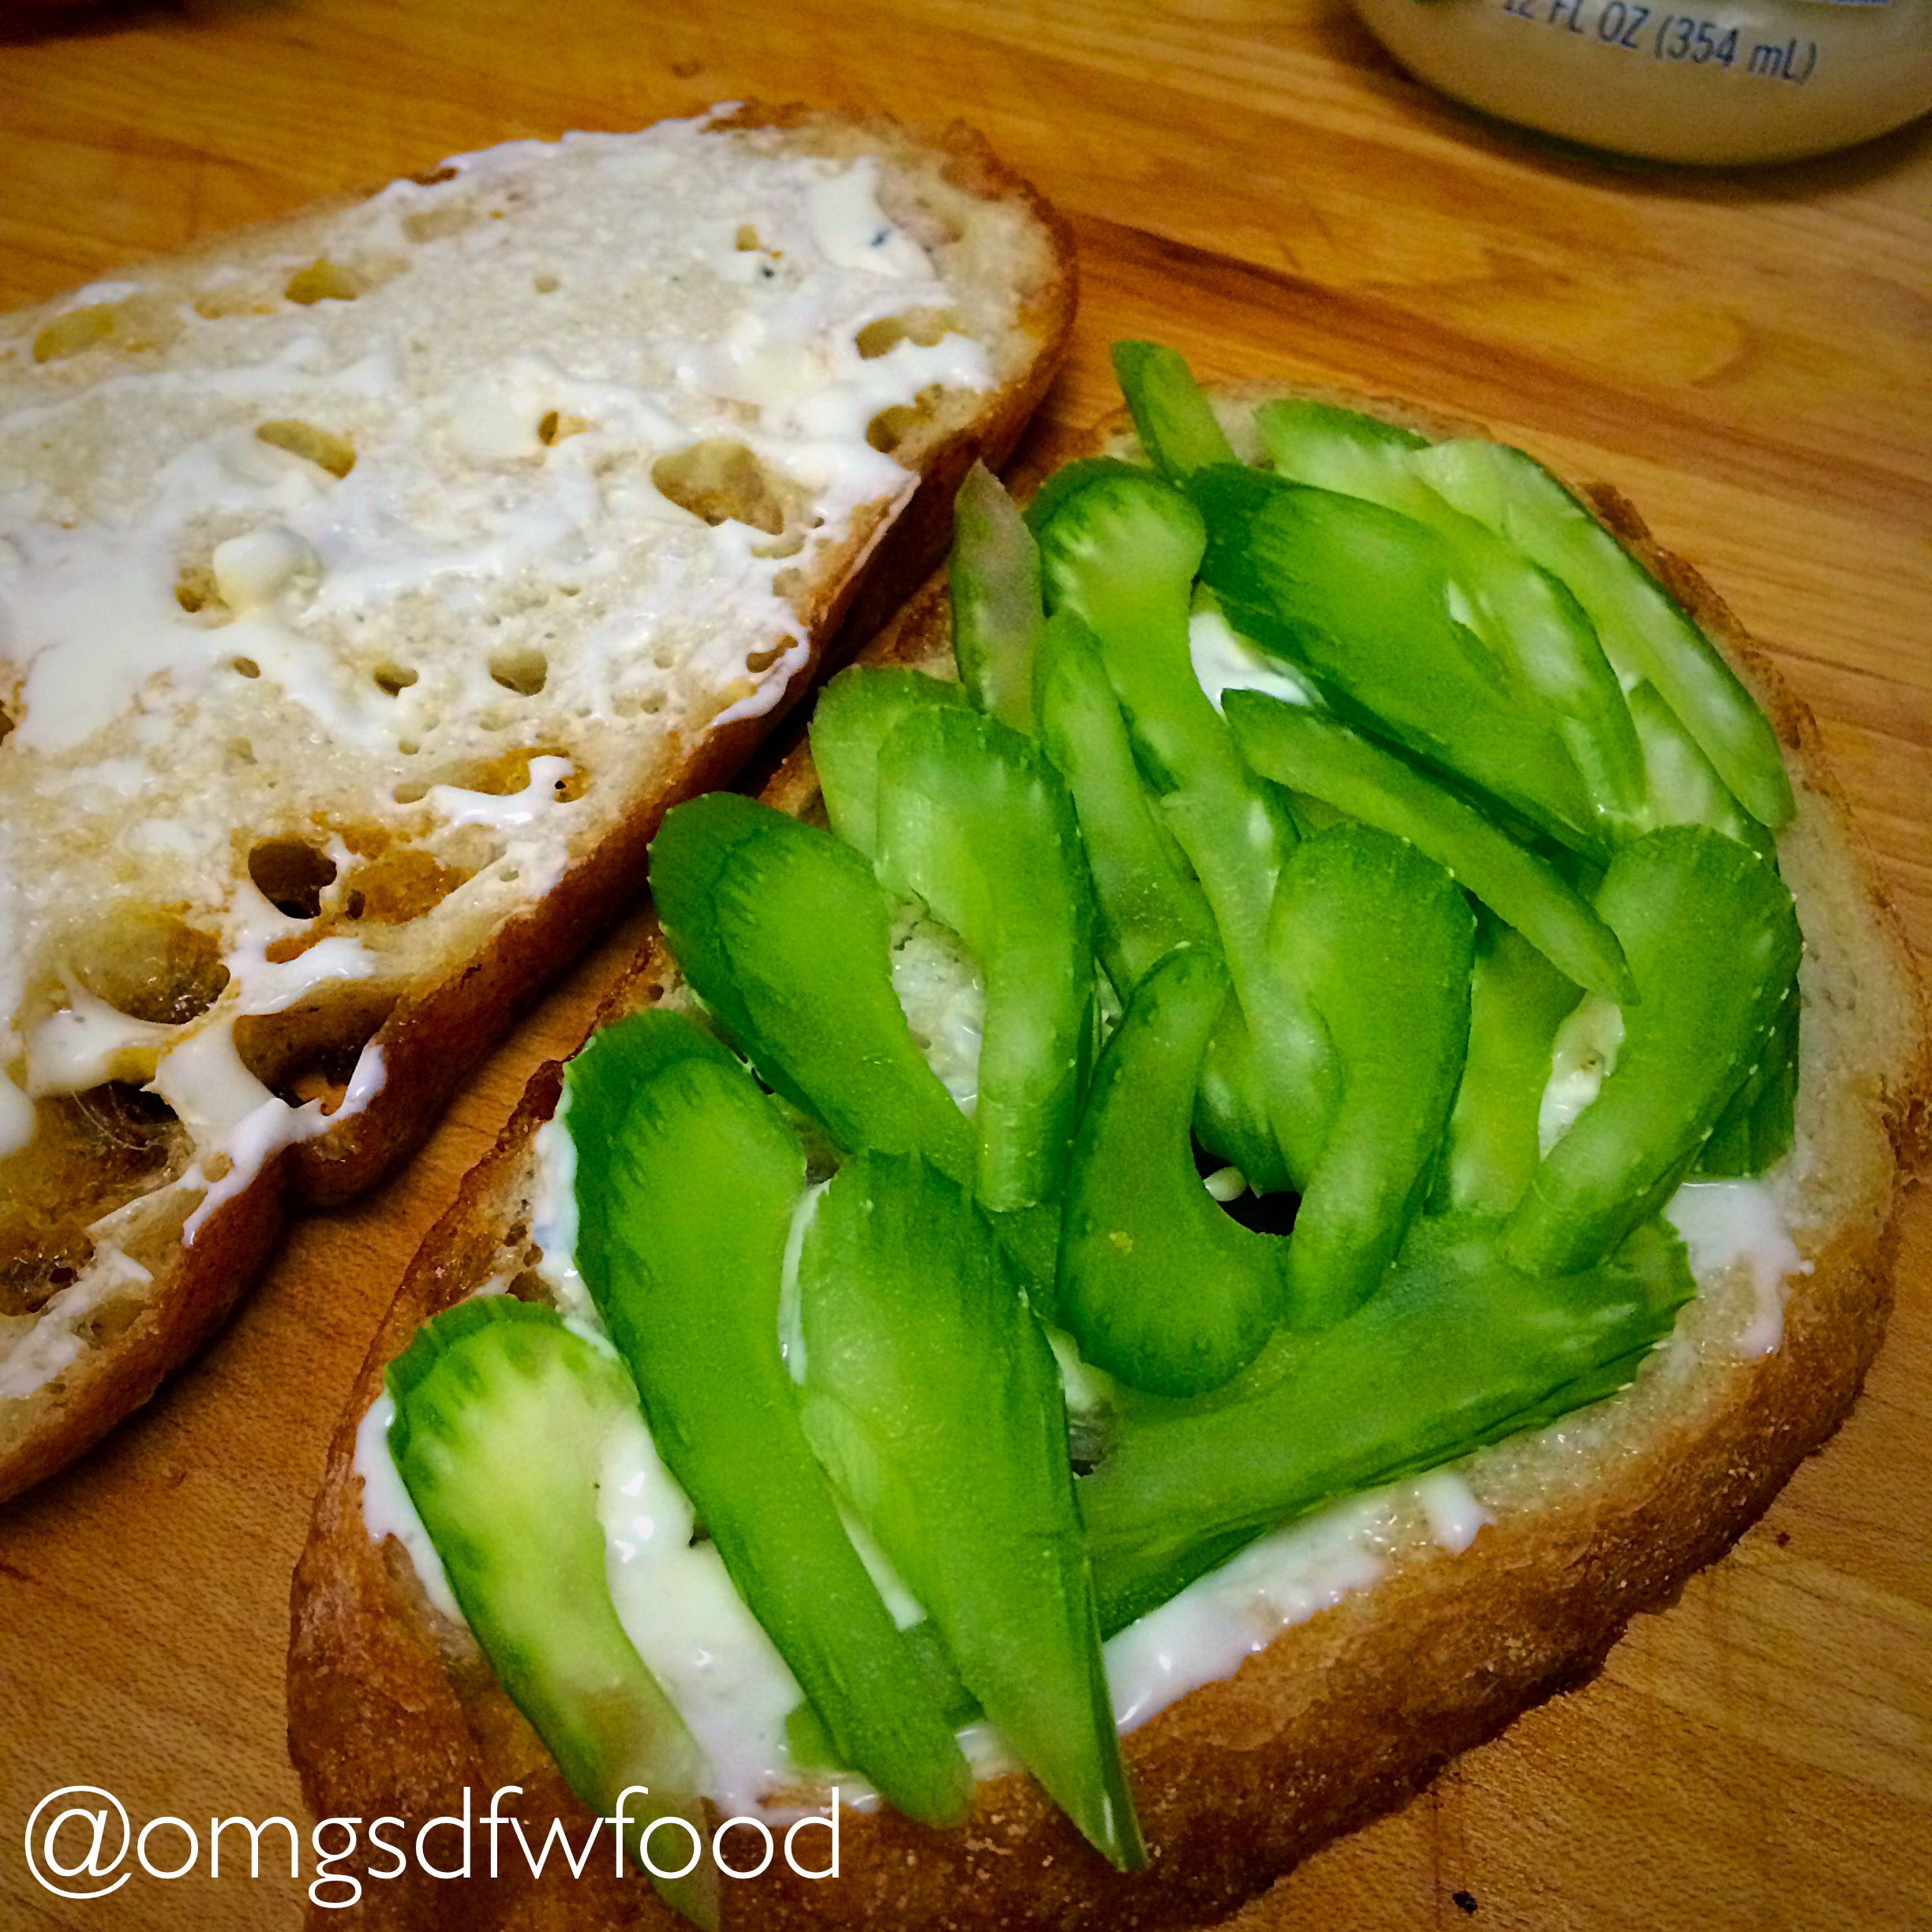
Once the one side is golden brown, remove from the skillet, and place the two slices of bread aside, leaning on one another to cool. This just makes the process go faster. While your two toasted slices are cooling, take your celery stalk, and slice it thinly on the bias. The idea is that you’ll be adding the celery for texture, but it can’t fall out of the sammy. Thus, no dicing.
Once the Pane Paisano slices are cooled, place them toasty side down, and spread the chunky blue cheese dressing onto the soft side of the bread. The softer side will absorb the blue cheesiness, and the chunks of blue cheese will fall into the wonderful crevices and pockets of joy in the bread. If you had toasted both sides, you’d have to smush the crispy bread to spread the blue cheese. See? There you go. One-sided toasting is muy importante for this sammy.
Now, take your thinly sliced celery, and cover one side of the sammy, making sure you are strategically placing the celery so that every bite gets that textural crunch. The blue cheese will act as your glue here so the celery won’t slide off.
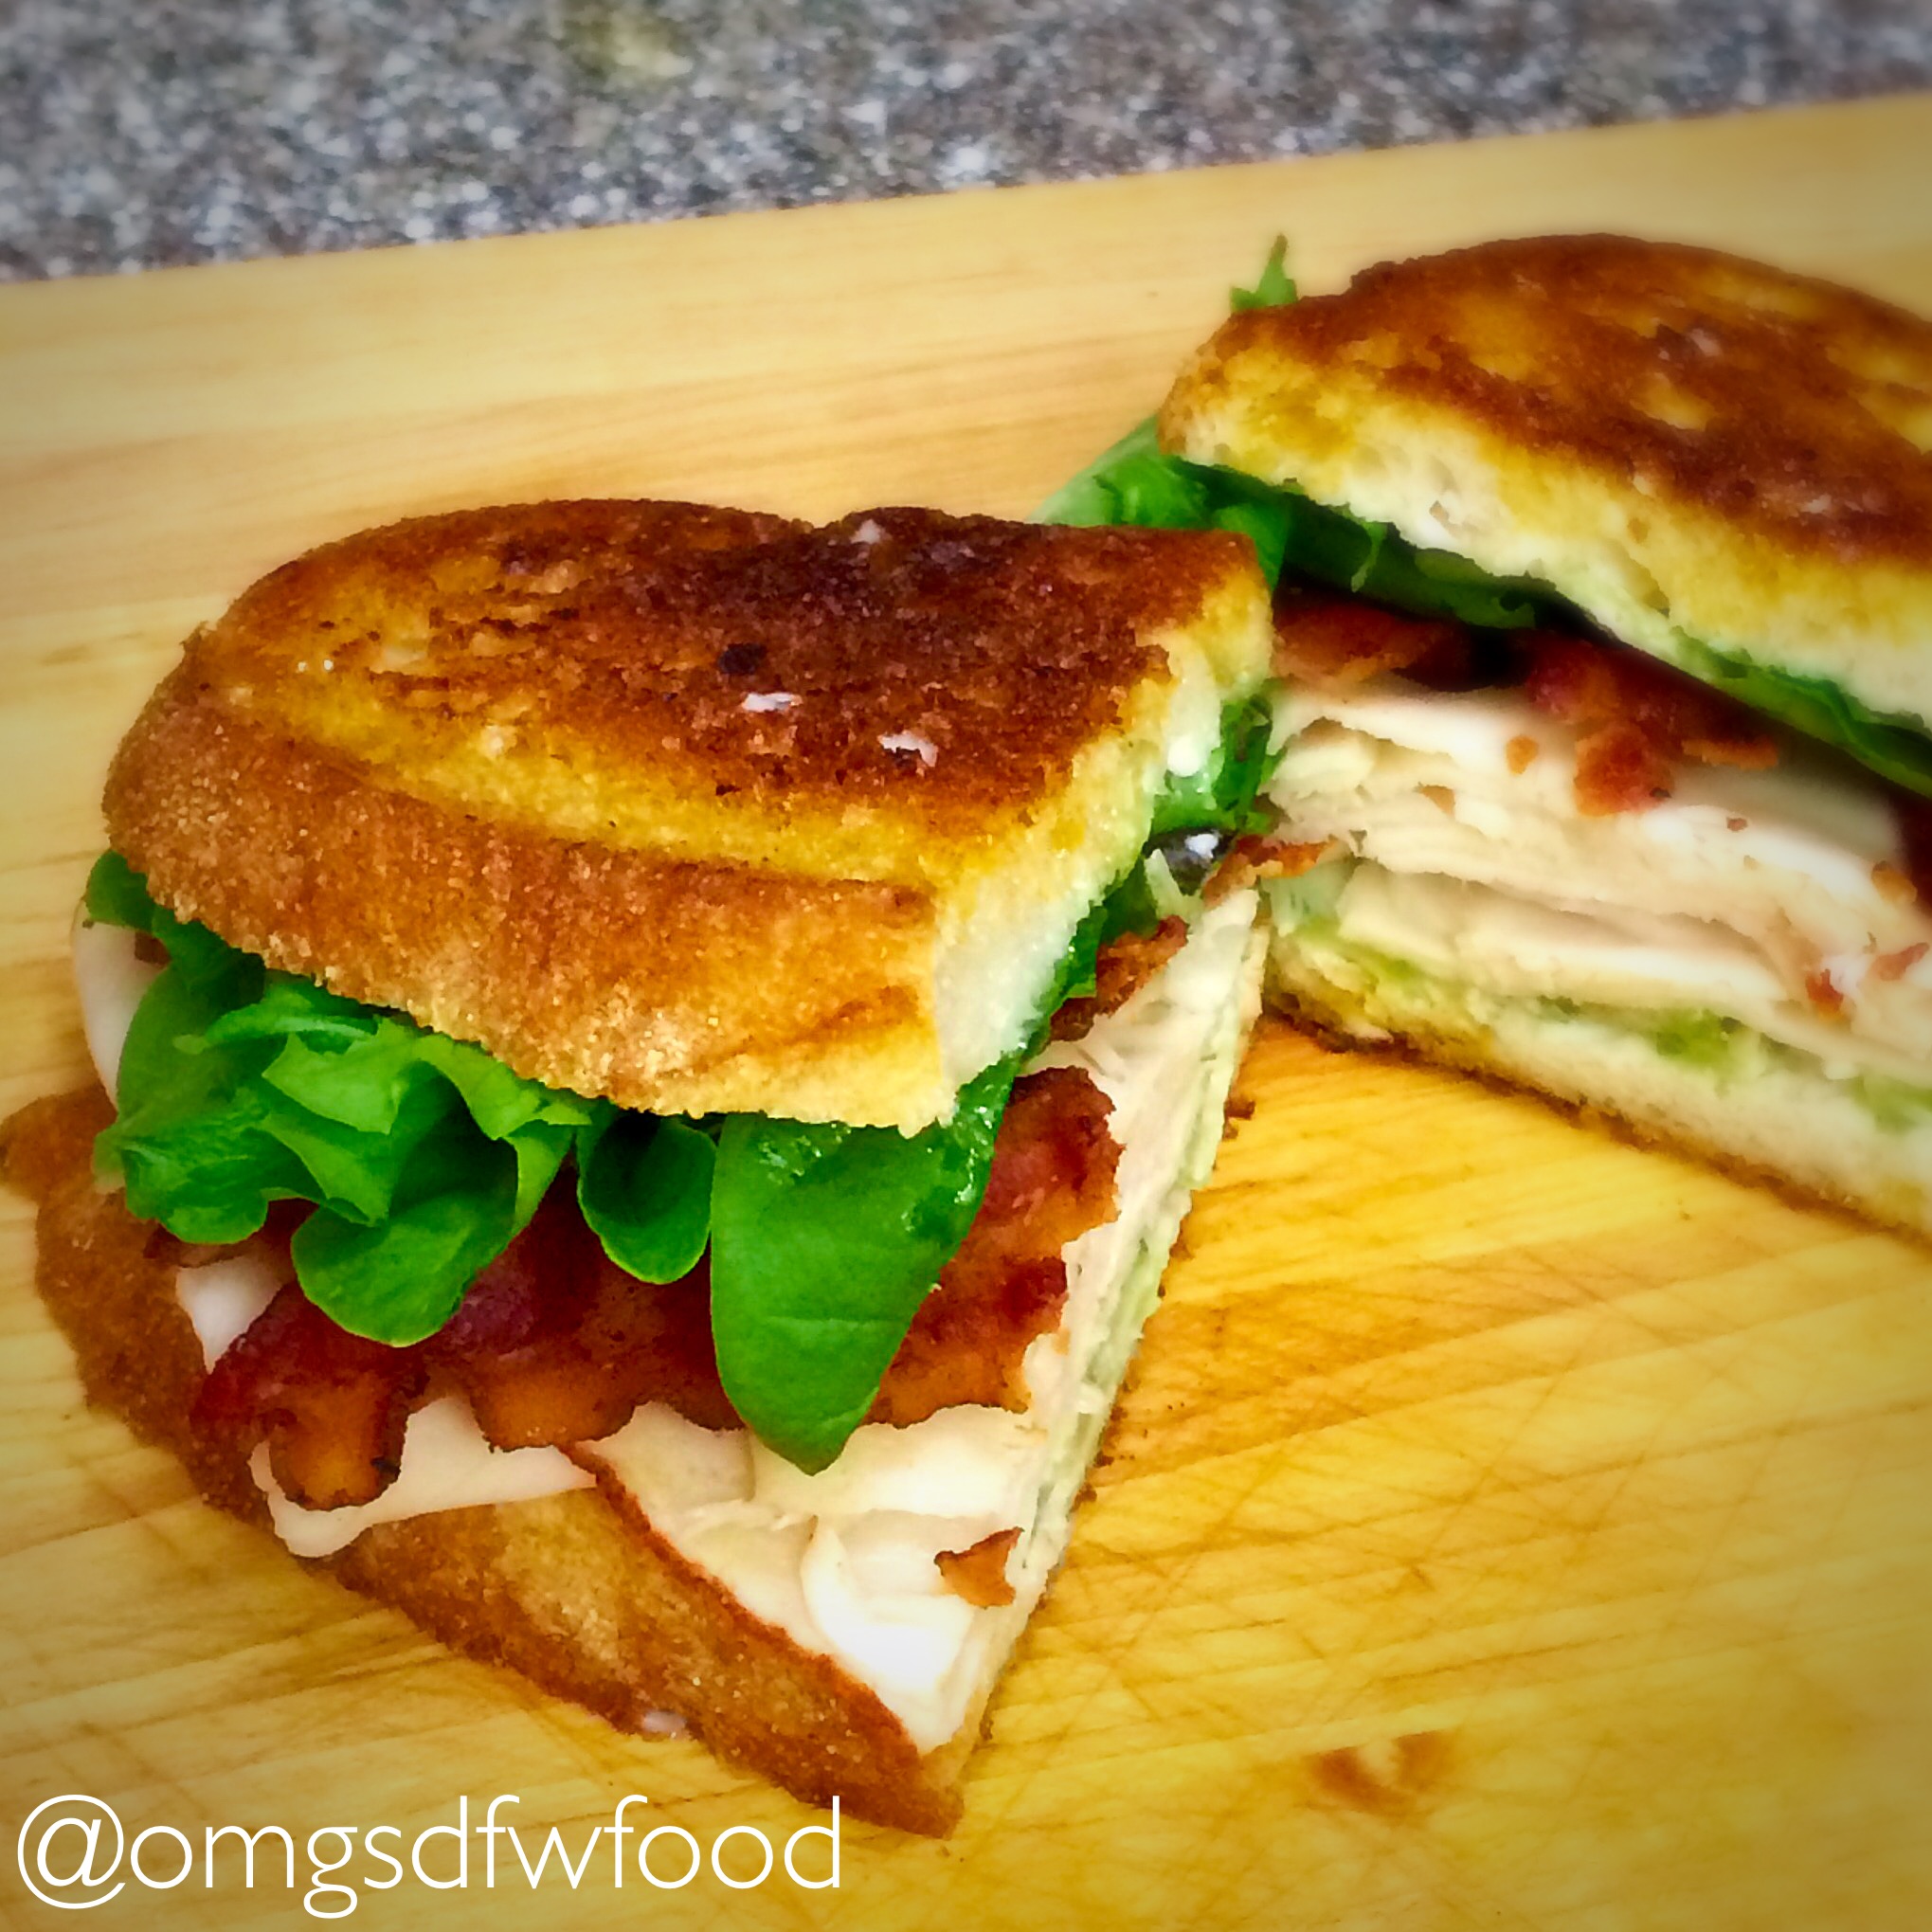
Next, layer your Buffalo chicken deli slices, bacon, and baby spring mix. Close up the sammy with the other slice, and enjoy the tangy zing of the Buffalo sauce against that creamy blue cheese and salty, smoky bacon. I can’t wait to turn this bad boy in for the contest… wish me luck!
Two days ago, we were facing a real dilemma: three zucchini squash were on their last leg in the fridge, and we had a decision to make.
The zucchini were still firm and weren’t anywhere near the “what is that?” stage, but they had definitely seen better days. I knew rosemary lemon chicken was on the menu; I knew we had potatoes, cheese, and cream, and I knew there was enough love and determination to make this potato zucchini bake happen. So given the circumstances, it was on like Chaka Khan. Continue reading “Incidental Potato Zucchini Bake”
Today was the first day in a week where the sun was shining and there were no clouds in sight. What better way to take advantage of the break from all the rain than with some simple grilling?!
Today was the first day in a week where the sun was shining and there were no clouds in sight. What better way to take advantage of the break from all the rain than with some simple grilling?!
Ma has been asking me to repeat this stuffed baby bell pepper recipe since I made it a few months back, and instead of broiling the peppers like I did last time, I put a new spin on it by placing everything on the grill. It’s quick and easy with minimal prep time.
Grilled and Stuffed Sweet Baby Bells
2 Chicken Breasts (boneless preferred)
1 Garlic Clove
1/2 Onion
2 tsp Knorr Caldo de Tomate OR Knorr Caldo de Pollo (bouillon)
1 Bag of Sweet Baby Bell Peppers
1 4oz Soft Goat Cheese
8 oz Shredded Cheddar Cheese (1/2 of a 16oz block)
Zest/Juice of a Lime
Paprika
Cumin
Pepper
Garlic Powder
Salt
Place chicken breasts in a pot, cover with water, and add garlic, onion, and bouillon. Bring to a boil, reduce and let simmer until chicken is cooked through, approximately 20 minutes for boneless chicken, longer for bone-in.
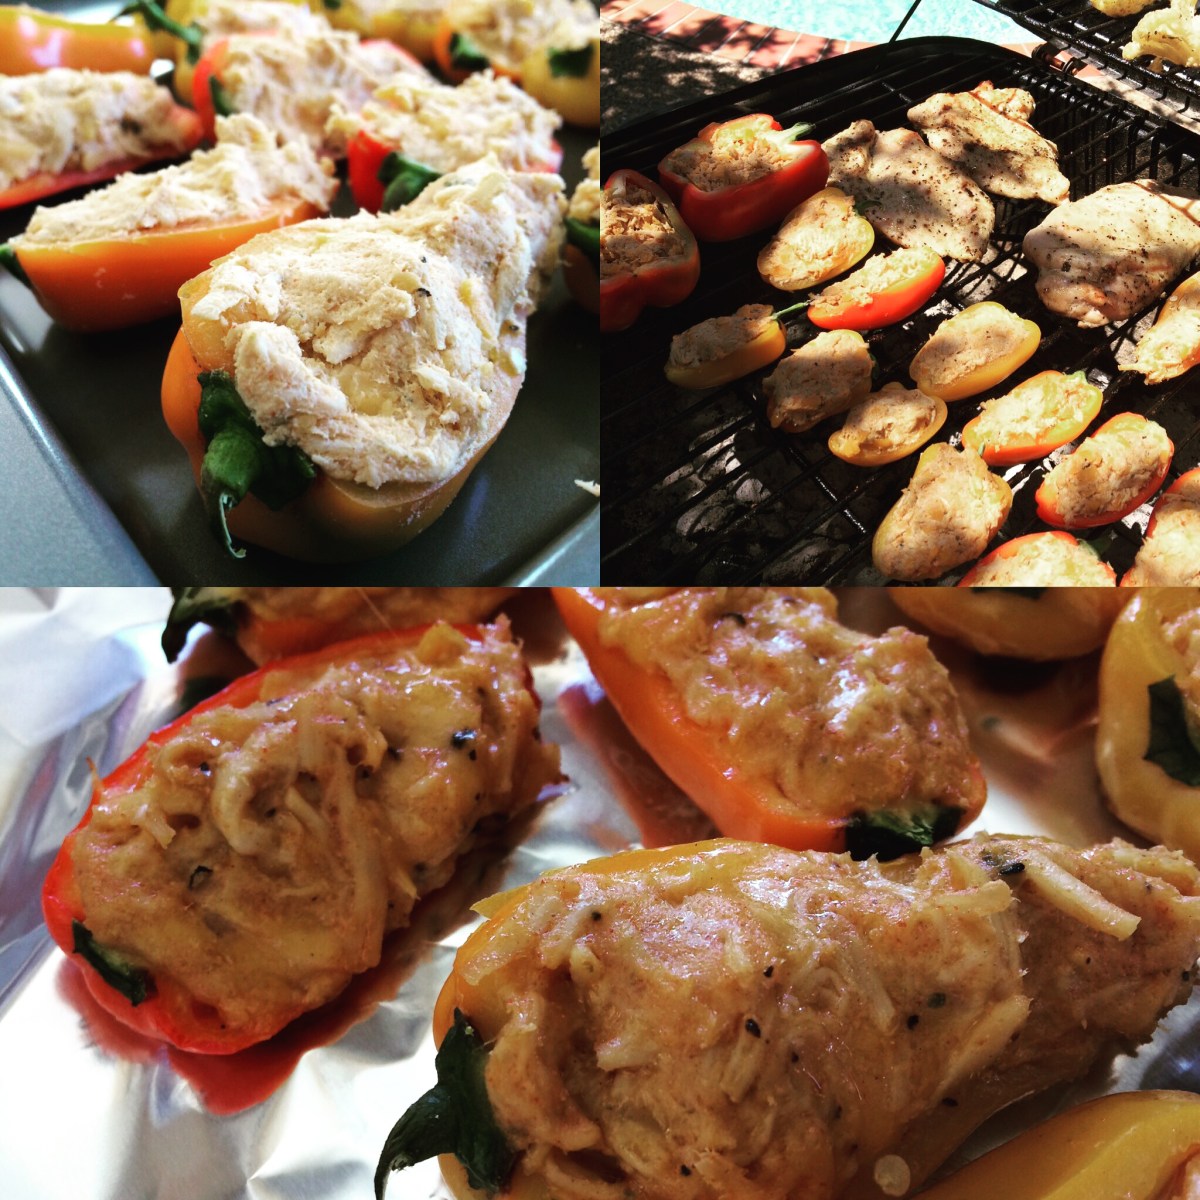
While chicken is cooking, start to heat up the grill and then split each baby bell pepper lengthwise and remove the seeds, creating a pocket to fill.
Once the chicken is done, remove from pot and set aside in a large bowl to cool. Shred the chicken using two forks, separating all the meat and removing any bones (if using bone-in chicken).
Add to the cooled, shredded chicken, the goat cheese, shredded cheddar, and zest and juice of one lime. Season the mixture to your taste using paprika, cumin, pepper, and garlic power – mostly equal parts. Mix thoroughly and then salt to taste.
Take the seasoned chicken and cheese mixture and gently fill each sweet baby bell pepper side generously but without mounding the top. Be sure to get into every corner of the pepper to avoid empty pockets.
Depending on your grill, gently place the stuffed baby bells onto the grill, being careful they don’t fall through. Smaller grill lines can be used to help support the baby bells by lining them up parallel to the grill lines without falling through. Use your judgement, and if your grill is too wide, use foil on the grill to avoid any peppers from falling through.
Once all on the grill, close the lid and let heat through, approximately 10 – 15 minutes. Check at least once half way through to ensure the grill isn’t too hot. You can also stuff large peppers, but they must stay on the grill for at least 20 minutes to cook through at medium-high temperature.
Get you a glass of some refreshing sangria, a cold beer, or a tall glass of lemonade, sit back and enjoy popping in those cheesy, sweet bites of deliciousness while you soak up some sun. I know that’s exactly what I did today and loved every second of it!
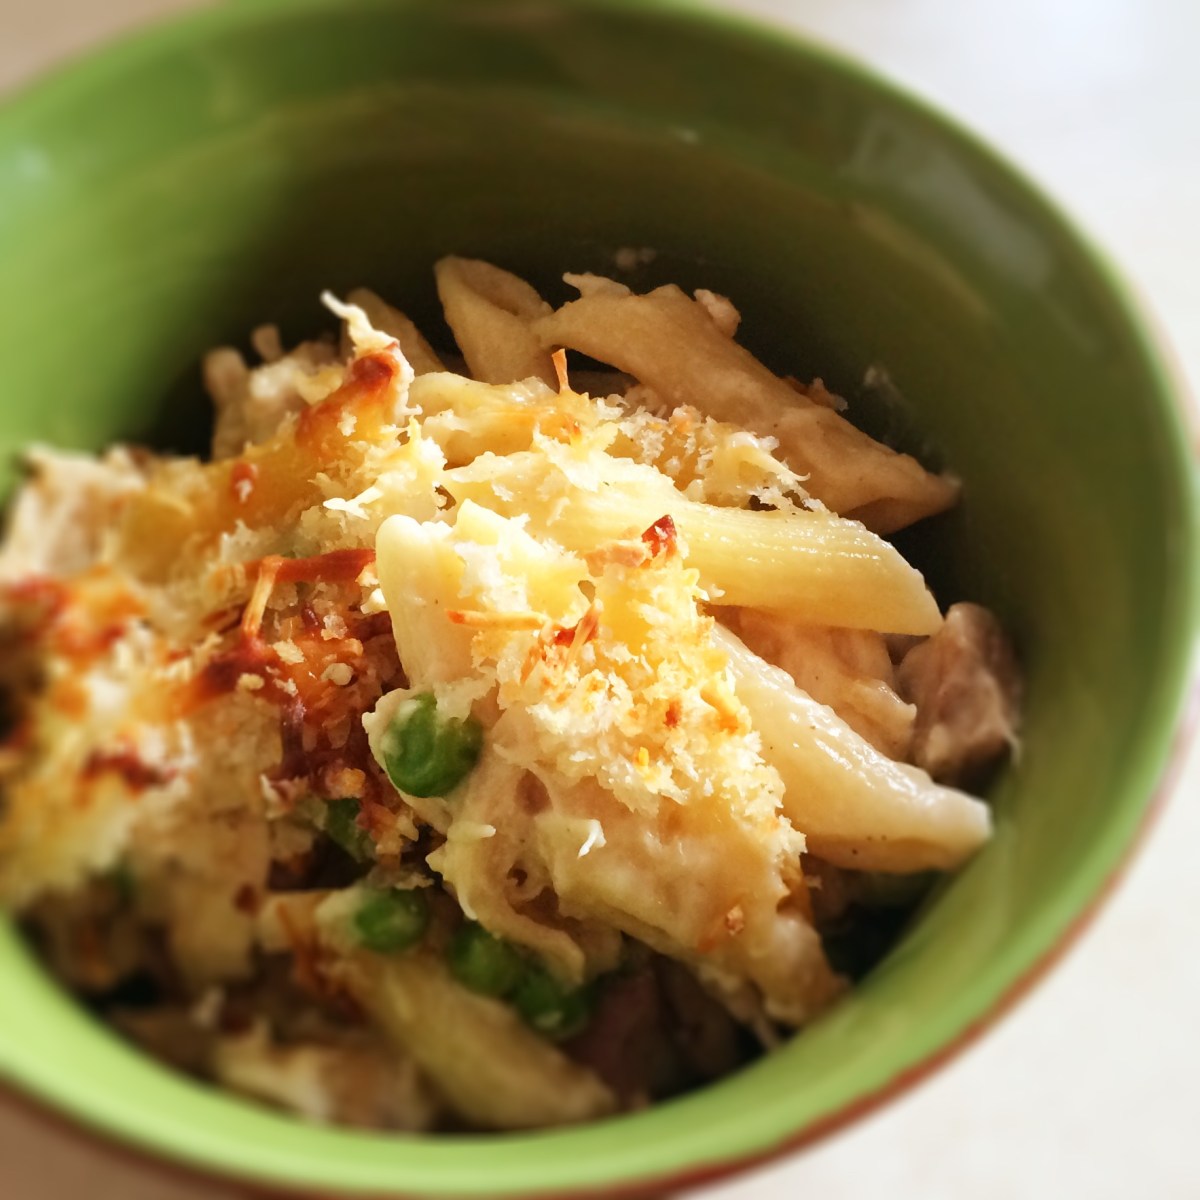
Recently, our Aunt Sophie came up to see my Ma, and in order to make life a little easier and to give Ma some extra time to visit, I offered to make several meals ahead of time for the week. Normally, Ma has to cook dinner for my brother, nephew, and grandmother. So, the goal was to make a few large one stop meals that could be complemented with a quick dinner salad and that’s it. One of the meals was a Creamy Penne Rigate with Chicken, Ham, and Peas in an Alfredo sauce with Panko, Parmesan, and Mozzarella topping. When Aunt Sophie arrived, we all ate dinner together, and it was such a hit that she asked for the recipe so she could make it for her grandchildren when she returned home to San Antonio.
Before I post this, in the spirit of full disclosure, I did use a store bought Alfredo sauce for this particular recipe. I know. I know. It’s a horrible thing to do, but because I was making 7-9 large meals in one afternoon, I didn’t make a bechamel like I would have done normally because I needed to save some time. I did, however, doctor the jar, which made me feel a little bit better about my atrocious deed.
Creamy Penne Rigate with Chicken, Ham, and Peas in Alfredo topped with Panko, Parmesan and Mozzarella
1 Large Onion Quartered
2 Individual Packages Baby Carrots
1 Tablespoon Whole Rainbow Peppercorns
2 Tablespoons Knorr Chicken Bouillon (Caldo de Pollo)
4 Large Garlic Cloves Smashed and Peeled
4 Large Boneless Chicken Breasts
2 Cups Whole Smoked Ham Cubed
1 Package Frozen Peas
2 Jars of Best Quality Alfredo Sauce (OR make a bechamel sauce and add copious amounts of Parmesan to the sauce)
1 16oz Box Dry Penne Rigate Pasta
1/2 Cup Panko Crumbs
1 Cup Shredded Parmesan (OR freshly grated)
1 Cup Shredded Mozzarella (OR hand torn in small pieces)
2 Tablespoons Butter Melted
Preheat the oven to 375°
Fill a large 6-8 quart pot with warm water up 3/4 of the side. On medium high heat, add quartered onion, baby carrots, peppercorns, bouillon, garlic and chicken breasts to the water and then bring to a low boil. Once the chicken is cooked thoroughly, remove the chicken and set aside to cool. Taste the broth and adjust seasonings. Strain the broth and transfer the onions, carrots, peppercorns and garlic to a blender. Add broth to the mixture in the blender about half way, just to help liquefy the ingredients. Blend until smooth. Return the ingredients from the blender to the broth and place back on low heat to keep warm. Taste and adjust seasonings, as needed.
Once chicken is cool enough to handle, shred by using your hands or by using two forks to separate the meat. Place shredded chicken in an extra large bowl and add the cubed ham, frozen peas, 1/2 cup of shredded Parmesan and 1/2 cup of shredded mozzarella, then set aside. Add the two jars of the best quality Alfredo sauce you can purchase, and then when the jar is empty, add the seasoned broth halfway up each jar. Place the lid back on the jar and shake vigorously to remove all sauce from inside the jar, then add both jar remains into the extra large bowl with the other ingredients.
In a separate medium size soup pot, fill 1/2 up with the warm broth and then add warm water up 3/4 of the side of the soup pot. You should still have some broth left in the original pot continuing to stay warm at a low heat. Bring the water/broth mixture to a boil. Add the box of penne rigate to the boiling water/broth mixture, and stir the penne rigate frequently for 6 minutes or until the pasta is almost done but still under cooked. Remove the under cooked pasta from the water/broth mixture and transfer the pasta to the extra large bowl with the other ingredients and thoroughly mix all the ingredients together. Discard the water/broth mixture.
Once all the ingredients are completely incorporated and coated with the sauce, transfer the entire contents of the extra large bowl into a deep lasagna baking dish or large disposable foil roaster for easier clean up. Once the mixture is evenly distributed in the pan, ladle approximately 3/4 cup of the warming broth over the entire mixture. Sprinkle the remaining Parmesan, mozzarella, and Panko alternating evenly over the entire surface of the mixture. Using a spoon, drizzle the melted butter evenly over the entire mixture to help the Panko and cheese brown in the oven. Create a loose foil tent to avoid touching the top of the mixture but seal around the ends to cover the pan.
Place in a 375° oven for 30 minutes or until the cheese is completely melted and the Creamy Penne Rigate is warmed through. Remove from the oven and remove the loose foil cover. Place back into the oven and set the oven to Broil. Carefully watch the Creamy Penne Rigate while it is browning under the broiler. Once the browning process starts, it will go fast.
Once the panko and cheese topping becomes golden brown and bubbly, remove the Creamy Penne Rigate from the oven carefully and then turn off the oven completely.
Since 2009, food lovers, bloggers and the like have convened at the International Food Bloggers Conference (IFBC) to explore food, writing, and technology, all while indulging in some of the best wine and food anyone can find at a conference. This year, I am partaking in the fun and leaving Bear and the cats to fend for themselves for a few days. To ensure the refrigerator doesn’t grow something funky, I decided to create a lil’ something from what we had already in the fridge and leave a good meal behind.
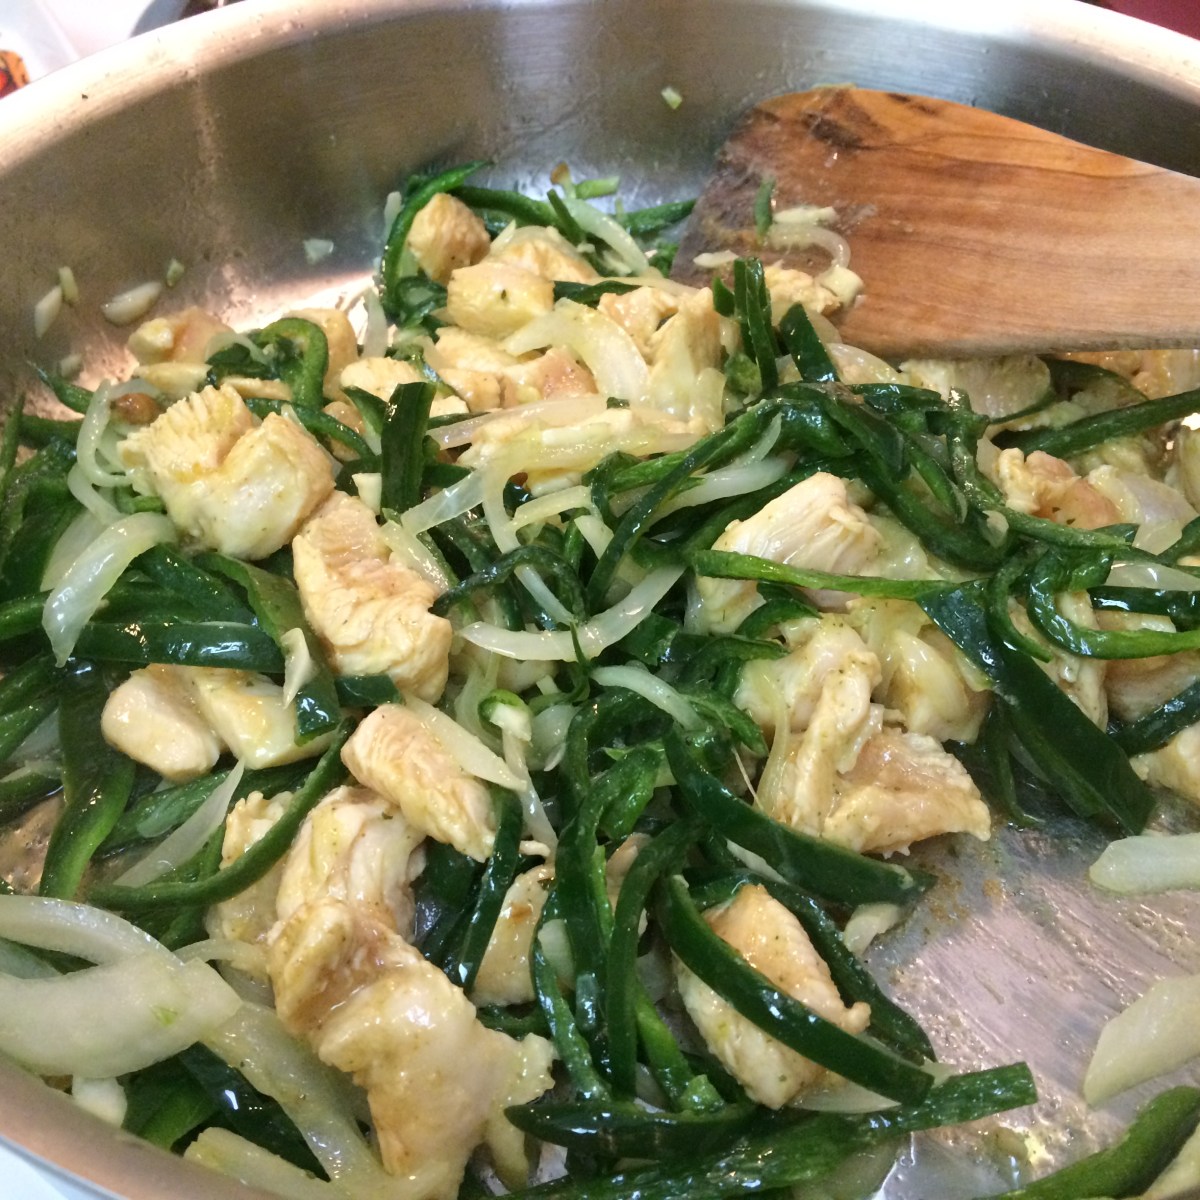
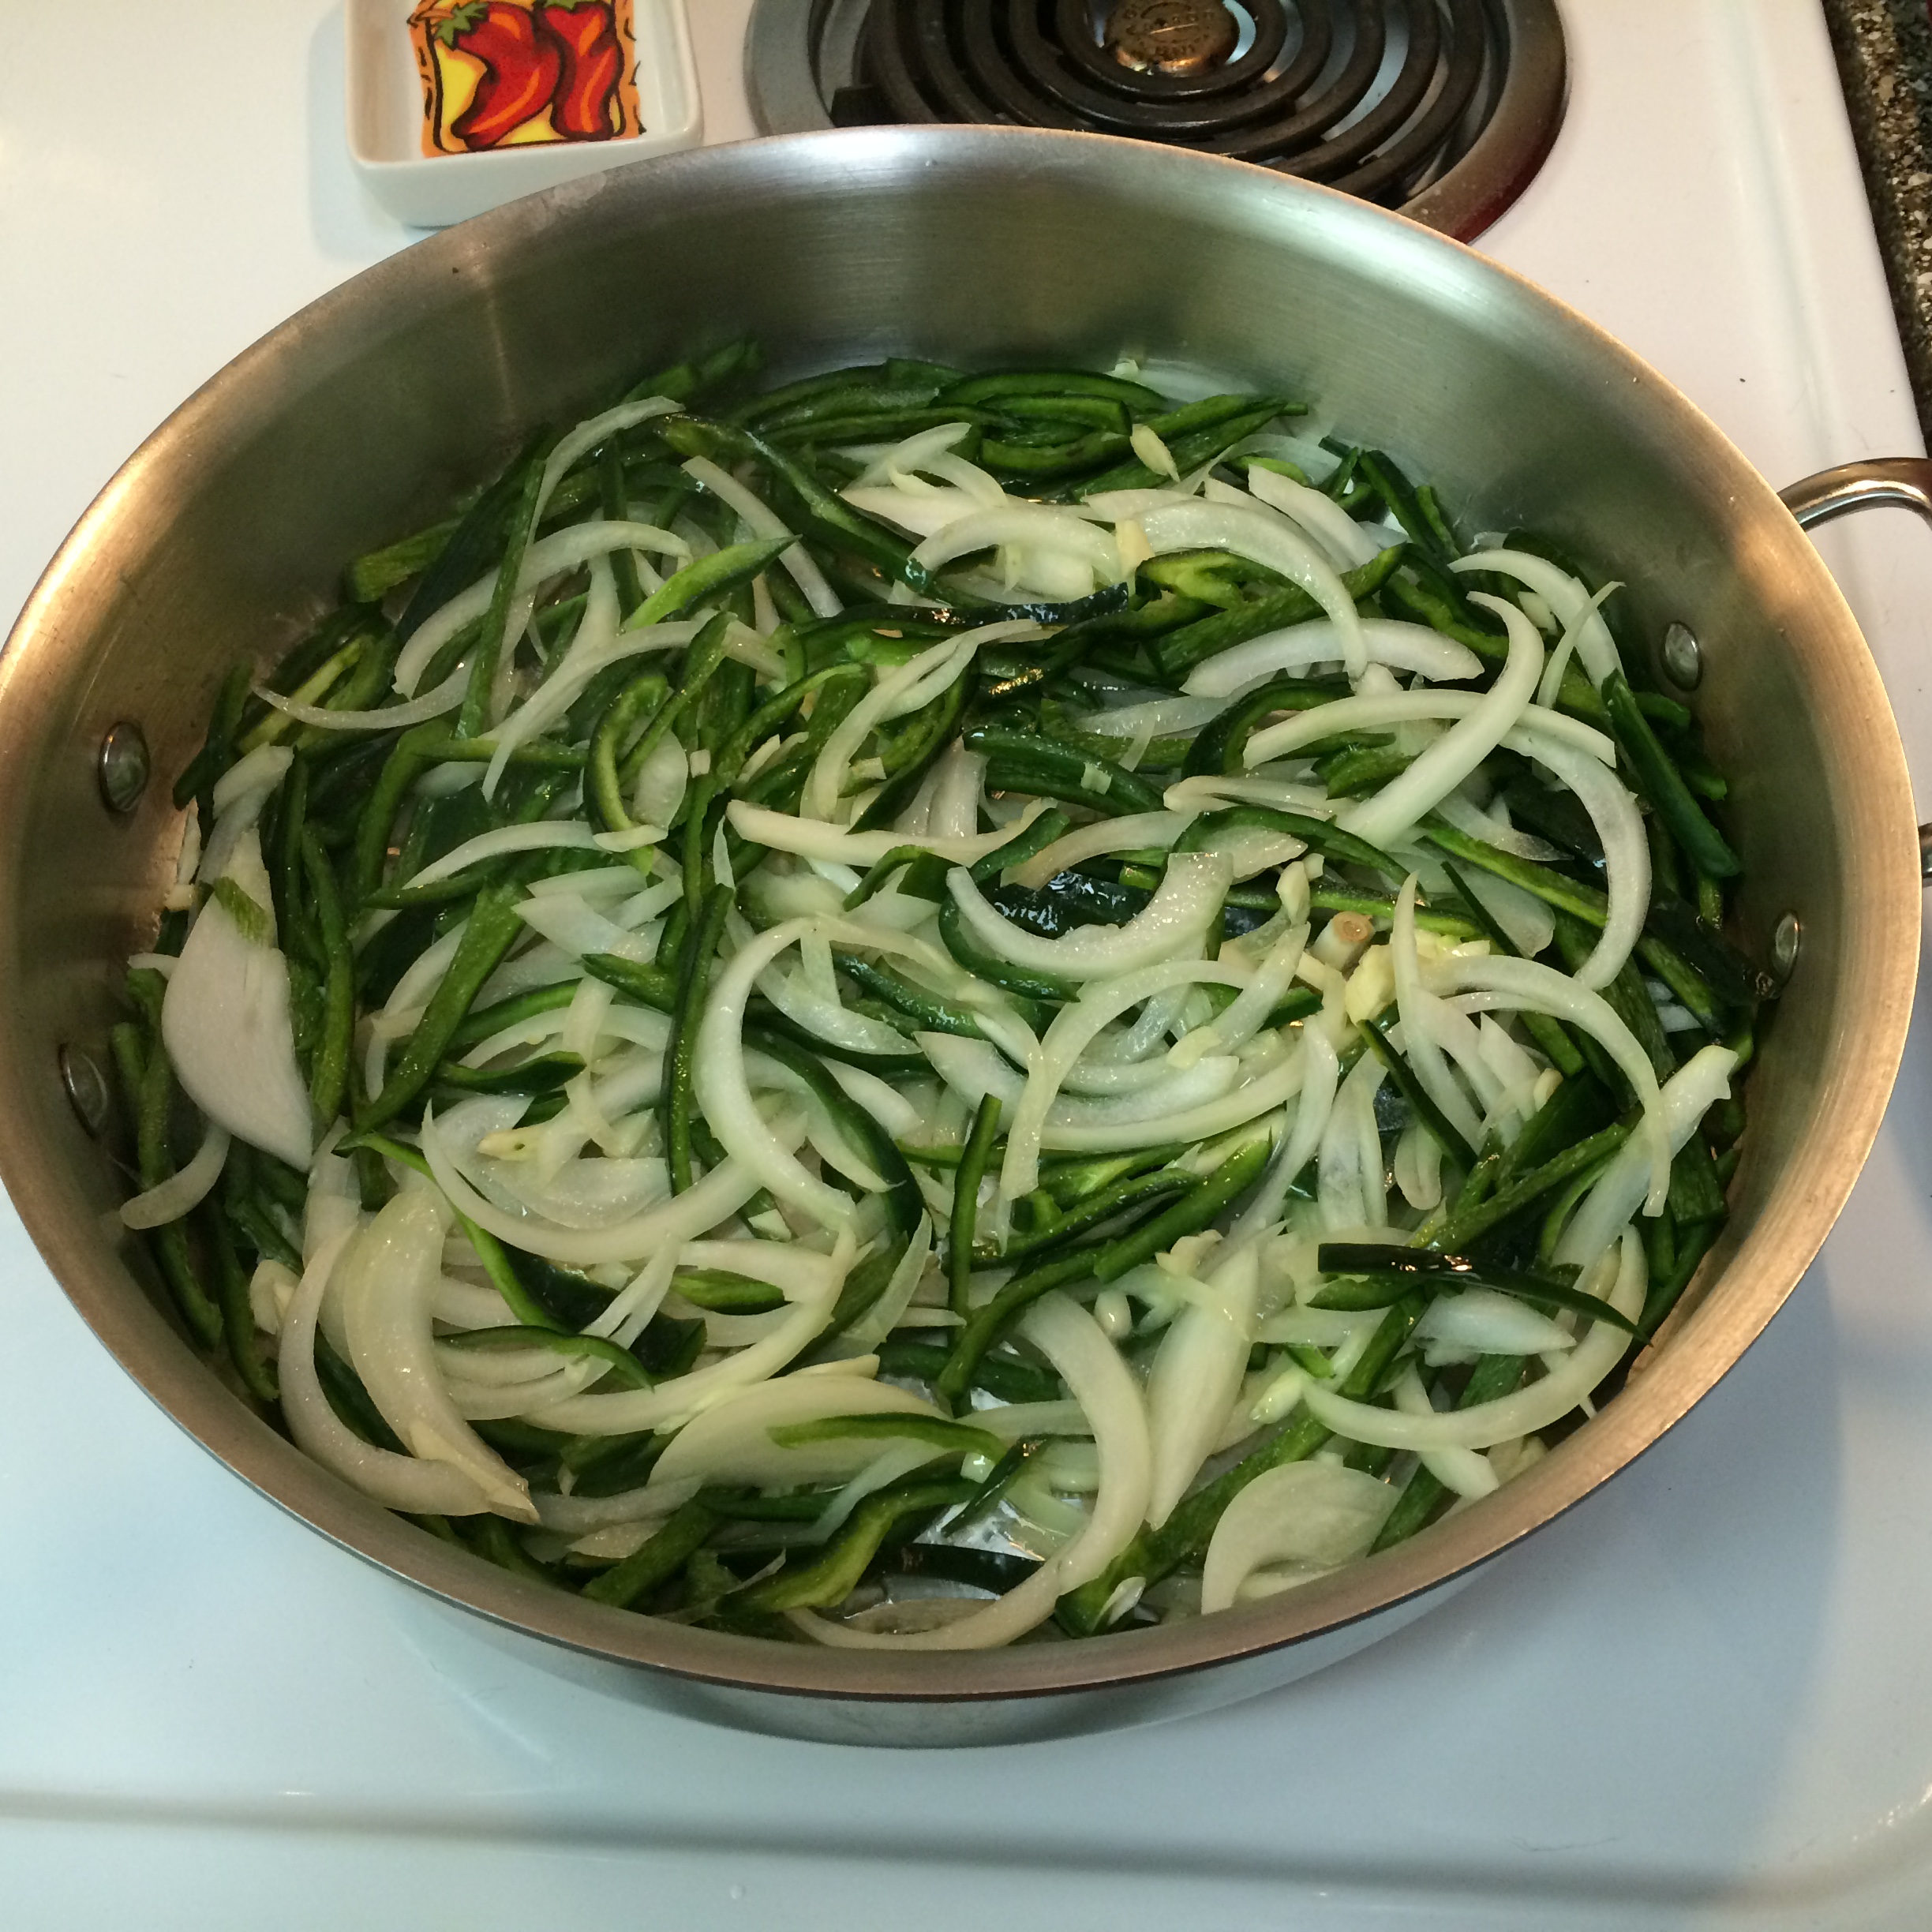
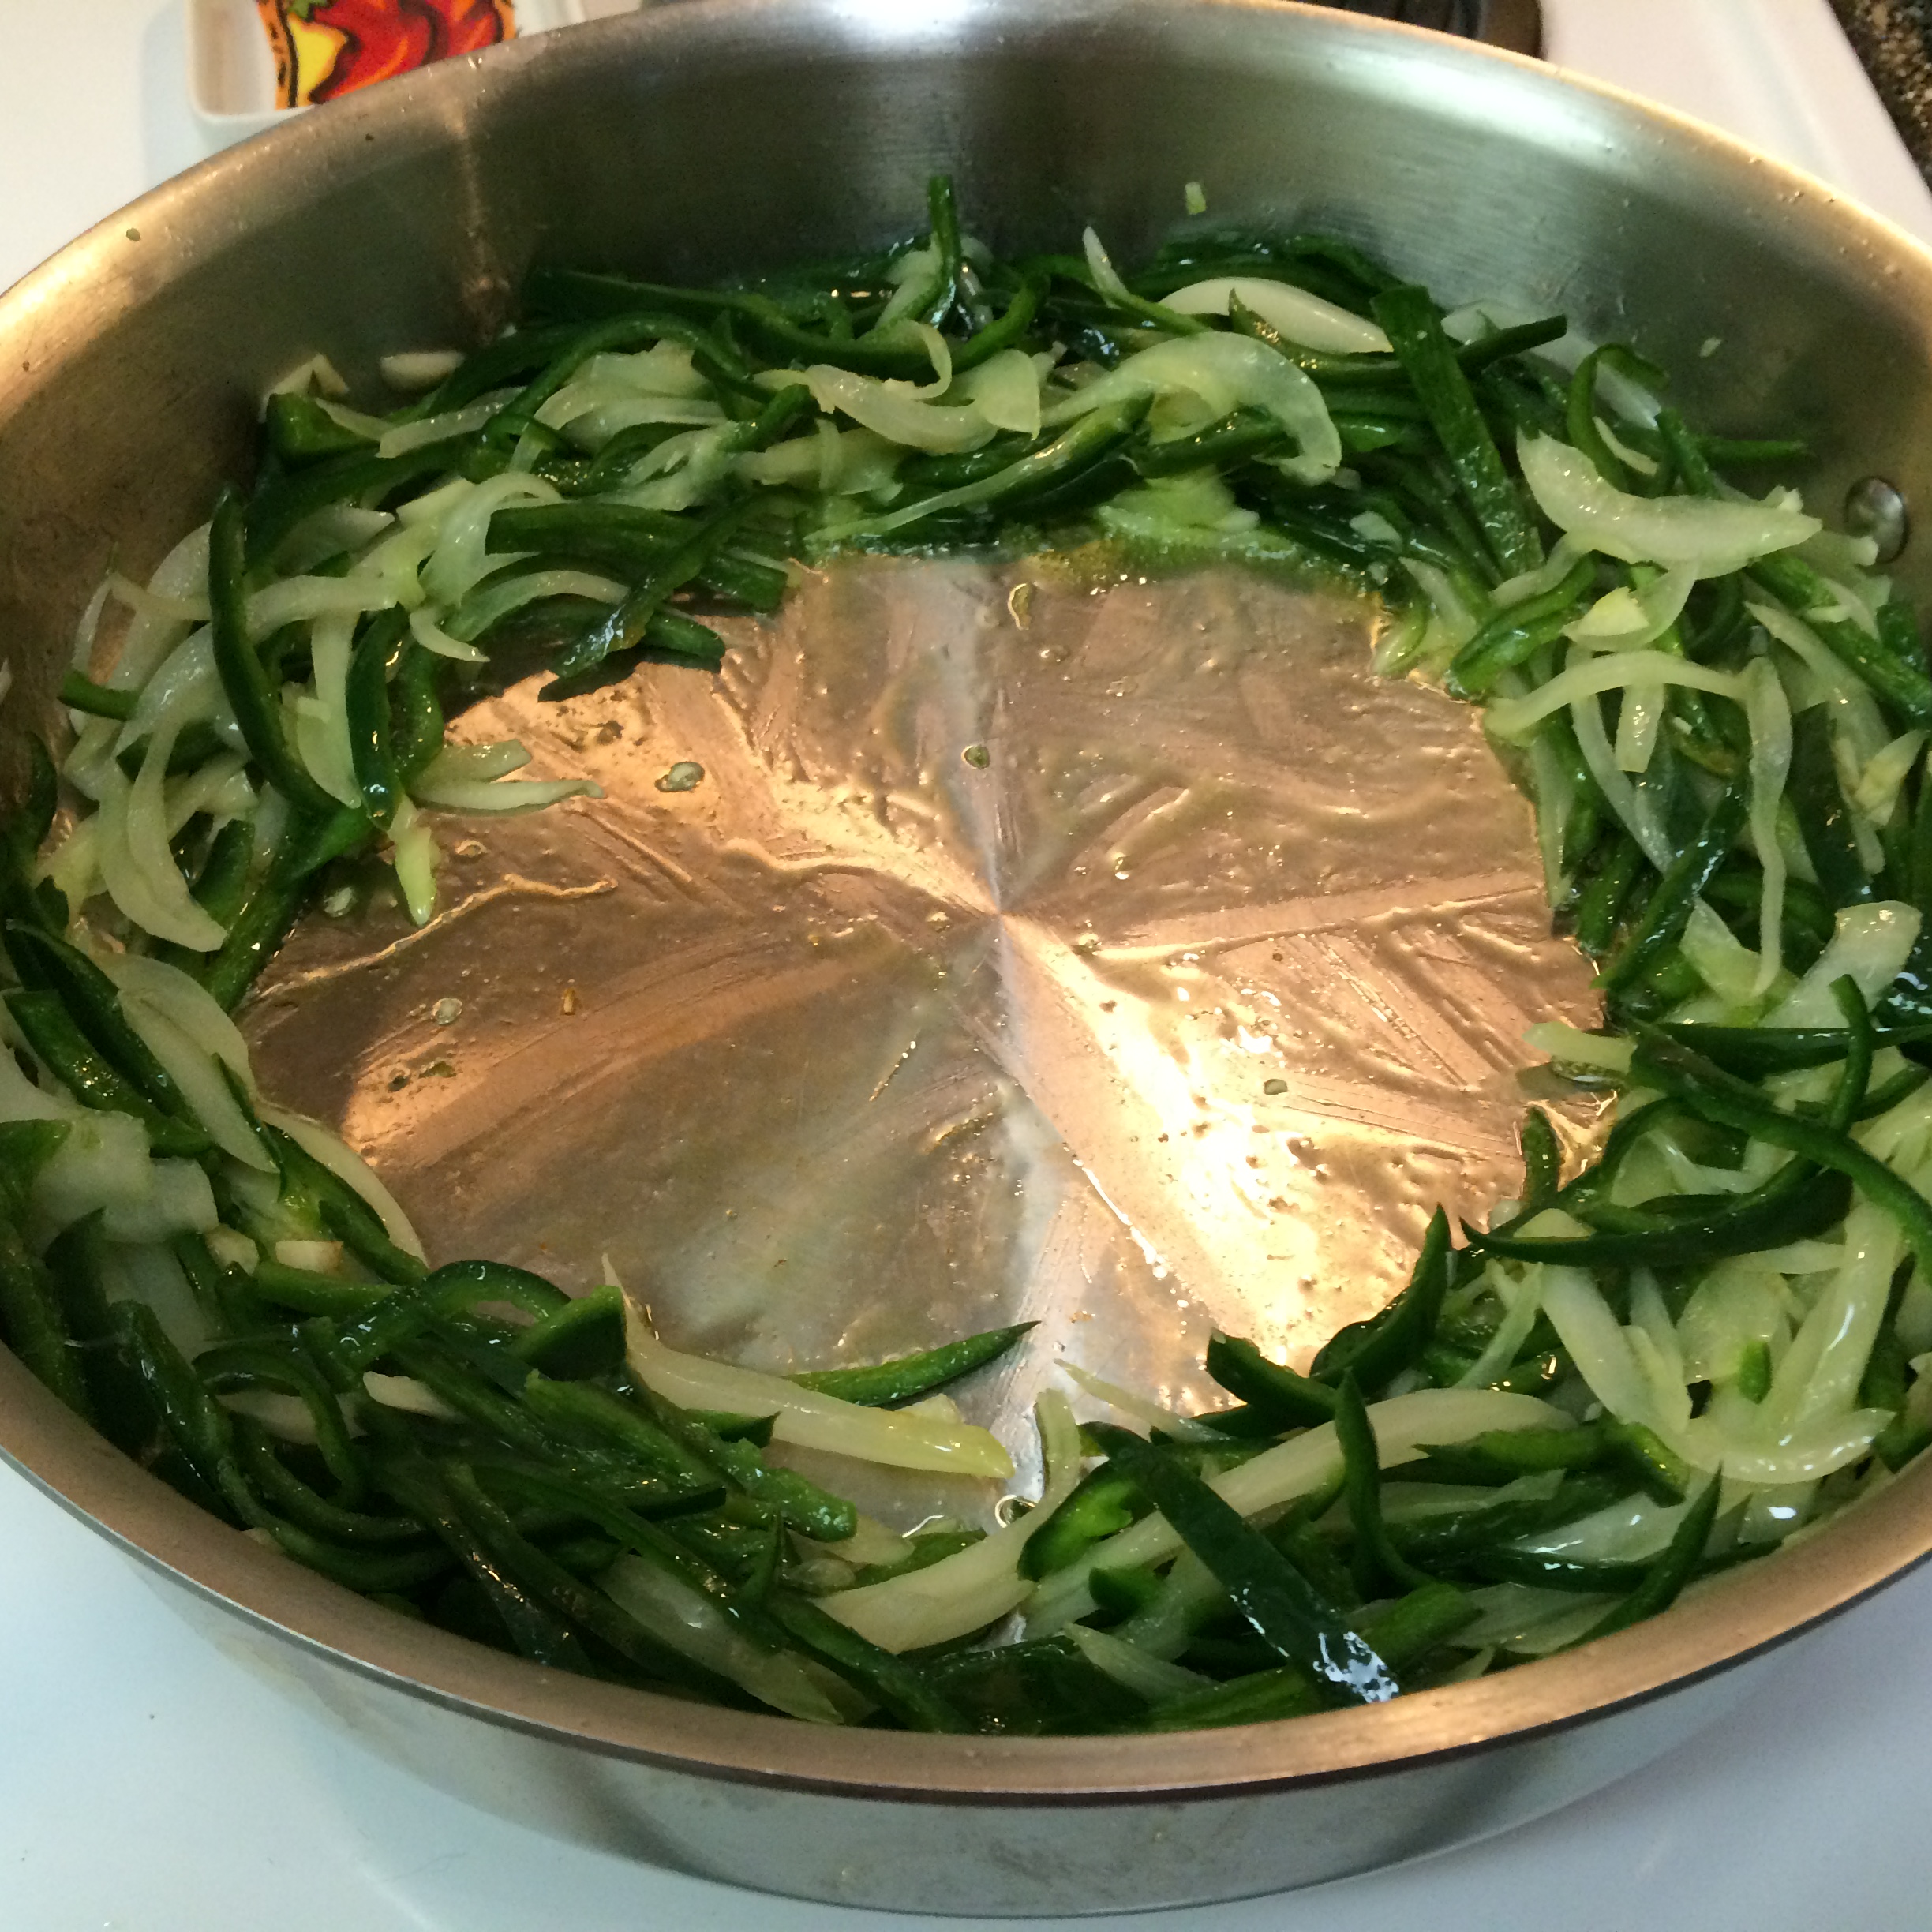
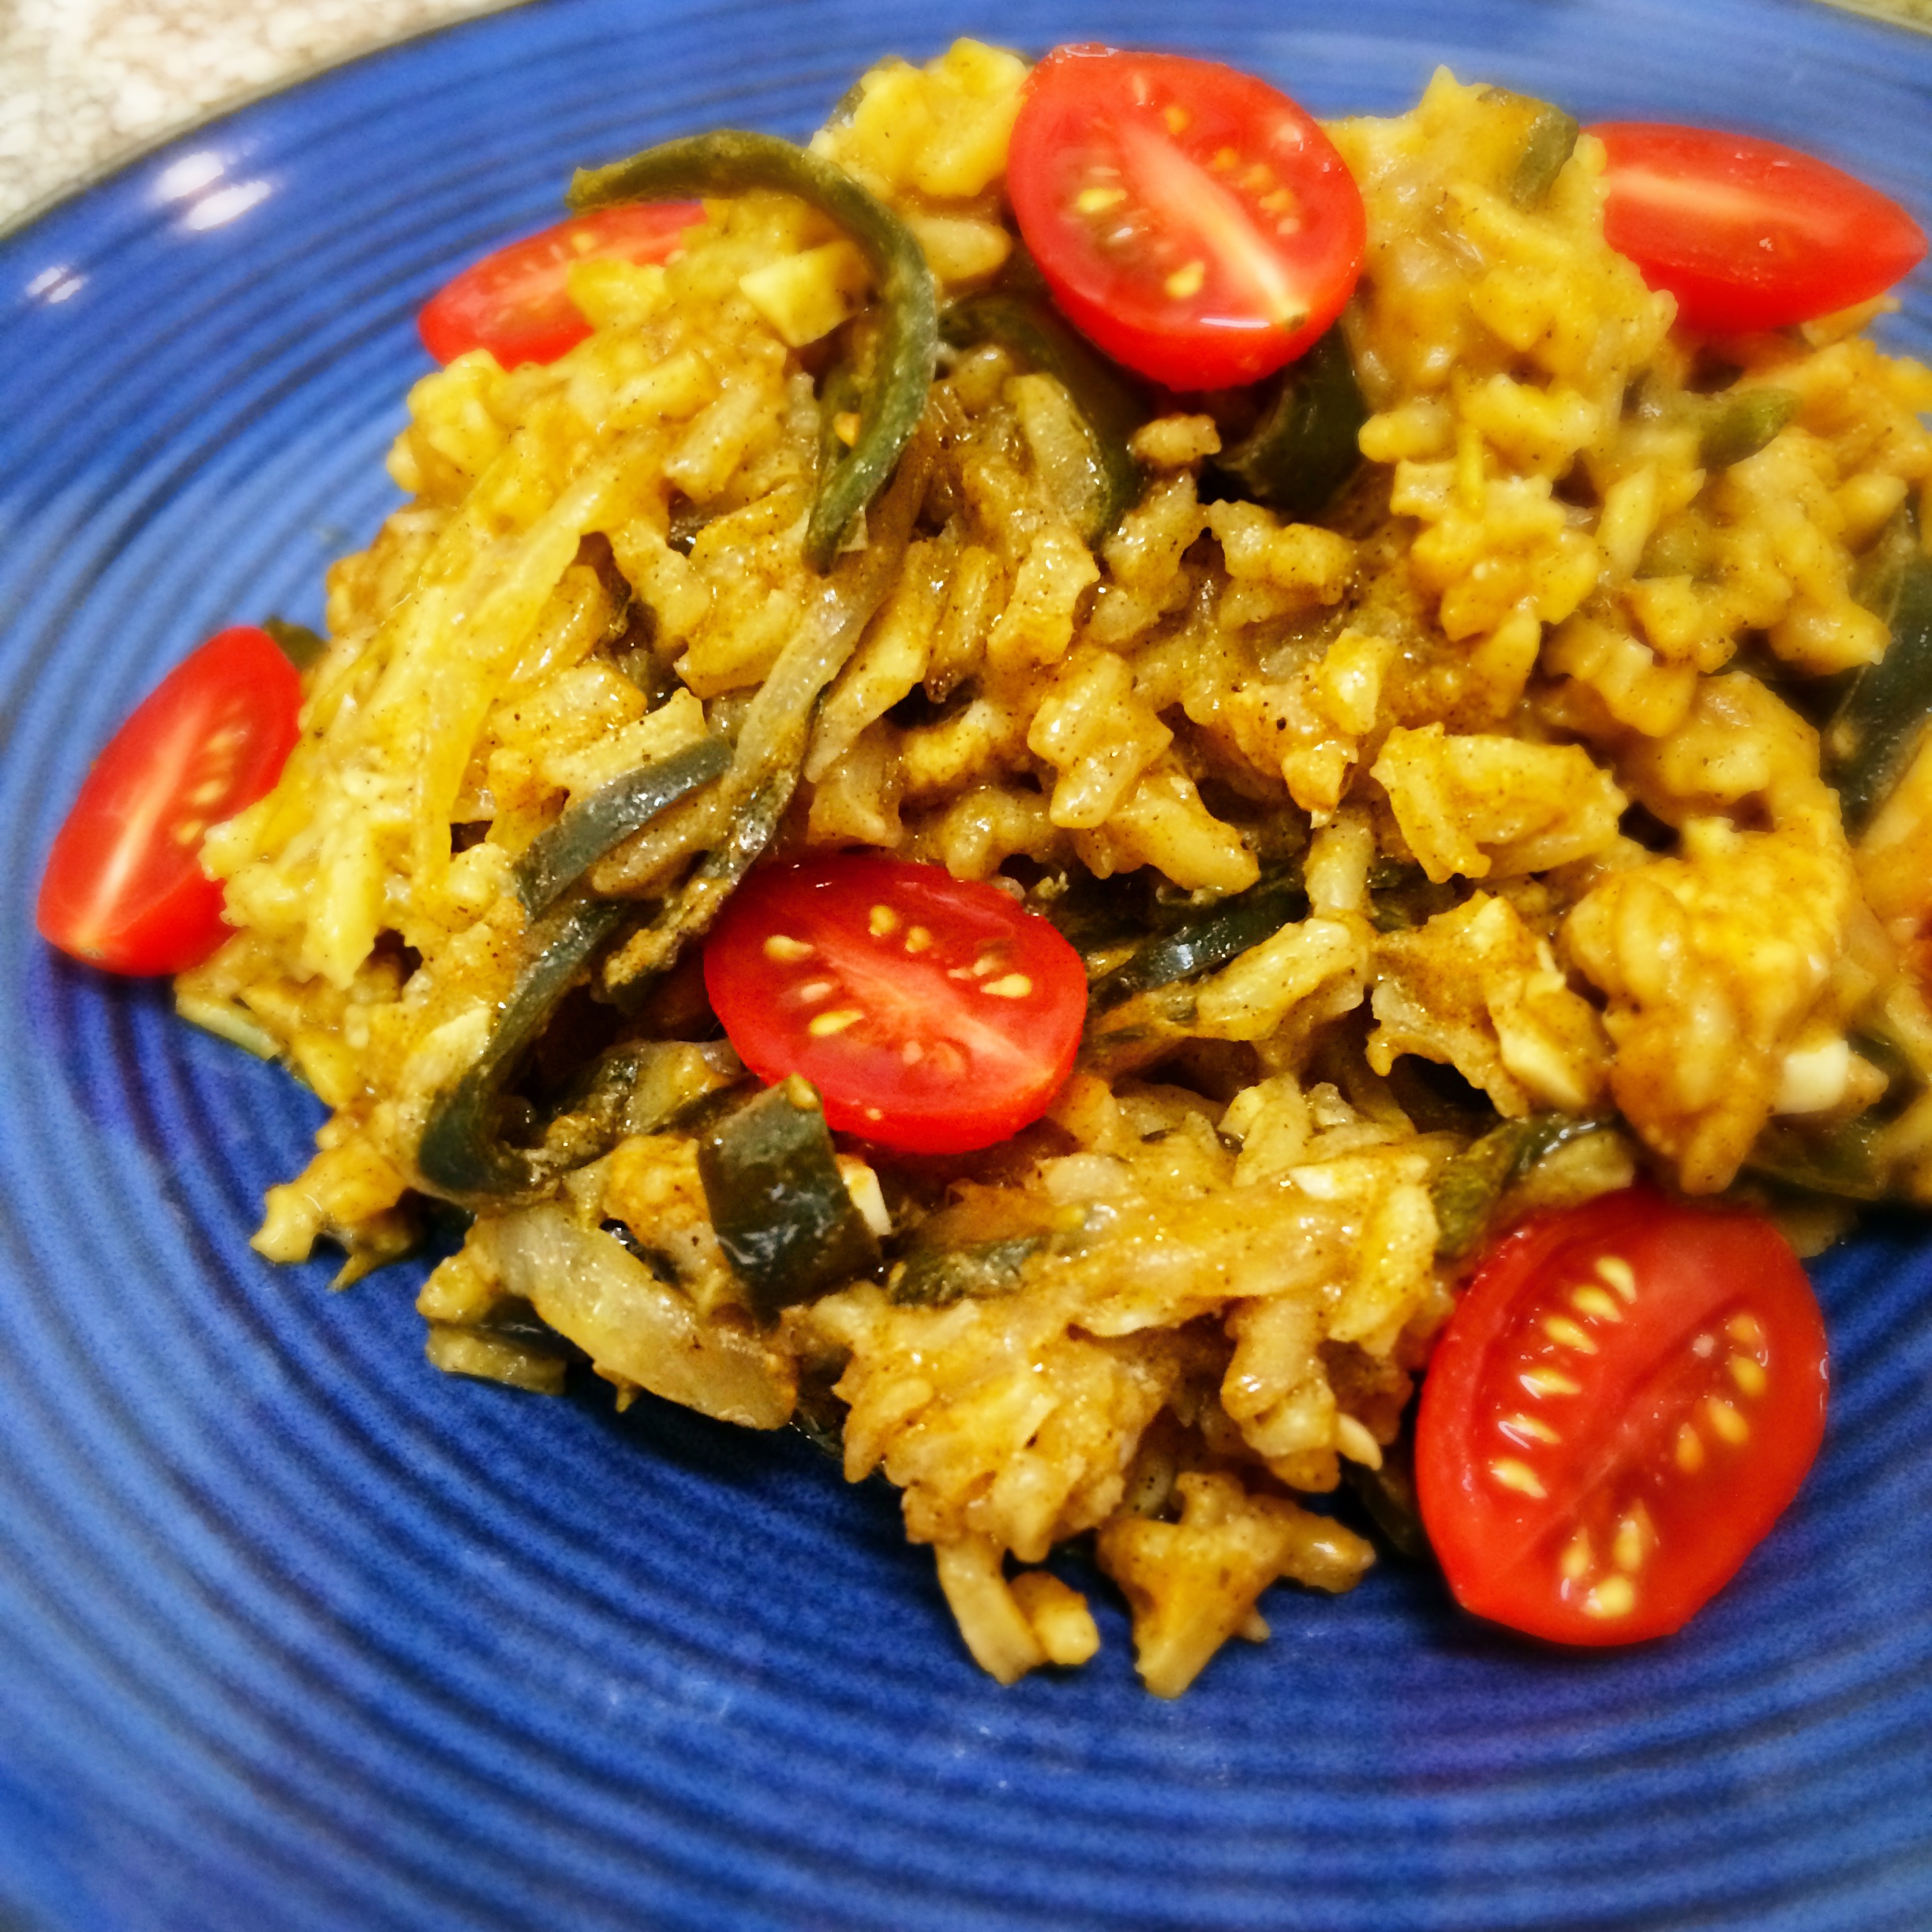
I started out with a large onion and three beautiful Poblano peppers just hanging out ready to be consumed. I French cut the onion and julienned the Poblano, then added about six large cloves of chopped garlic to the mix.
In a large skillet, I heated up a tablespoon of vegetable oil on medium high heat and then added the mixture to sautee until the onions started to get translucent and the Poblanos became relaxed.
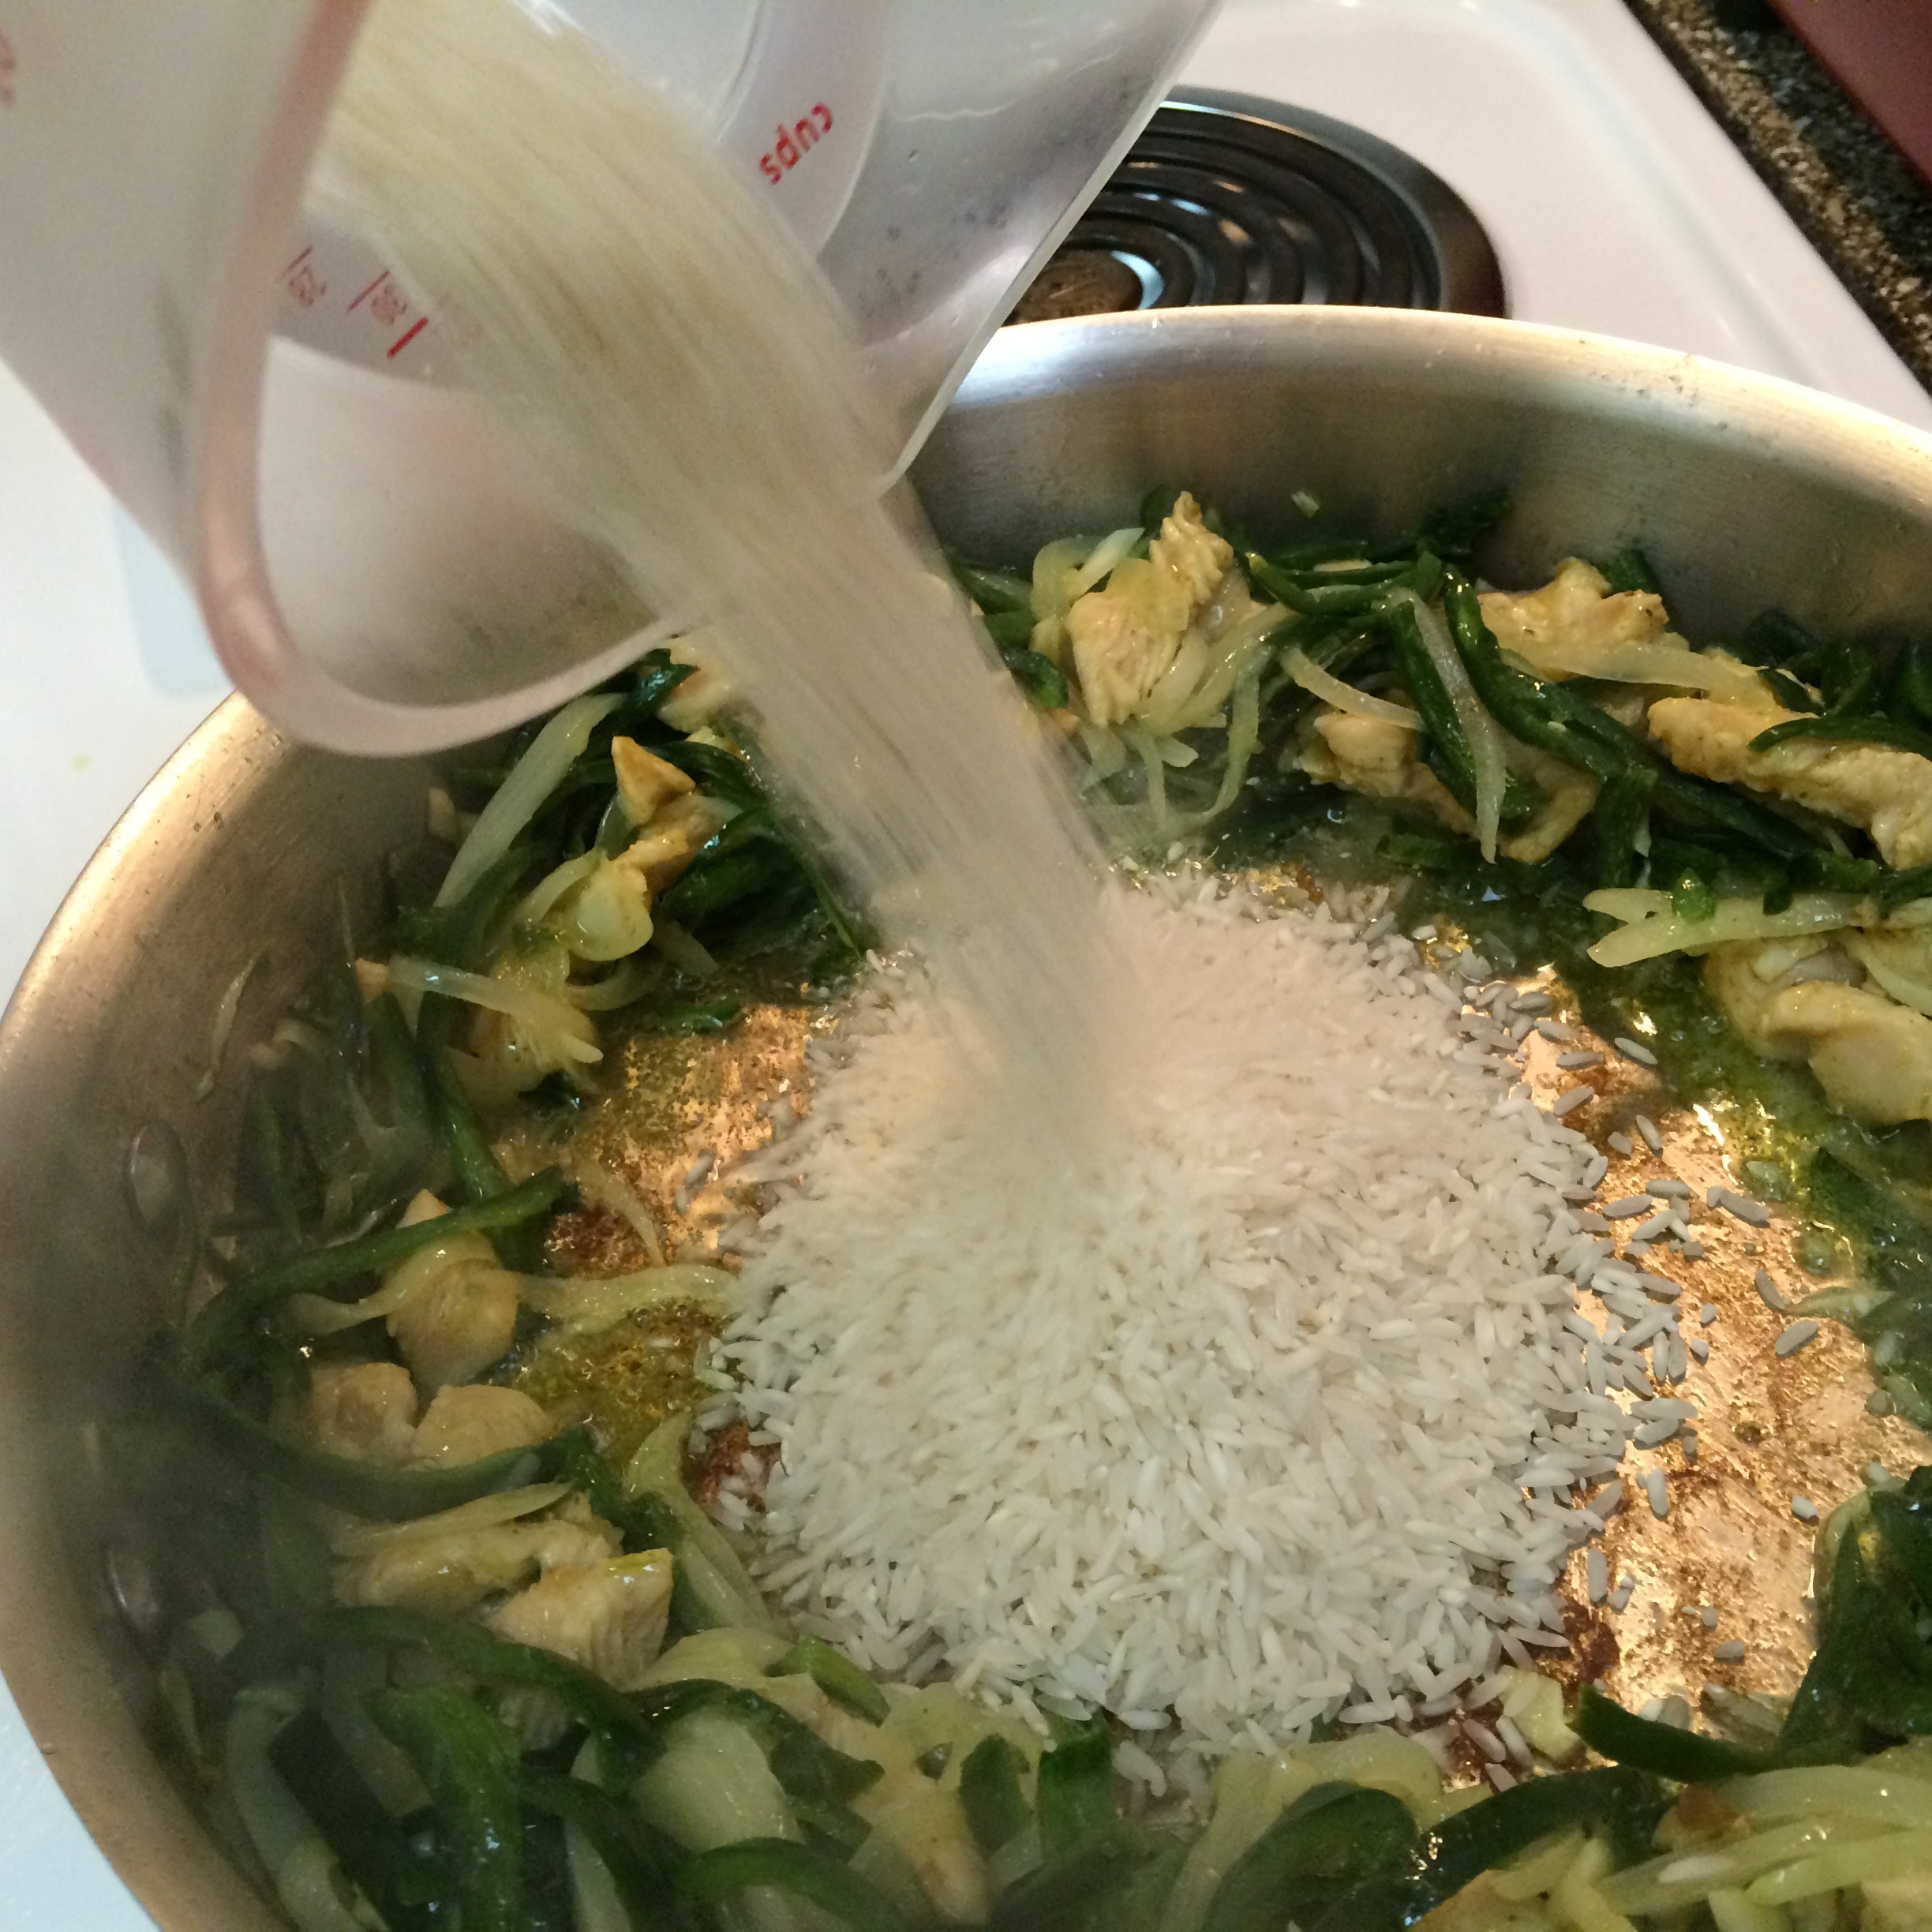
While that was going, I chopped a couple of chicken breasts into bite size pieces and then seasoned the chicken with Knorr Caldo de Pollo (chicken bouillon a la Mexicana), cumin powder, and garlic powder. I didn’t add salt because the bouillon has loads of salt. Once the onion and Poblano mixture was nice and tender, I created a well in the center of the pan and then added the chicken to the center. After the chicken began to start browning on one side, I stirred it all together and created another well.
This time, I added 3/4 cup of white rice to the well and allowed each grain to be coated with some oil and to be toasted up nicely. Once the rice started to turn from opaque to a solid white, I went ahead and combined everything together, making sure to scrape the bottom of the skillet to lift up any fond (yummy tasty bits that get stuck to the pan when cooking).
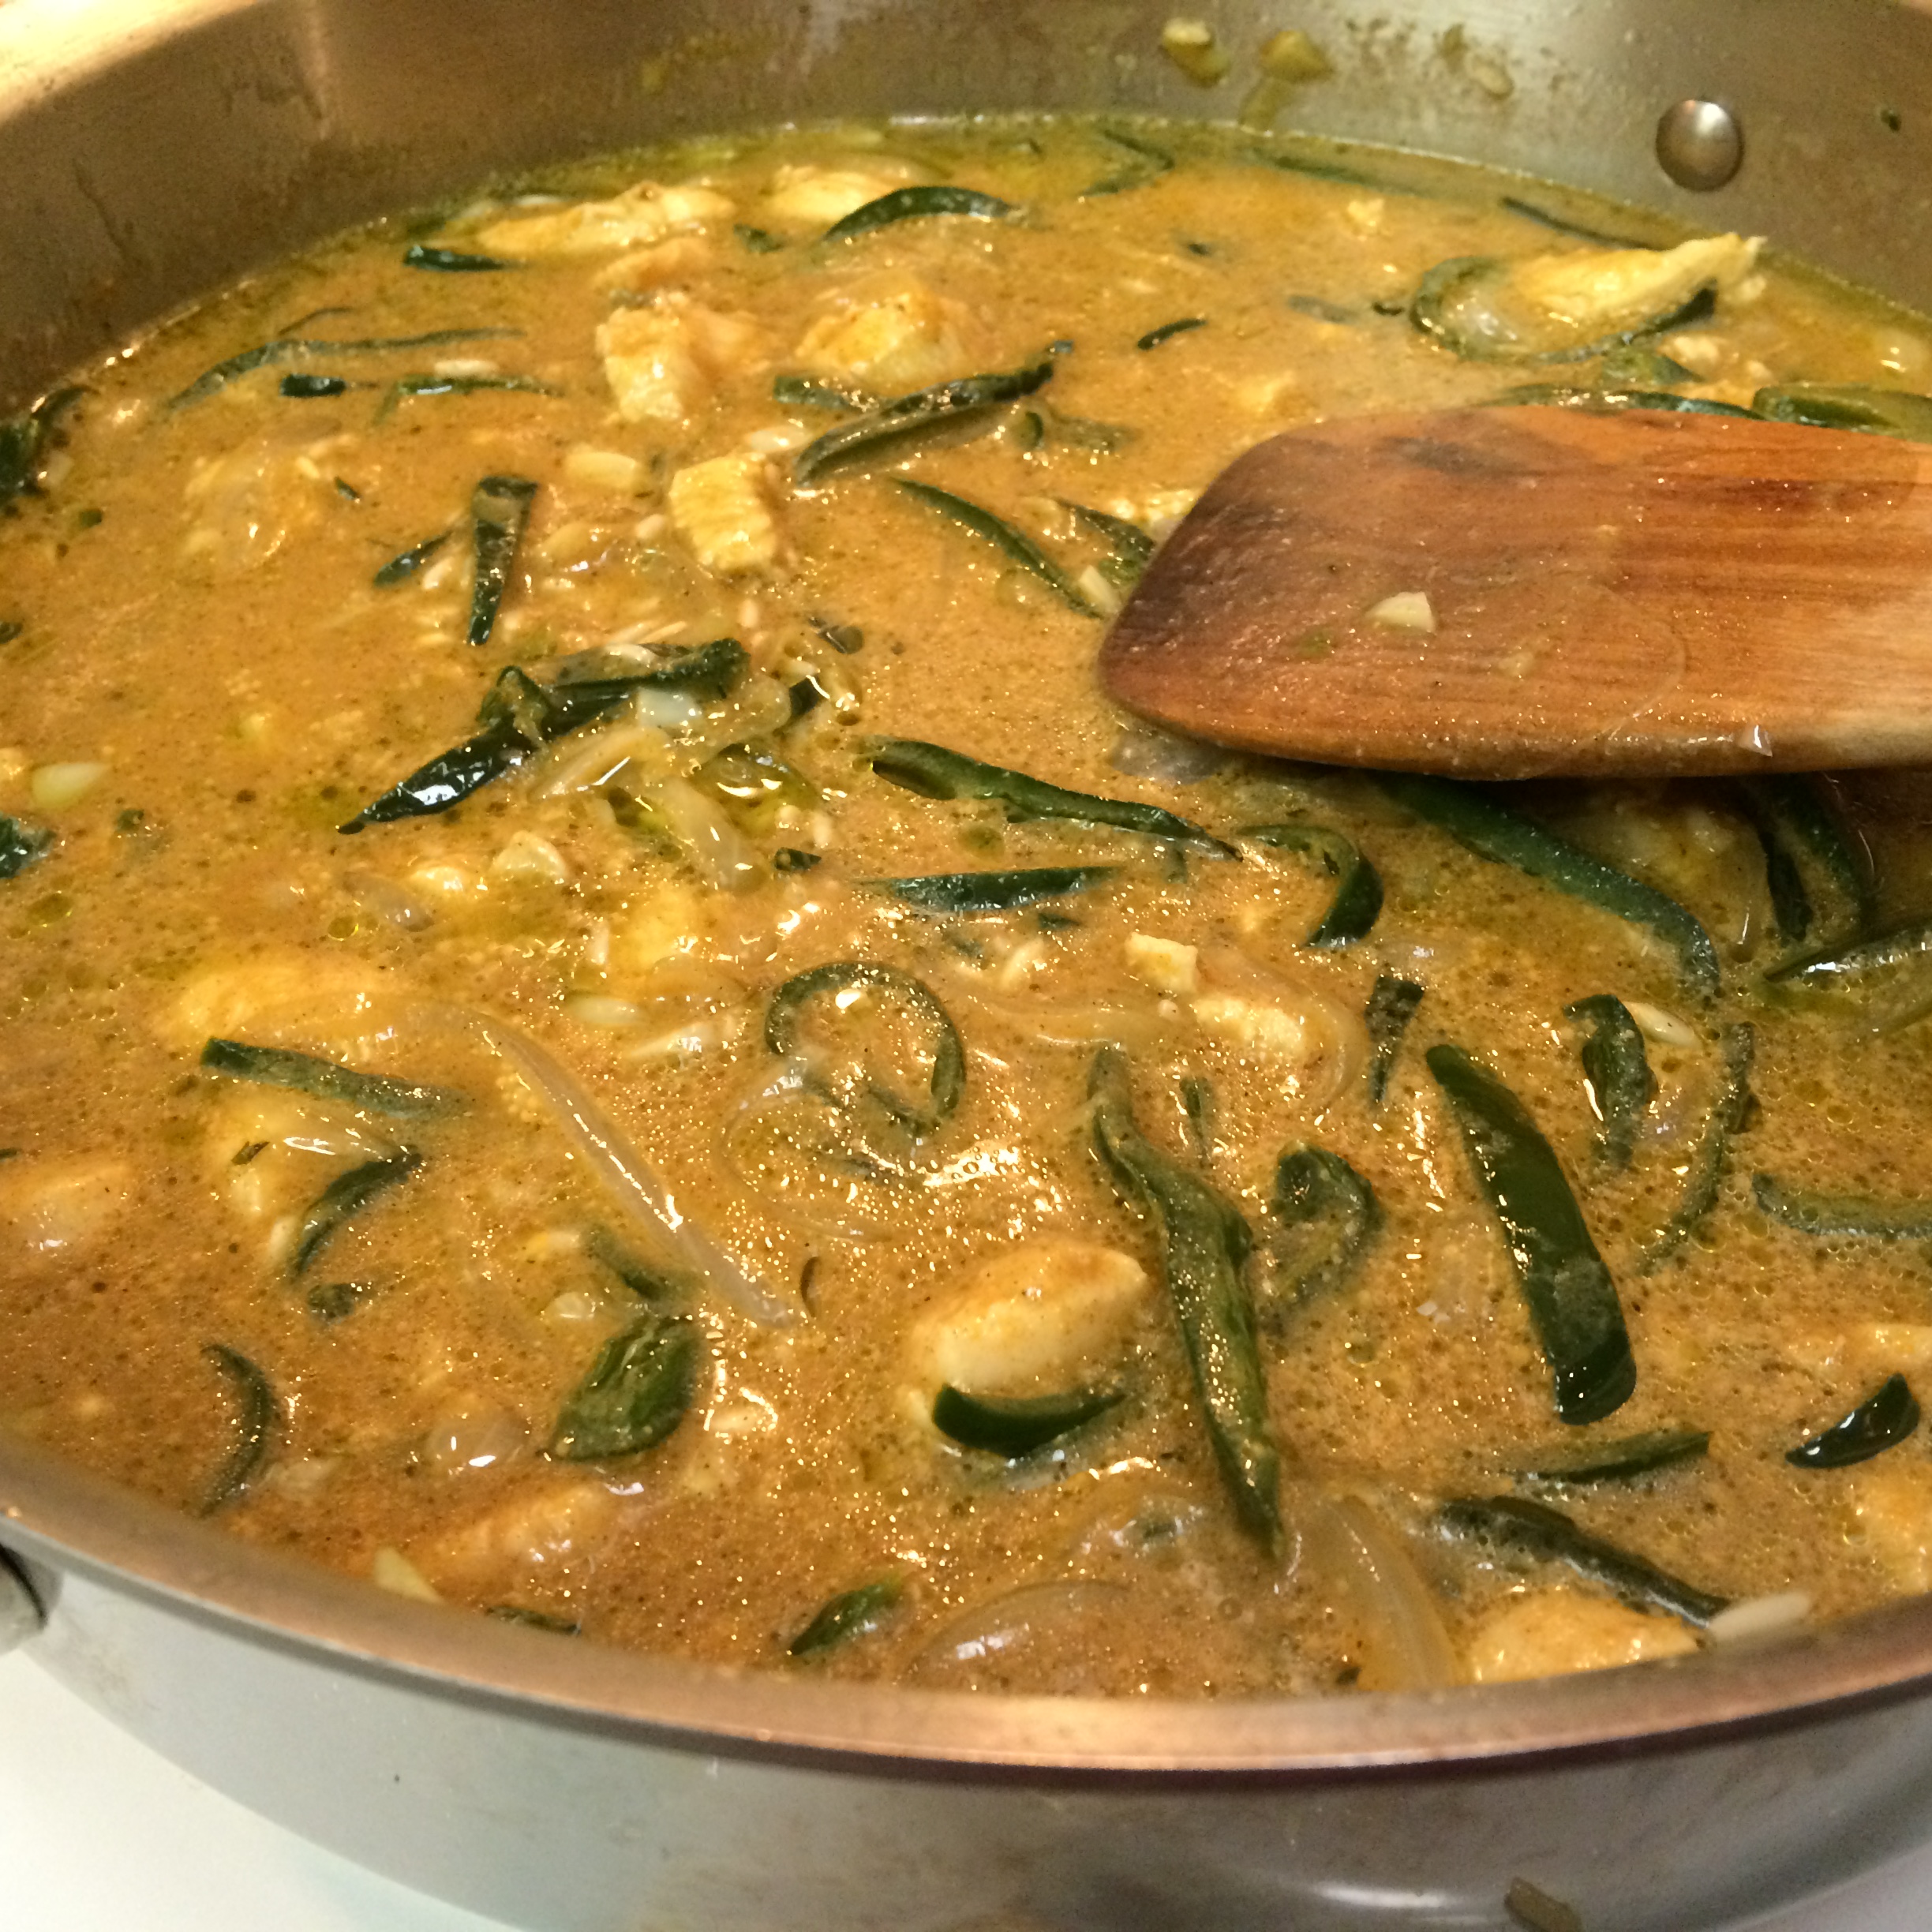
In a measuring cup, I added the remaining smoky salsa I had made a few days ago, along with two tablespoons of table cream, making about 1 cup of liquid and then added hot water to the mixer to make it just over 1 1/2 cups total. You can use tomato sauce, chicken stock, or even use some of your favorite jarred salsa that you have on hand, as long as it totals double the amount of rice. I simply used what I had on hand. I added the liquid to the skillet and combined well, scraping the bottom of the skillet once again to incorporate that delicious fond.
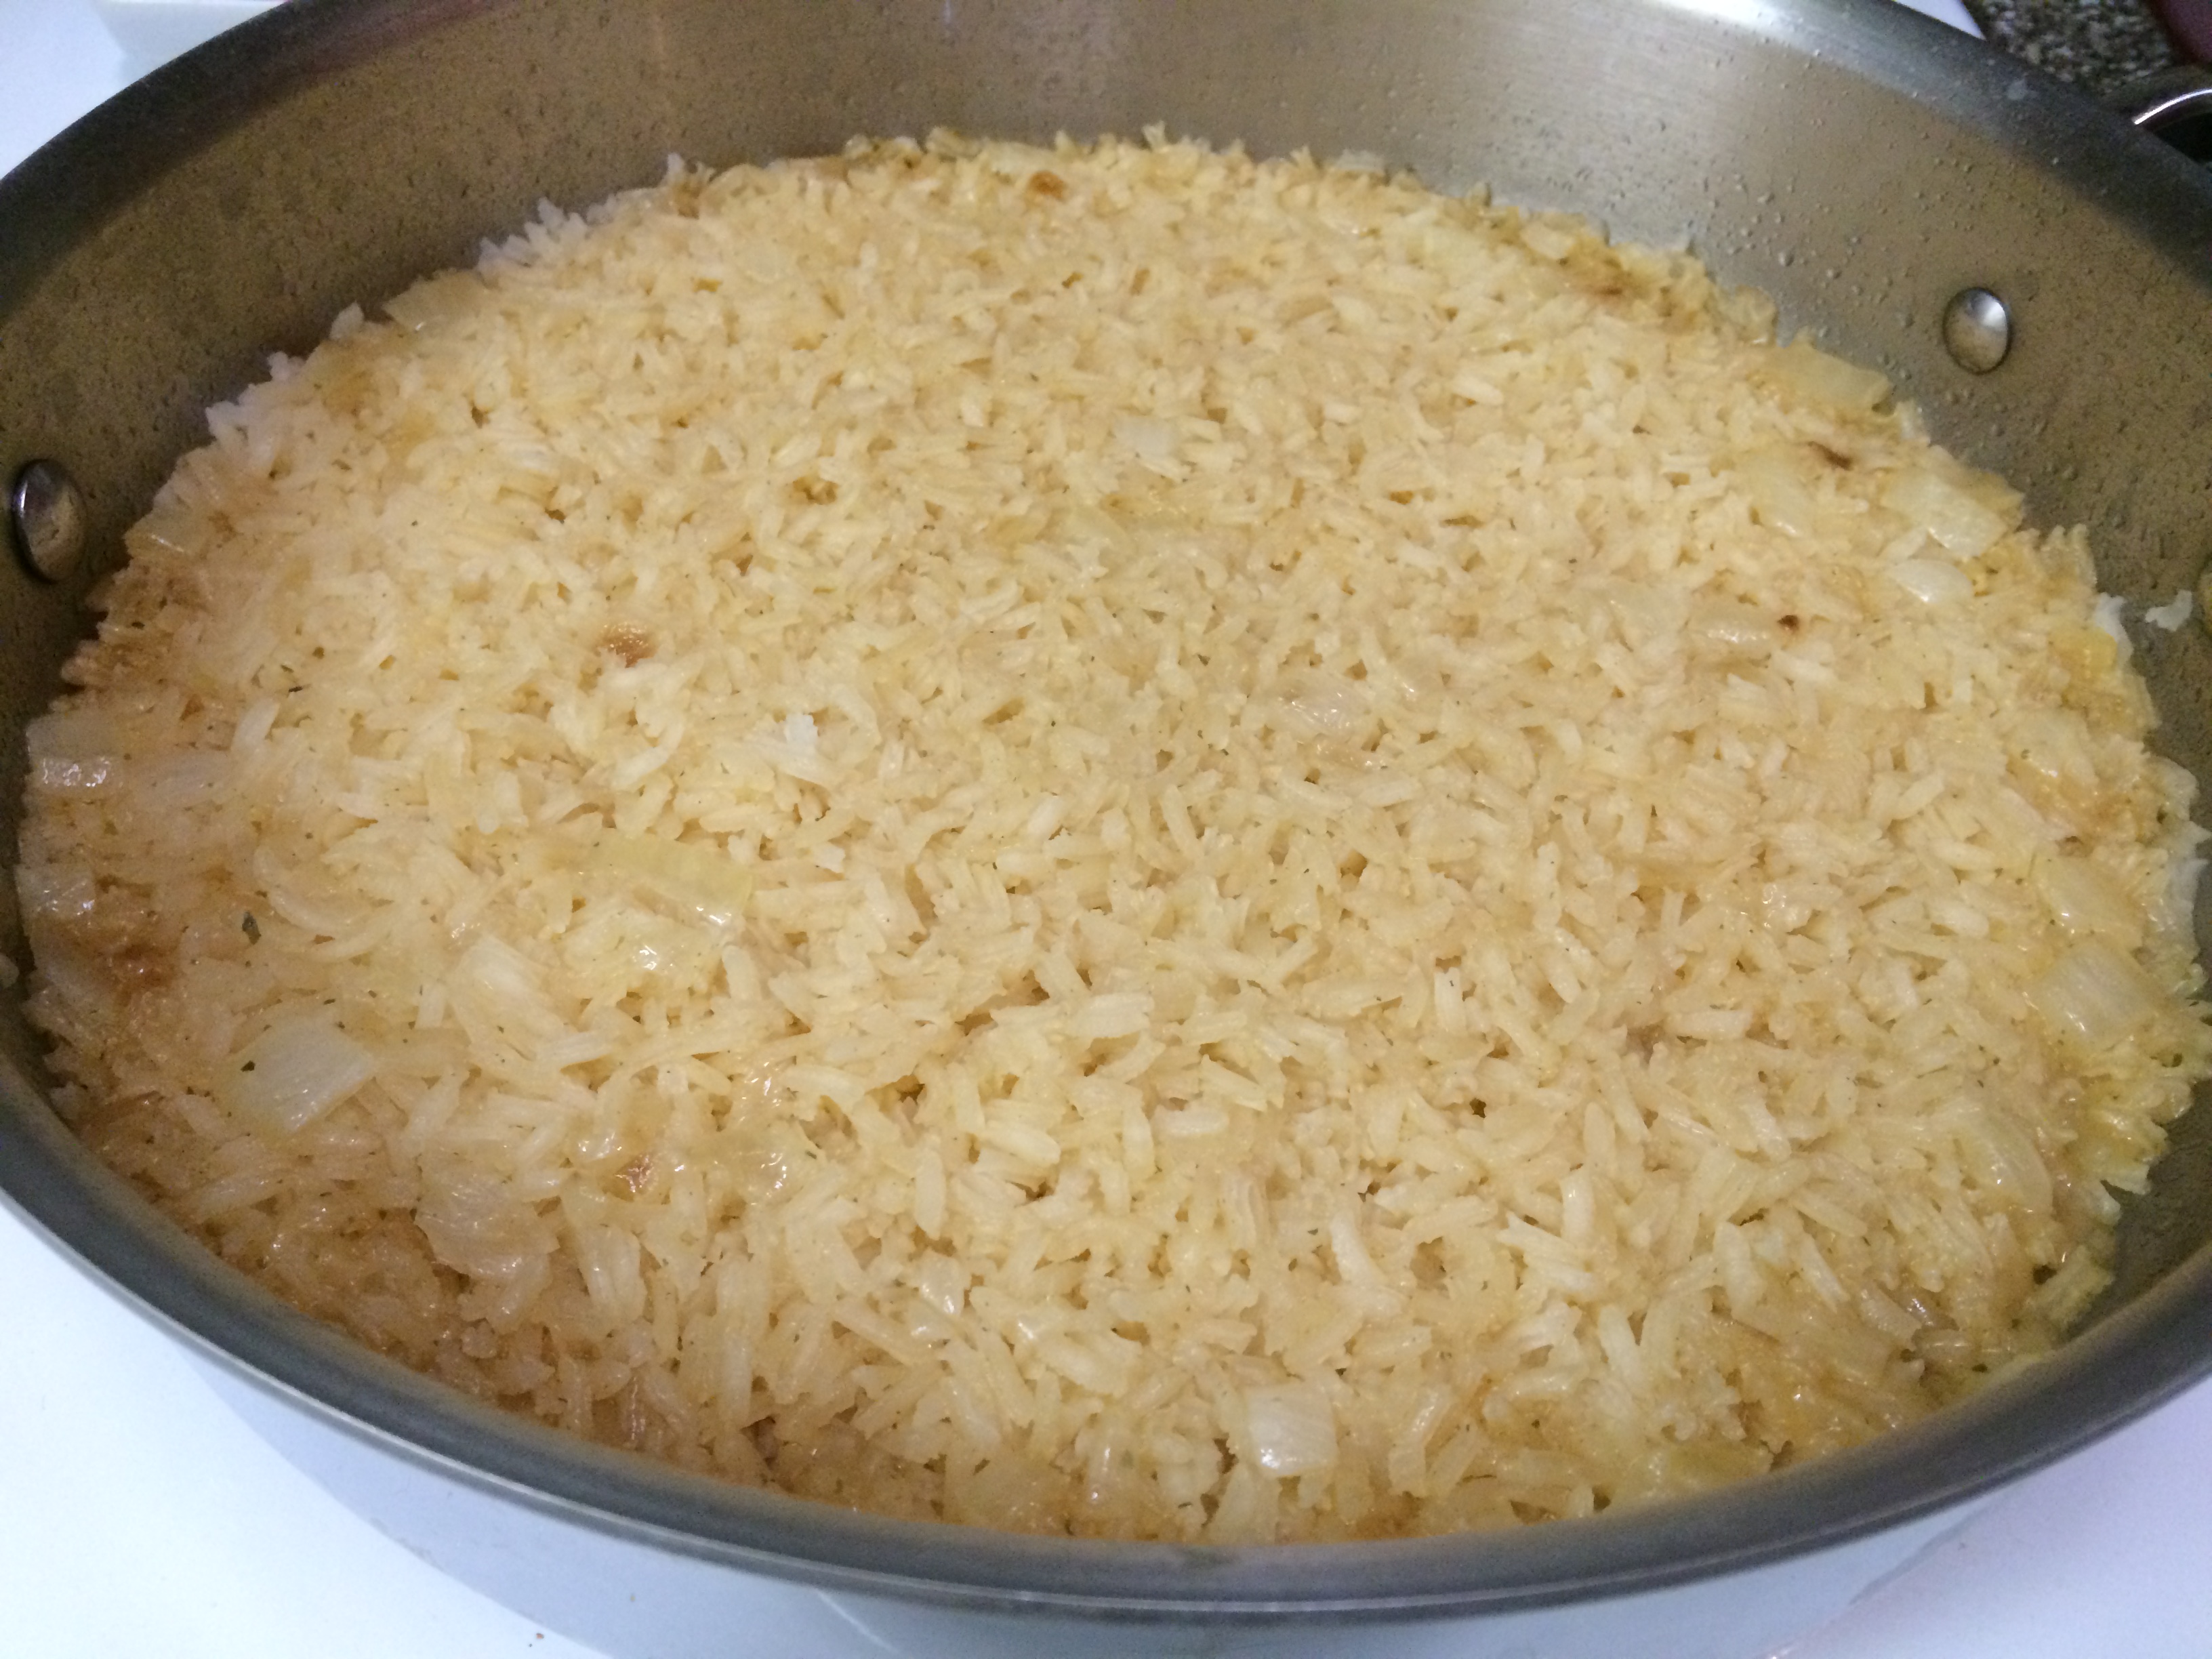
Immediately, I covered the skillet and reduced the heat to medium low and left to simmer covered for 25 minutes. Whatever you do, DO NOT remove the lid. The key to perfect rice, alone or with a protein or veggies, is to start on medium high, then add one part rice to two parts liquid, let come to a boil, immediately cover and reduce to medium low for 25 minutes completely covered and undisturbed. You will have perfect rice every single time – we can both thank my cousin Normie for that tip. It changed my rice game forever. I even usually just cut the heat off once the time is up and leave it covered until ready to serve. Best rice advice, I’m telling ya. Check out this rice from a few meals ago. ——–> Right!?!
Once the Poblano Arroz con Pollo was done, I sliced a few salad or cherry tomatoes for a pop of color and freshness. Now, I can enjoy the IFBC knowing Bear has some amazing Poblano Arroz con Pollo to devour!
I can’t wait to share what I discover at the conference. From what I understand, we’ll enjoy an amazing tasting of Seattle’s very best restaurants, specialty shops and more, and if that isn’t enough, I have tons of restaurant visits planned… Seattle, here I come!
I’ve been a little bored lately, as seen by the blatant, “Hi – she’s lost it – someone please take her,” expression on Cat’s face in this photo.
Bear’s out of town. (clearly) I had just wrapped up an assignment, missed a family hang by minutes and had already cashed in all my “fine, I’ll humor you” cards with Cat.
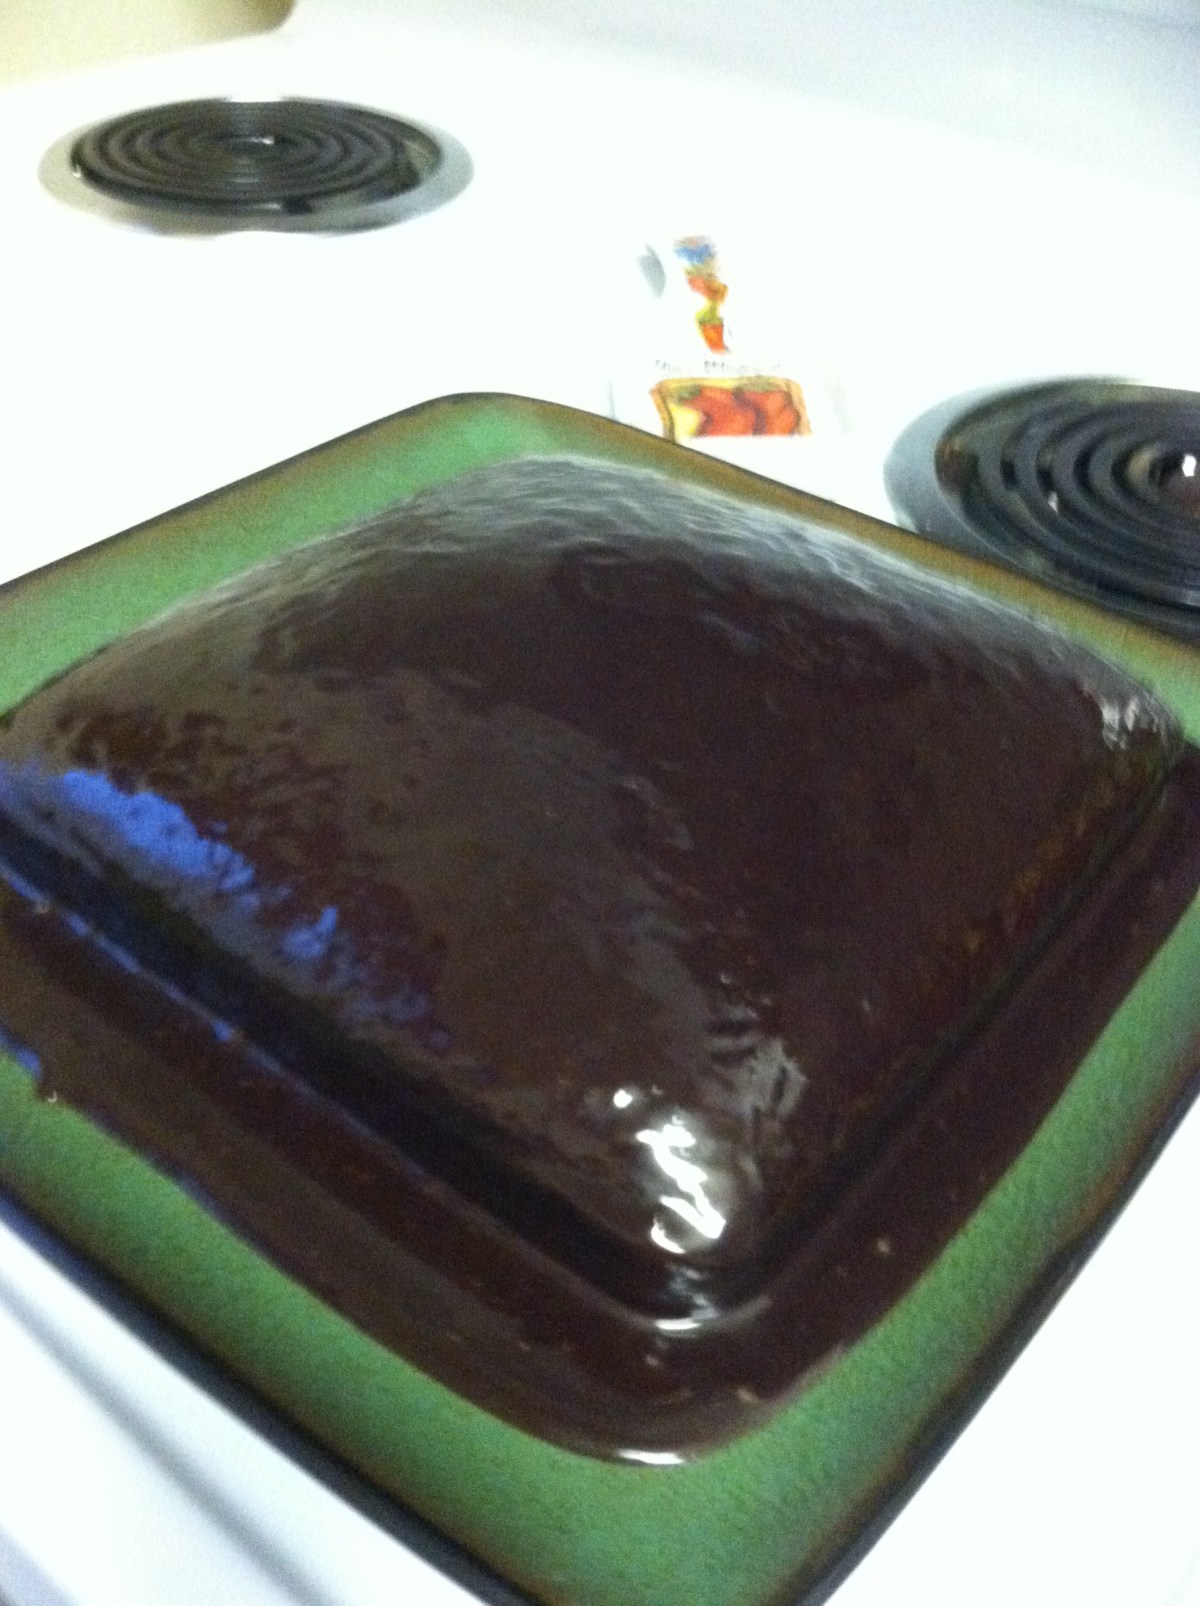
As you can imagine, the stale late afternoon only poked at my boredom, teasing it into a whirlwind of creative energy demanding to be utilized. After writing a song, cleaning our place, finishing a painting and walking with a friend, there was only one other thing to do – make chocolate cake.
But, the only problem was I had just cleaned the kitchen. (see earlier energy outlet activities) So, I needed an easy, no frills cake that would not ruin my freshly sanitized Fortress of Solitude. I needed a cake in a mug recipe.
So, I found this quick and easy recipe on the Food Network and molded it into what I needed. Recently, I’ve been trying to eat better so I don’t feel like I’m dying when I’m tying my shoes. So, I had to figure out how to tweak this bad boy without removing any of its decadence and delight, two things absolutely necessary for an enjoyable chocolate cake experience.
Here’s the original as I wrote down from their site – the parenthesis was my scribble-scrabble for myself. I’ll explain in the revised version.
Side note: the day before I’d made an easy cherry almond crumble – seen here:
And, I had some leftover cherry filling I’d made.
Super Easy “Sugar-Free” Cherry Filling
1 Cup – Fresh Pitted Black Cherries
2 tsp – Unsalted Butter
2 tsp – Stevia powder
1 tsp – Cornstarch
Dash of Nutmeg
Dash of Salt
Good Splash of water
Combine all ingredients in a sauce pan and heat on medium until thickened.
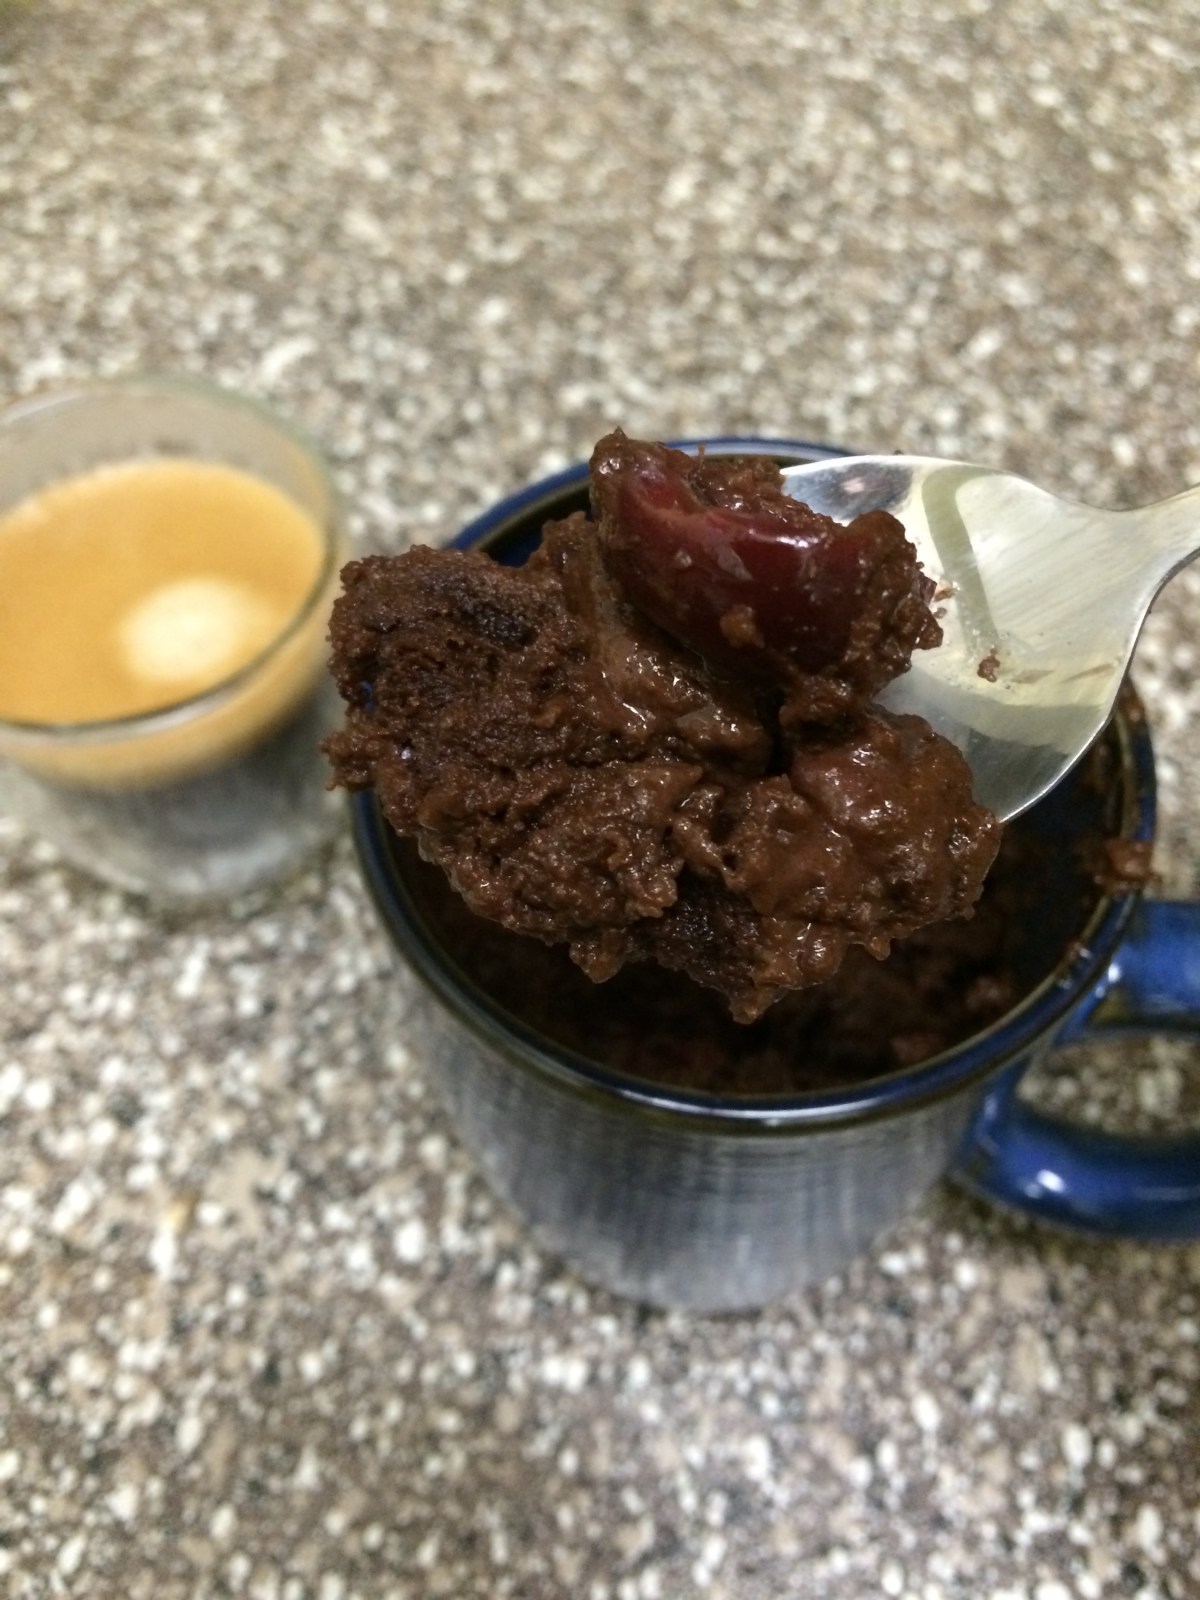
So, I had about 1/2 cup of refrigerated cherry filling left since my crumble was an individual portion. I knew I could make a killer Gooey Chocolate Cherry Cake in a Mug with what I had left.
Here’s my healthier, cherried-up version of the cake:
Gooey Chocolate Cherry Cake in a Mug
¼ Cup Flour
3 tsp Stevia Powder
2 TBS Cocoa Powder
1 Egg
3 TBS Almond Milk
3 TBS Melted Coconut Oil
1 tsp Mexican Vanilla Extract
Dash of Salt
Dash of Chipotle Chile Powder (substitute or add a dash of cinnamon for more depth)
Super Easy “Sugar-Free” Cherry Filling
Whisk all but the cherry filling together in a medium sized bowl until well combined. Add cherry filling into the bottom of a large mug. Pour combined cake batter over cherries. Microwave on high for 2 minutes. I like mine gooey, but you can microwave for another minute if you want yours without the muddy goodness.
My substitutions are the healthier alternatives and don’t take away any of the decadence or flavor. The addition of the chipotle chile powder is also just another layer of depth that adds to the cake. It’s that extra “something” that tickles the throat without creating a burn. Since the cherries already had nutmeg in them, I didn’t add more cinnamon. If you wanted to remove the cherry filling altogether and just add cinnamon, you’d have a wicked Mexican Chocolate Cake in a Mug! Plus, you probably won’t need that additional minute in the micro to avoid the gooey. And, you could add some sweetened condensed milk or cajeta (caramelized condensed milk) over it to really take it to another level!
Enjoy whatever version you decide to make!
I know I enjoyed mine, especially with my cafecito!
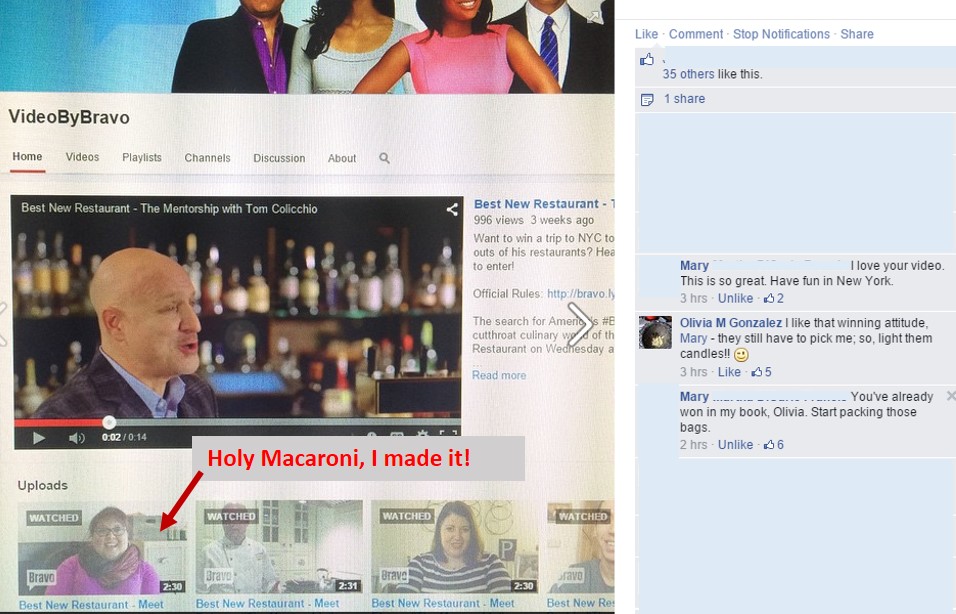
Today has been a pretty awesome day. A few days ago, I was notified that I was chosen as one of the top five finalists for Bravo TV’s Best New Restaurant “The Mentorship” contest. And, today, they posted my video submission to their YouTube page. On March 9th, we shall see who gets to spend the day with Chef and Restaurant Entrepreneur, Tom Colicchio. He will be mentoring one very lucky individual, and my friend Mary has advised me to “start packing my bags” because I’ve already won. I love the positive thinking, and I couldn’t agree more with having a winning vision. While I’m a huge fan of Top Chef and Best New Restaurant, this opportunity is way more than just being a fan. It’s an incredible chance to change dreams to reality, as my Bear and I have long dreamed of owning our own restaurant.
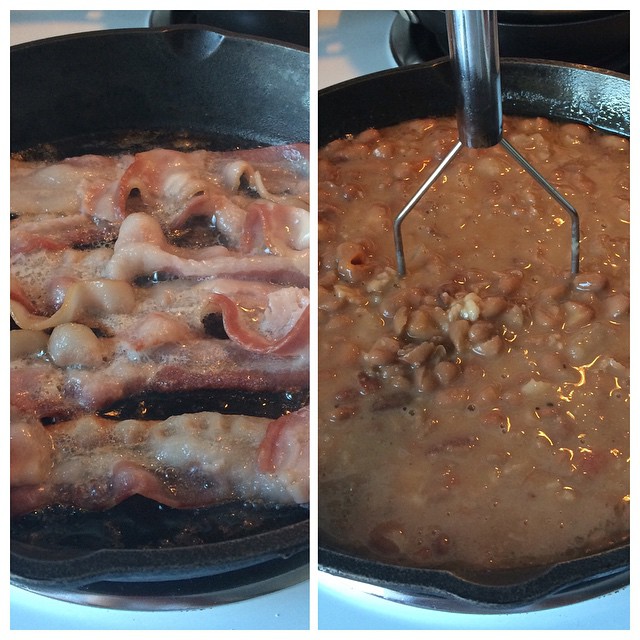
At the very same time, the DFW area has been blasted with snow, frozen pellets of ice and other cold weather phenomenons that require copious amounts of hot chocolate and warm food to be consumed. So, this morning, I got the cast iron skillet out, heated up some butter tortillas from Central Market, got some bacon in the pan, and took my already-created Borracho Beans (drunk beans) to task with a masher to make refried beans!
The combination of bacon, beans and Bravo TV’s finalist news was the absolute perfect combination to celebrate while staying nice and toasty inside. I’m also posting today because my friend, Kerrie, has been asking about this Borracho Bean recipe for months now and will hunt me down to kill me if I don’t post sometime soon. So, here we go!
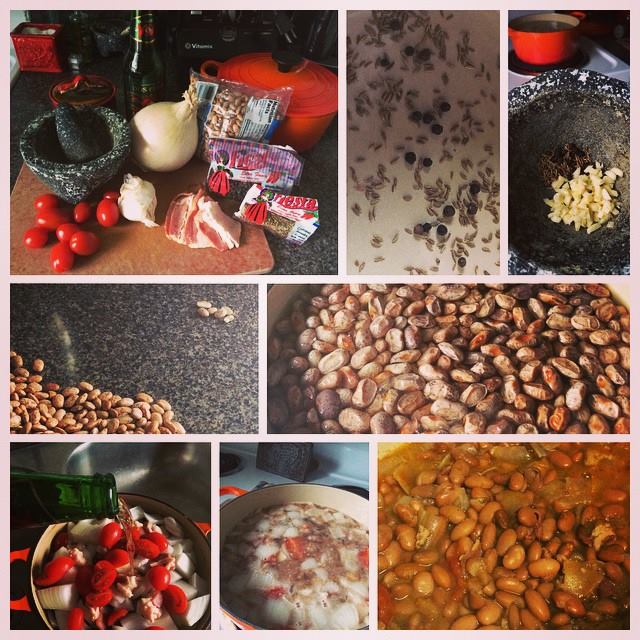
Borracho Beans
1 lb dried pinto beans
1/2 medium white onion chopped
1 large tomato (or 1/2 package of cherry tomatoes will do)
3-4 uncooked bacon strips chopped
1 bottle of Mexican beer (Negro Modelo or Dos Equis preferably)
2 large cloves of garlic
1 tsp cumin seeds
1/2 tsp whole black peppercorns
Salt to taste
Water
6 quart pot (cast iron enamel preferred but not required – the pot will be roomy for the beans)
Separate then discard any broken or unappealing dry beans, as well as possible rocks or inedible pieces from the dry beans. Rinse the beans in a 6 quart pot with warm water, slush around and discard the water, leaving the beans in the pot. Add water to the pot to cover the rinsed beans, then place the pot on a stove top and boil rapidly for 45 minutes. Be sure to watch the pot and add water if it reduces too much. The beans must stay completely covered during this process.
Once the beans have boiled for 45 minutes, remove from the stove top, carefully discard the water only and gently rinse the beans again. (You can use a sieve, but I find that covering the top with the pot cover and being careful over the sink with pot holders usually does the trick.) Add the chopped onion, tomato, bacon strips, and beer to the pot, then cover the rest with warm water until the beans are completely covered with about an inch of water above bean level. Return the beans to the stove at medium heat.
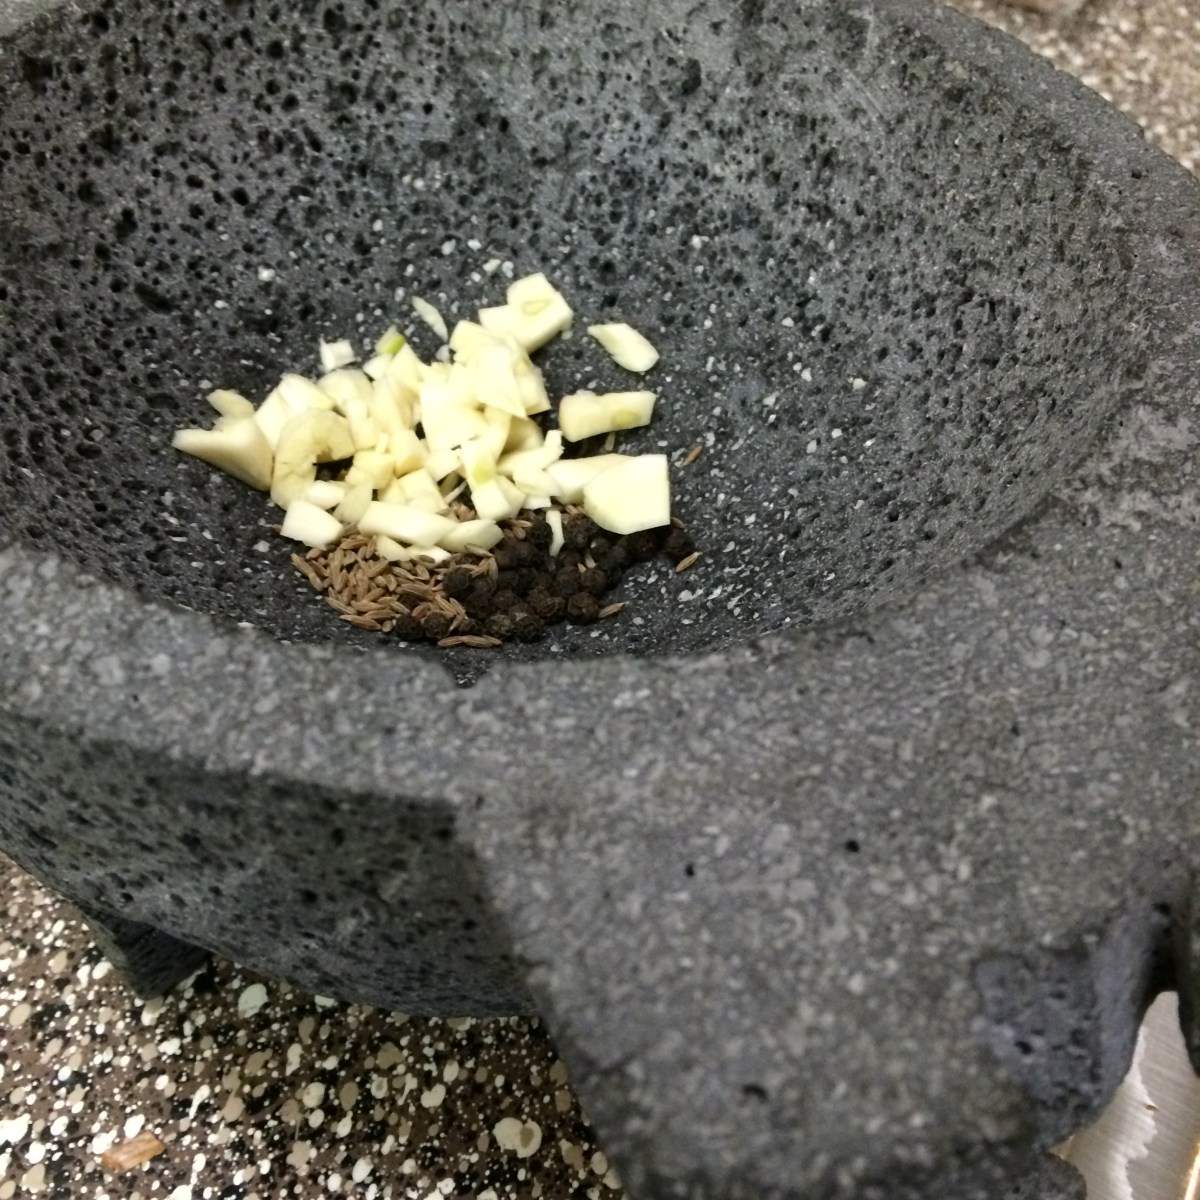
In a separate skillet pan on medium heat, lightly toast the cumin seeds and black peppercorns until they become aromatic. Add the toasted cumin seeds and peppercorns to a molcajete (mortar and pestle). Roughly chop the peeled garlic cloves and add them to the molcajete. Crush the cumin seeds, peppercorns and garlic together until they become a paste. You can add a little water to make it easier once the peppercorns are broken up. Add the mixture to the beans, adding more water to the molcajete to help motivate the paste to leave the surface. Gently stir the simmering beans and leave to cook for another hour.
Towards the mid-end of the cooking process, add salt to taste. This is a controversial thing, as some say adding salt at the start makes the beans hard and others say you can’t add salt at the end because it doesn’t flavor anything. Well, I add right towards the middle of the end and it usually does the trick – happy medium. I’m positive there is a scientific reason for each method out there, but my way works. And, if it ain’t broke…
At this point, if you’d like to add salsa, jalapeños or additional seasonings like garlic powder, cumin powder or onion powder, you can. You can even add roasted green chiles which make a flavorful addition. However, I have found that simple really is best, especially if you want to make refried beans with the borracho beans. And, let them simmer but don’t boil to mush. The flavors must develop but the beans will get too soft if you keep them simmering for too long. Just keep an eye out and a spoon handy for tasting.
To make refried beans (the right way, in my opinion), fry up some bacon in a cast iron skillet. Remove the bacon, leave the drippings in the pan and add the borracho beans, liquid and all, to the pan and let out all your aggression with a potato masher, creating a creamy, textured, bacony bean to eat with tortillas. The longer they sit on the heat, the thicker the beans will become, and that’s what you want. Don’t serve the beans too runny. That’s never fun for anyone. Add bacon to the bean-smeared tortilla, and you have my very favorite breakfast celebration taquito in your hands, my friend.
Here’s to hoping there’s another celebration taquito in my future. I’ll keep you posted!
My friends and family rock – mostly because they tolerate me and encourage (sometimes enable) my addiction to bacon. But, they also rock because they all love food and are pretty much geniuses in the kitchen. And, those who opt not to cook or bake, happily serve as taste testers and provide honest and thoughtful opinions. So, all around, these folks are pretty much the best group to provide some killer (as in good, not lethal) cooking and baking tips.
I sent a shout out to my peeps and asked them to offer up their best cooking or baking advice, and boy, did they deliver! And, they covered the gamut. From basics like knives and equipment, to things I didn’t even have on my radar (see #3), this top six list is a culinary quick-stop resource for anyone who ventures into the kitchen.
Along with my own advice, I’ve combined some of the feedback into topics since some of us hit on the same subject – great minds think alike and all. So, here is my inner culinary circle’s gift to you…
Have you ever been watching a cooking show and thought to yourself, “I could totally rock that out”???
A few weeks ago, I was watching an episode of Secrets of a Restaurant Chef with Anne Burrell on the Food Network, and she made this amazing fish stew called… (now, I’m going to provide the link to her recipe, but you have to promise you’ll check out what I did FIRST before you hop over there… mine is a little different… promise???!??) Okay… she made this amazing fish stew called Pacific Cod and Clam Cacciucco. (I’ll know if you clicked over there before reading all of this – just sayin’.)
Of all the chefs on FN, I think I have been inspired the most by dishes Chef Anne creates on her show. Now, although I did not follow her recipe and didn’t even look it up before making my own, to be honest, I was truly inspired and decided to create my own version of a Cacciucco (a Tuscan Fish Stew).
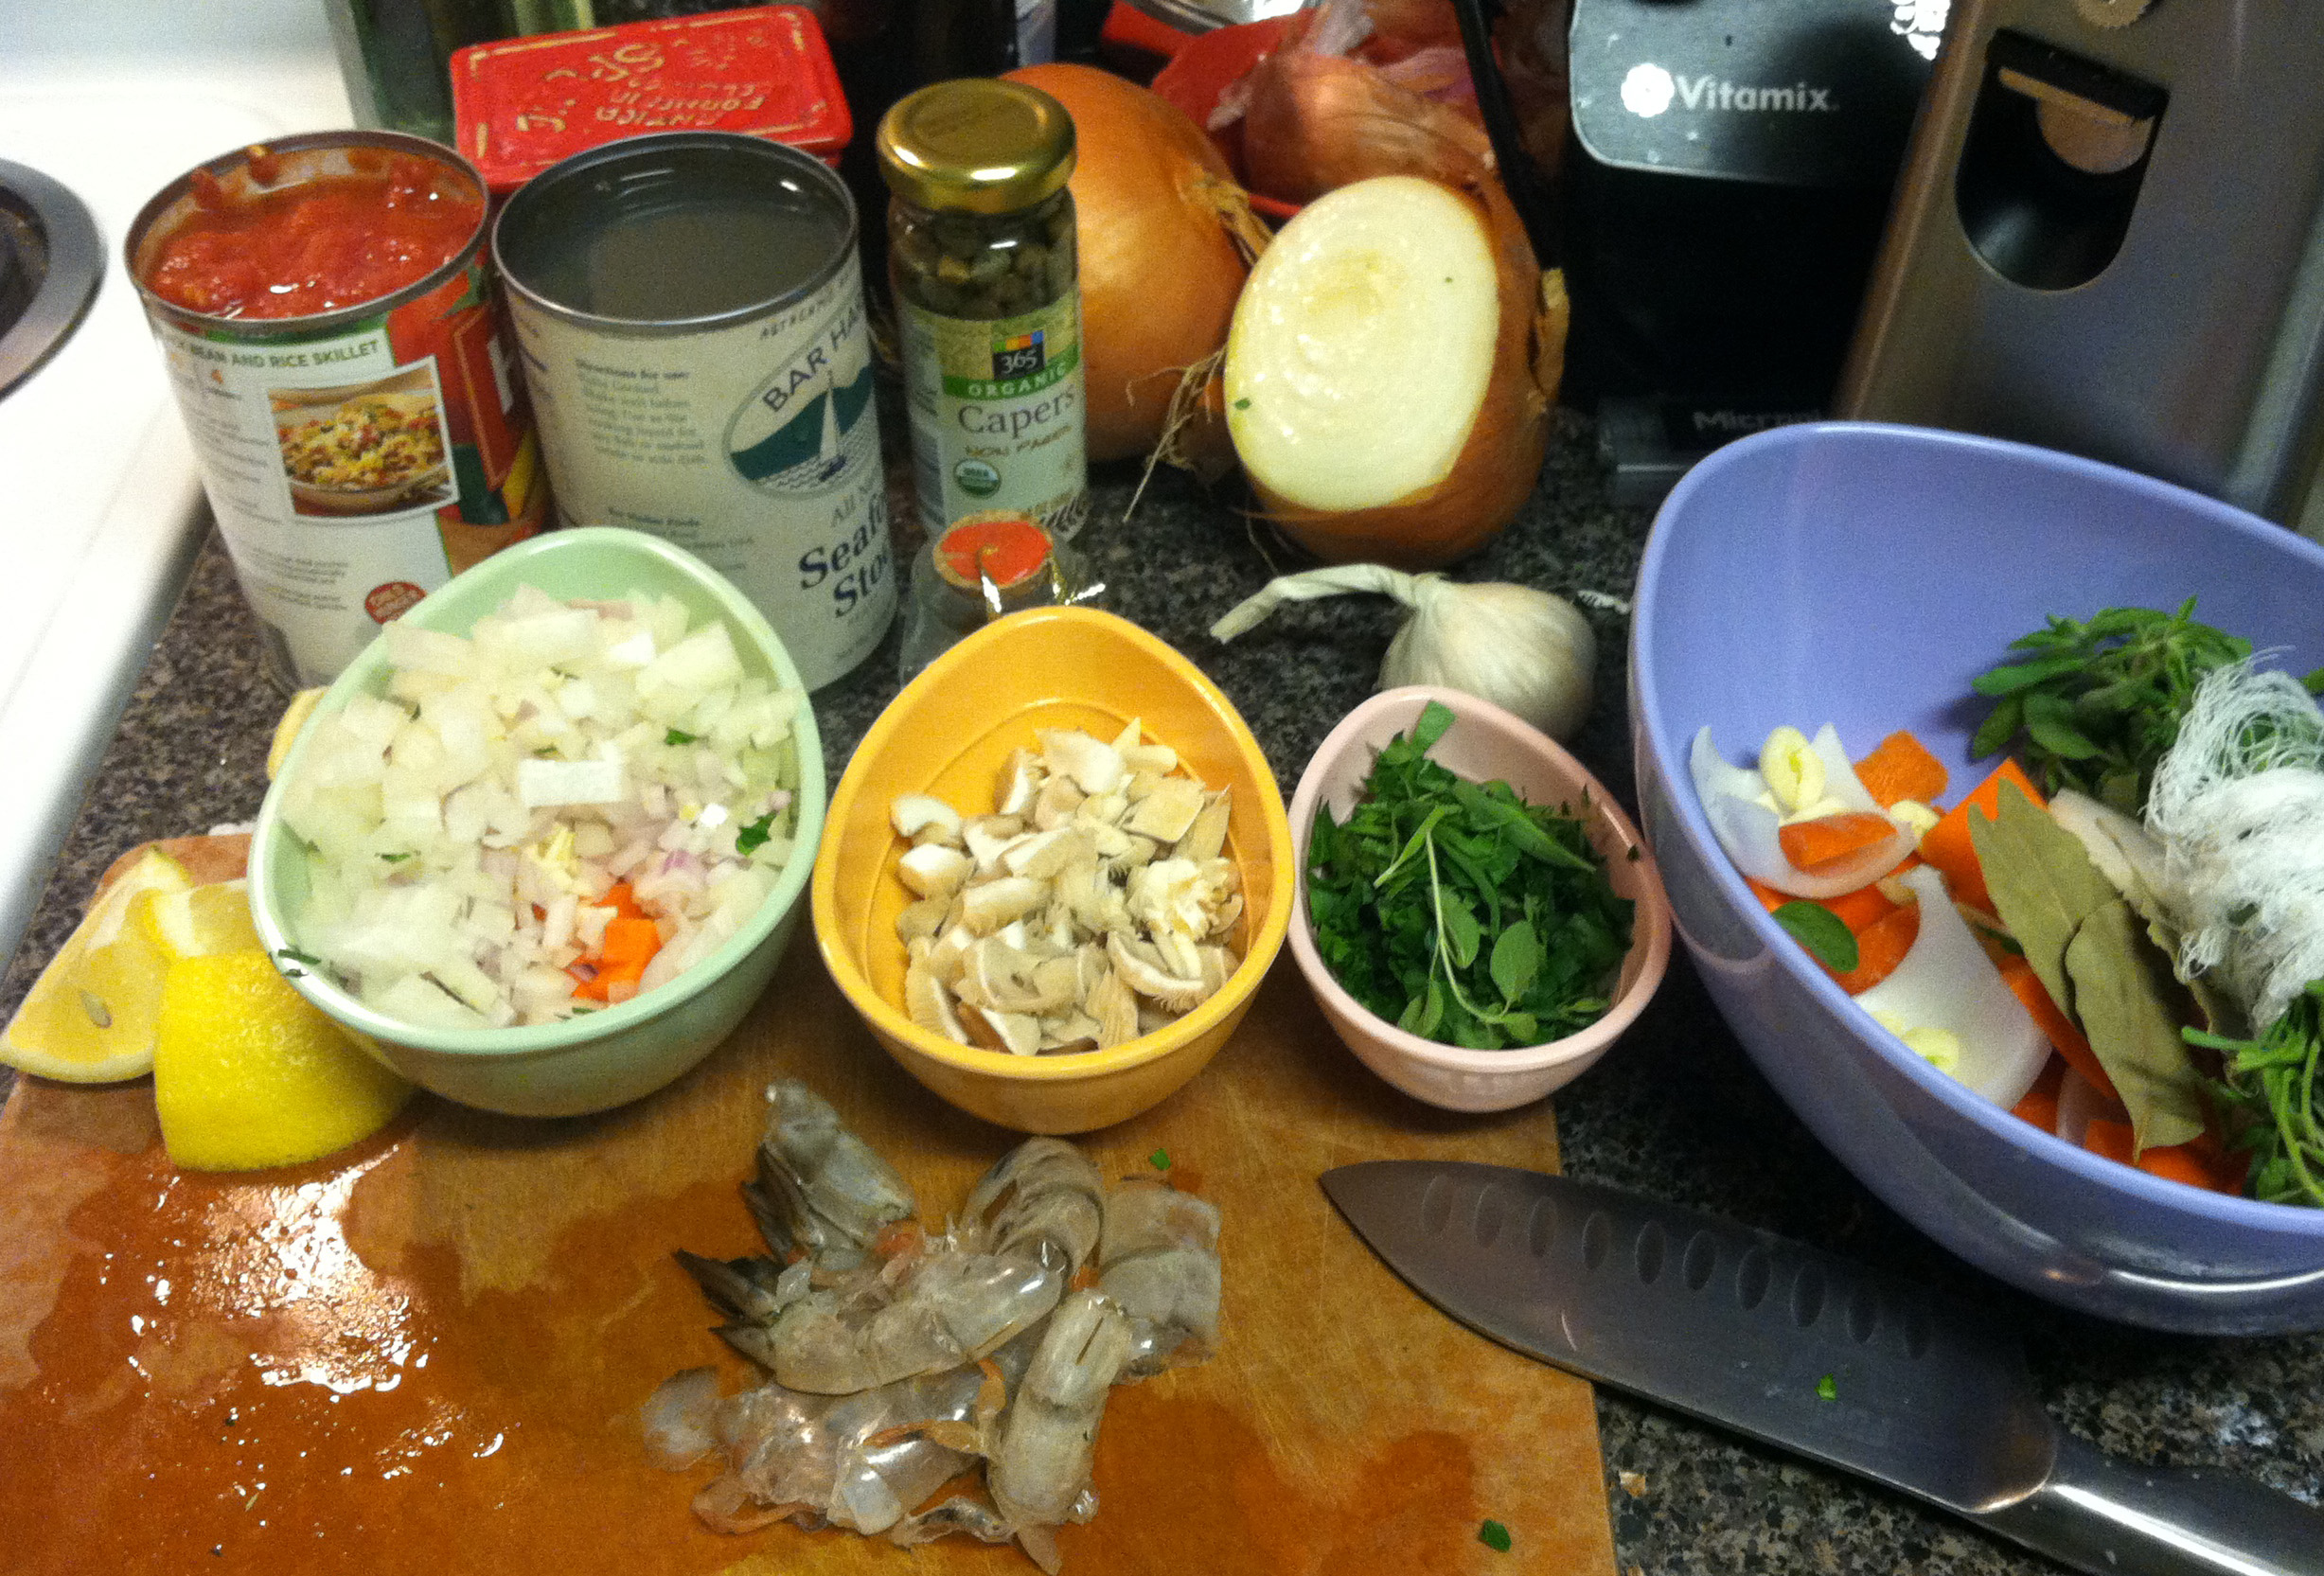
Mise En Place
There are three main components to this dish: the fish stock, the searing of the seafood, the building of the stew. It’s best to do all your prep, per the norm. If you’re a “do as you go” cook, this stew will take you forever. So, mise en place, people! Mise En Place!
I started with the fish stock.
When I went to the fishmonger to pick up my Halibut, Littleneck Clams, Scallops and Gulf Shrimp, I also asked for fish bones to build a stock. He said he didn’t have any on hand but pointed me in the direction of Bar Harbor fish stock in the stock aisle, saying it was the best out there. It’s a canned stock (don’t judge – I tweaked it, foodies – put the shrimp forks down). I knew I would have to build a ton of flavor in order for my Cacciucco to remotely taste as good as what I imagined Chef Anne’s version tasted like; so, I made sure to add tons of herbs to create a bouquet, as well as used some bay leaves, carrots and onions for the fish stock base.
Fish Stock Base
Fish Stock
1 TB Olive Oil
4 Smashed Garlic Cloves, skins removed
½ Huge Carrot, roughly chopped (nobody cares, it’s stock base)
½ Onion, roughly chopped (again, save the knife skills for the stew itself)
3 Bay Leaves
1 Bouquet, including fresh oregano, marjoram, thyme, tarragon
Shrimp Shells from prepping the shrimp
1 Can Bar Harbor Fish Stock
Juice from ½ a Lemon
Salt / Pepper for Seasoning
Fish Stock
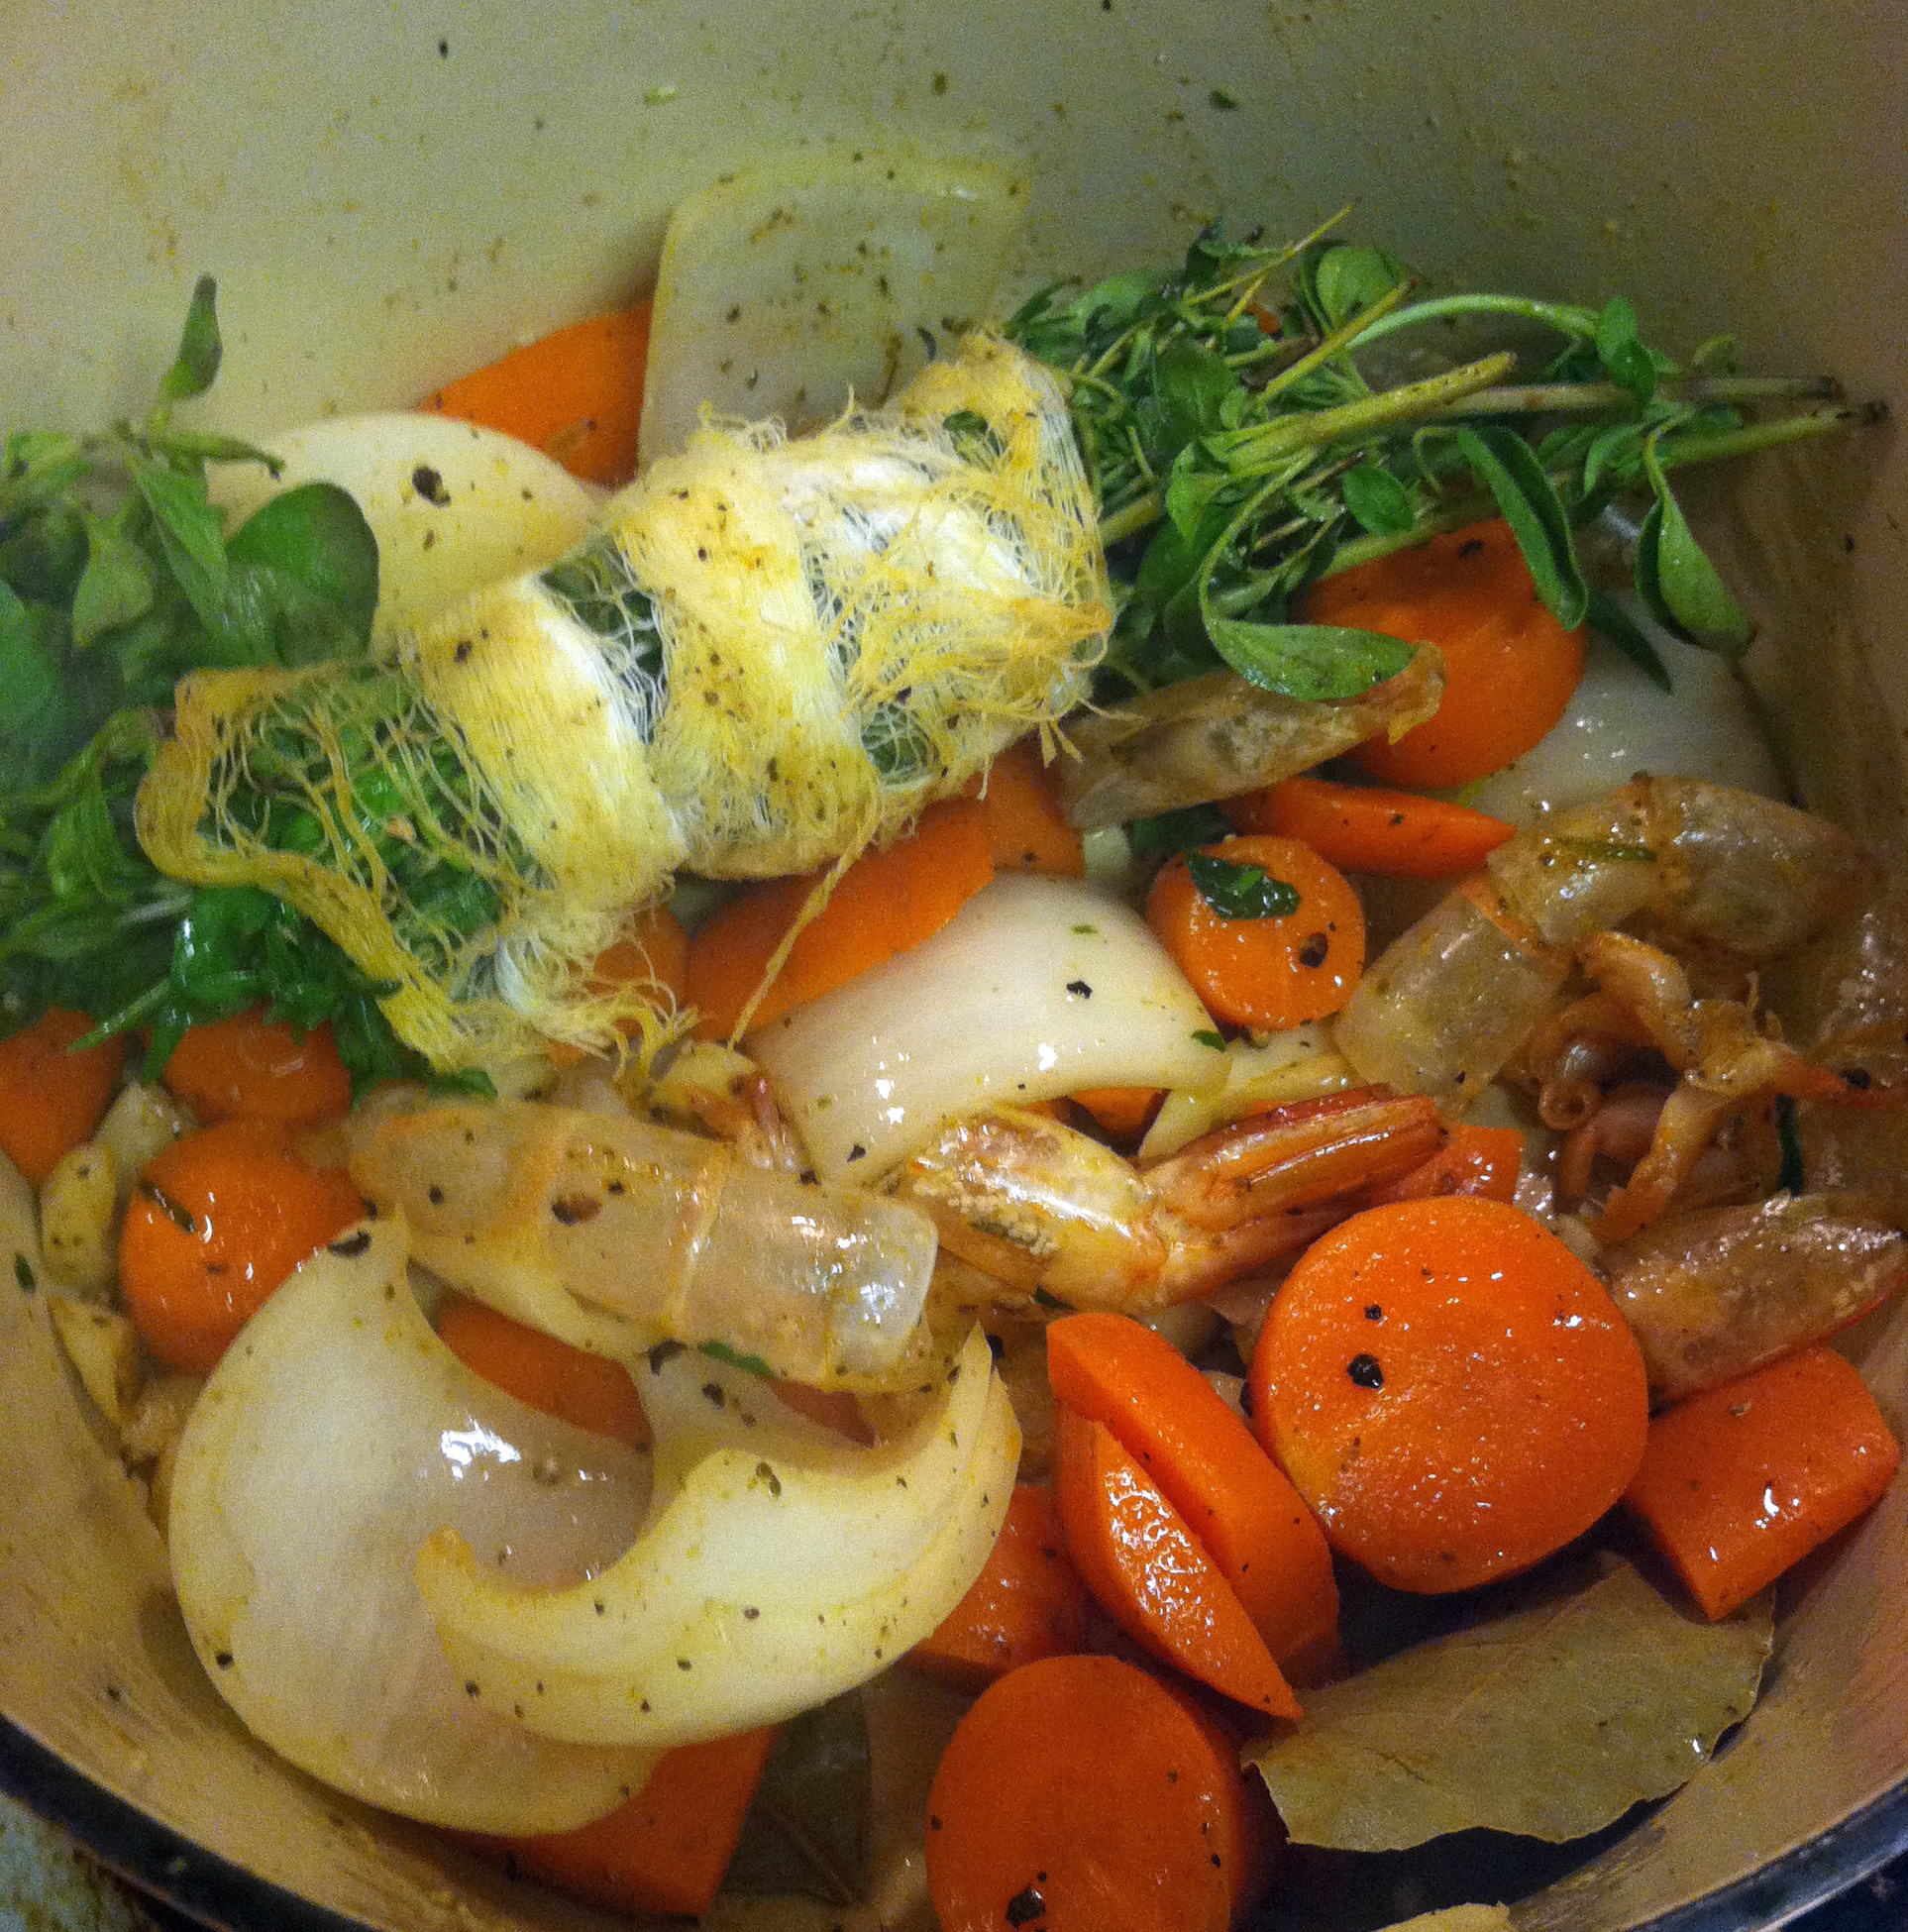
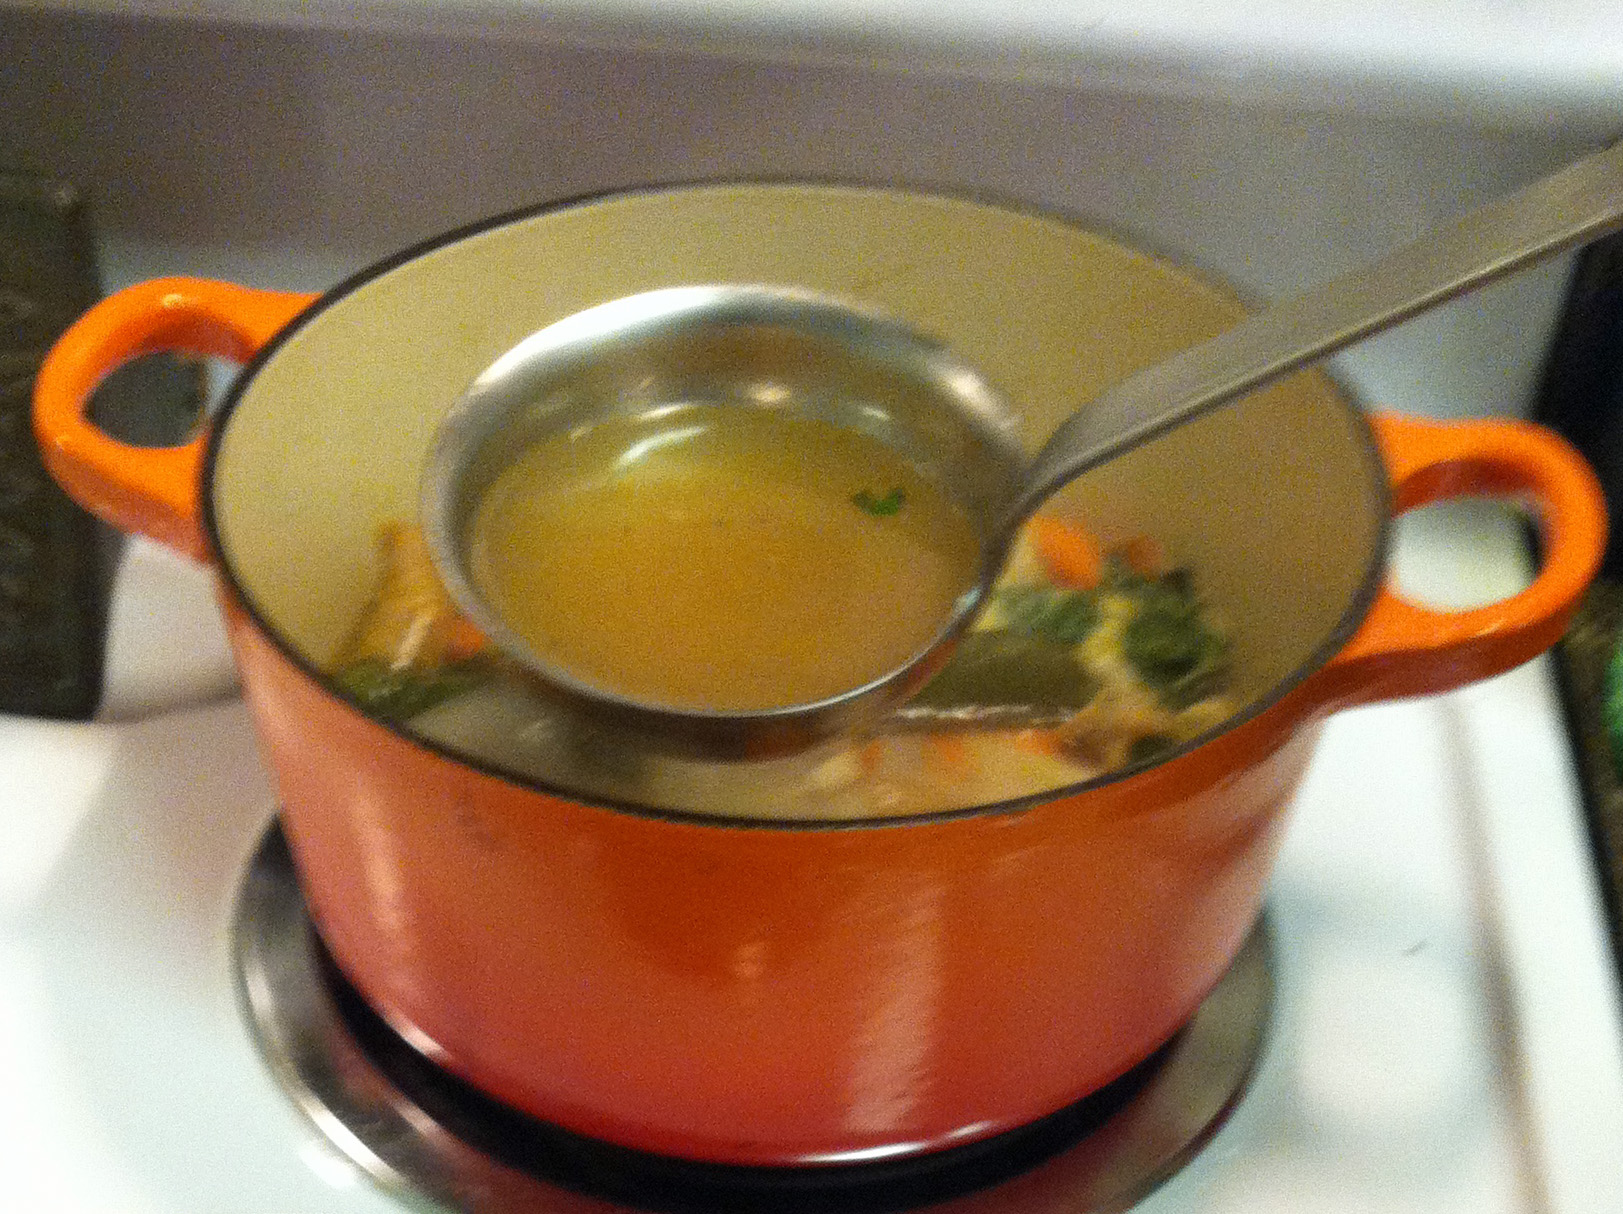
On medium-high heat, add olive oil, garlic, carrot and onion and sauté until the onion starts to create that heavenly smell in combination with the garlic and barely starts to turn translucent. Season with salt and pepper. Add in the bay leaves, bouquet and shrimp shells and continue to sauté until you can see that the shrimp are turning pink, approximately 4 minutes or so. Add in the can of fish stock and allow to simmer on medium-high heat for at least 10 minutes and then add the lemon juice and additional salt and pepper to taste. Leave on a low, rolling simmer while you cook the rest of the dish, as you will want to fortify the flavors prior to adding it to your Cacciucco base.
Next up was the Cacciucco base, and I knew this was going to be fun. Part of the fun was knowing what was already in my refrigerator that I could add to my own version. Chef Anne used tomato broth she created from pureeing whole peeled tomatoes, and I used fire roasted tomatoes that had some chunk to them. There are no mushrooms in hers, but I used oyster mushrooms as part of my Cacciucco base (not authentic, I know… but I didn’t say I followed the rules, now did I?) And, for my version, I added more herbs like flat leaf parsley and also capers to the mix… just because. Here’s the base:
Cacciucco Base – Saute
Cacciucco Base
1 TB Olive Oil
5 Minced Garlic Cloves
½ Huge Carrot, medium dice (this is where your knife skills matter; cooking evenly is muy importante or molto importante in this case)
½ Onion, medium dice
1 Shallot, medium dice
1 Oyster Mushroom Bunch, medium dice (these will not look perfect – it’s okay; don’t waste time trying to make squares out of spongy irregularly shaped objects – just make
them the same general size)
1 ½ tsp Capers, drained
½ Cup White Wine (I used Sauvignon Blanc – you can use any good white wine – something you’d drink)
2 TB Flat Leaf Parsley, roughly chopped
1 TB Fresh Oregano, Marjoram, Thyme, Tarragon combined, roughly chopped
1 tsp Saffron Threads
1 Can Fire Roasted Tomatoes with Garlic
Fish Stock
Juice from ½ a Lemon
Salt / Pepper for Seasoning
Cacciucco Base – White Wine and Saffron
On medium-high heat, add olive oil, garlic, carrot, onion and shallot and sauté until the onions start to turn translucent. Season with salt and pepper. Add in the oyster mushrooms and capers and continue to sauté until you can see that everything is starting to cook down, approximately 4 minutes or so. Add in the white wine to deglaze the pan, making sure to scrape up any fond (yummy goodness that may stick to the pan while sautéing) and then allow to simmer on medium-high heat until the wine starts to cook down, approximately 3 minutes.
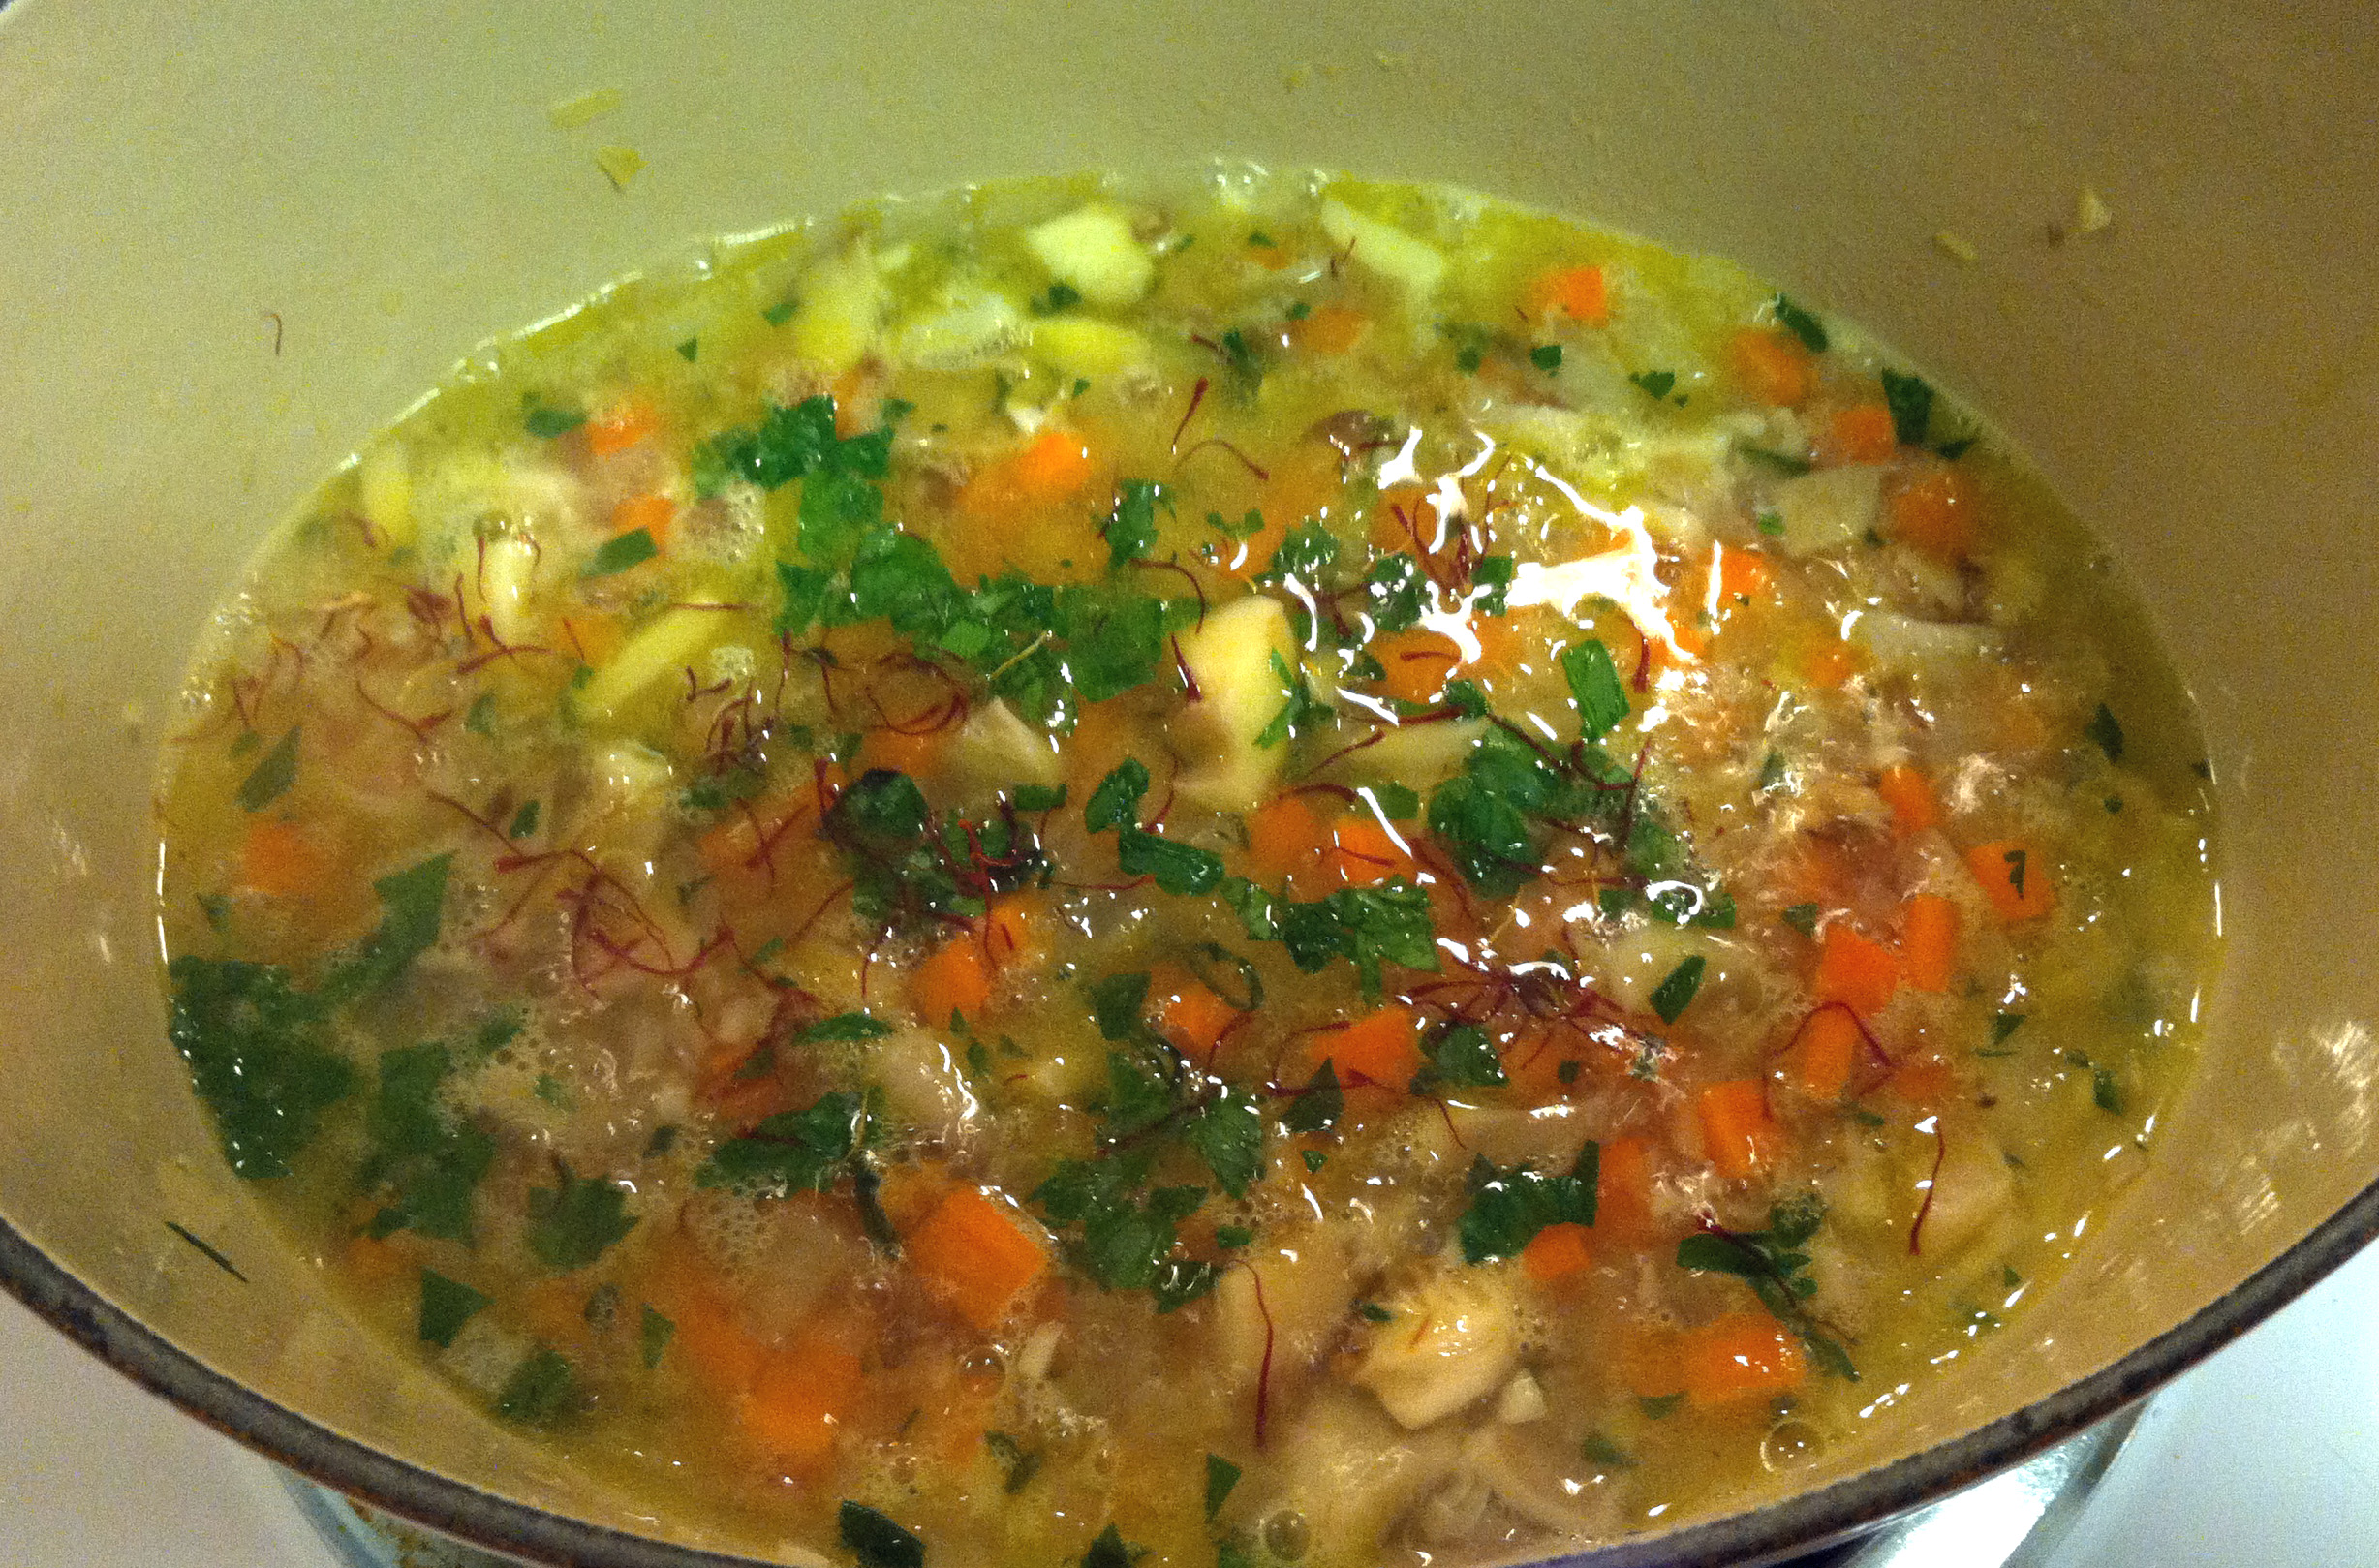
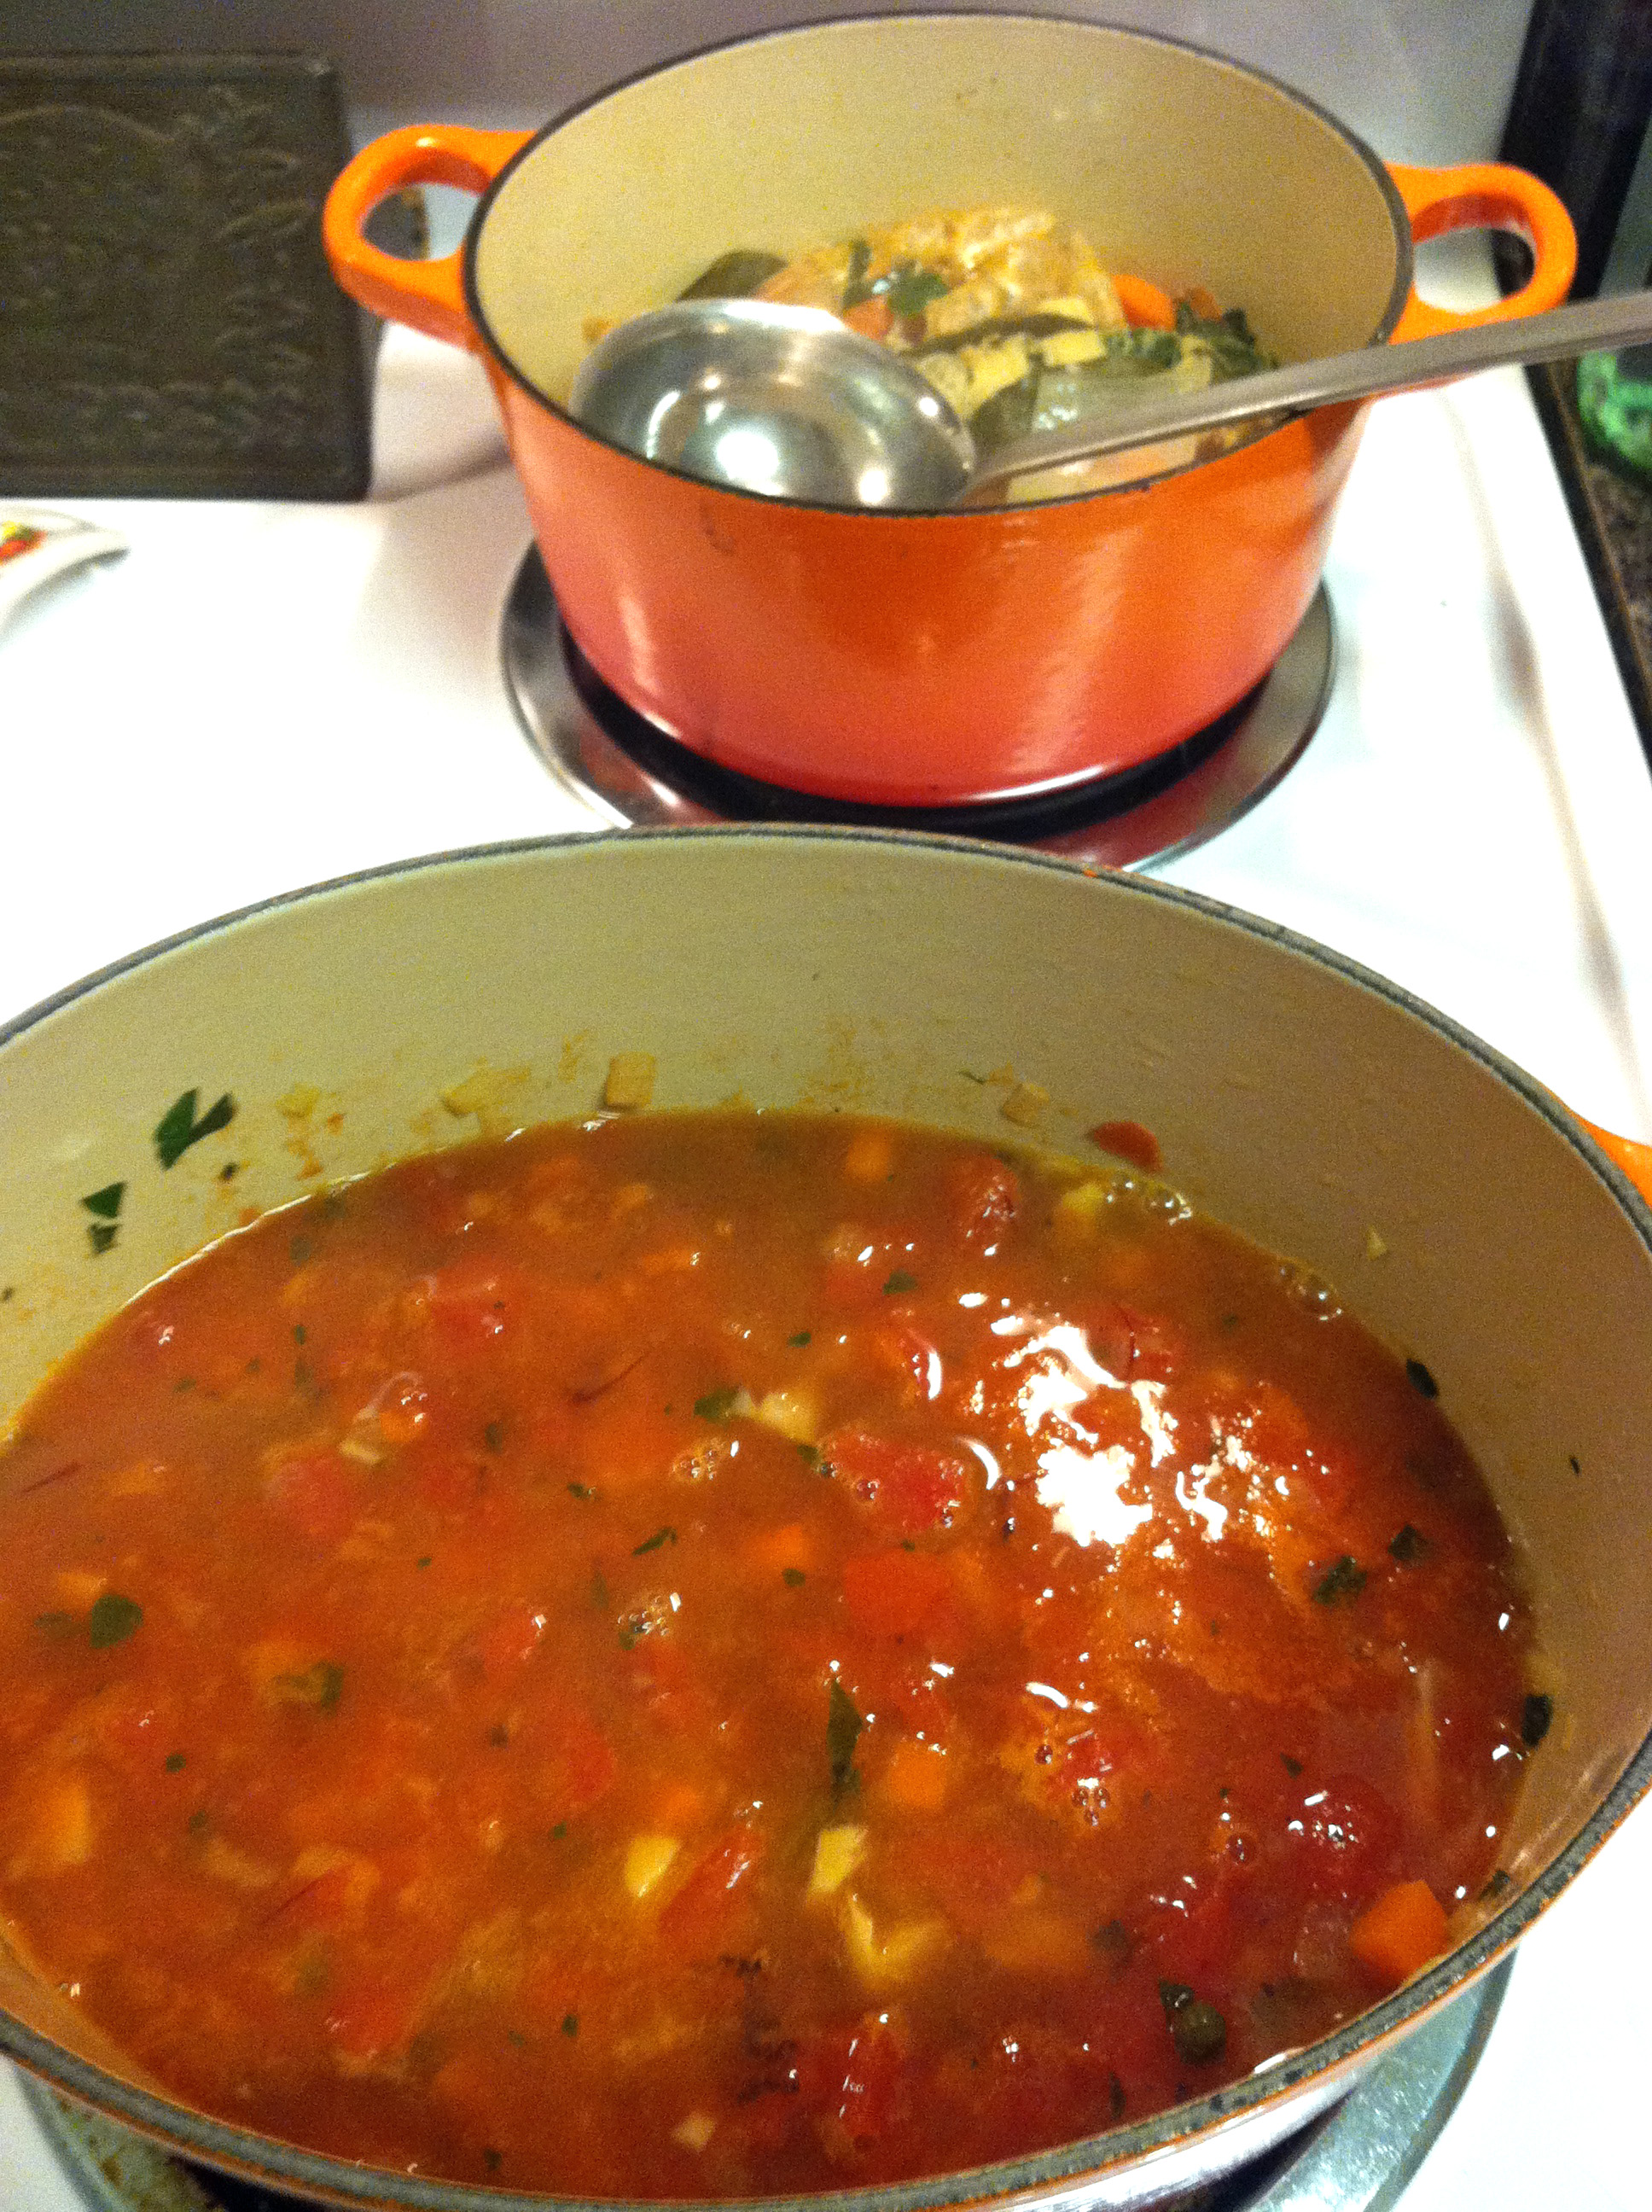
Cacciucco Base – Tomatoes and Stock
Add in the herbs and the saffron and cook for another 2 minutes or so. The sauce may start to turn a bright yellow/orange/red color. That’s the saffron at work! Then add the fire roasted tomatoes and stir. Gradually add the fish stock (ladle in the broth only) and then add lemon juice and additional salt and pepper to taste. Turn the heat down to low-medium and get ready to start adding the seafood.
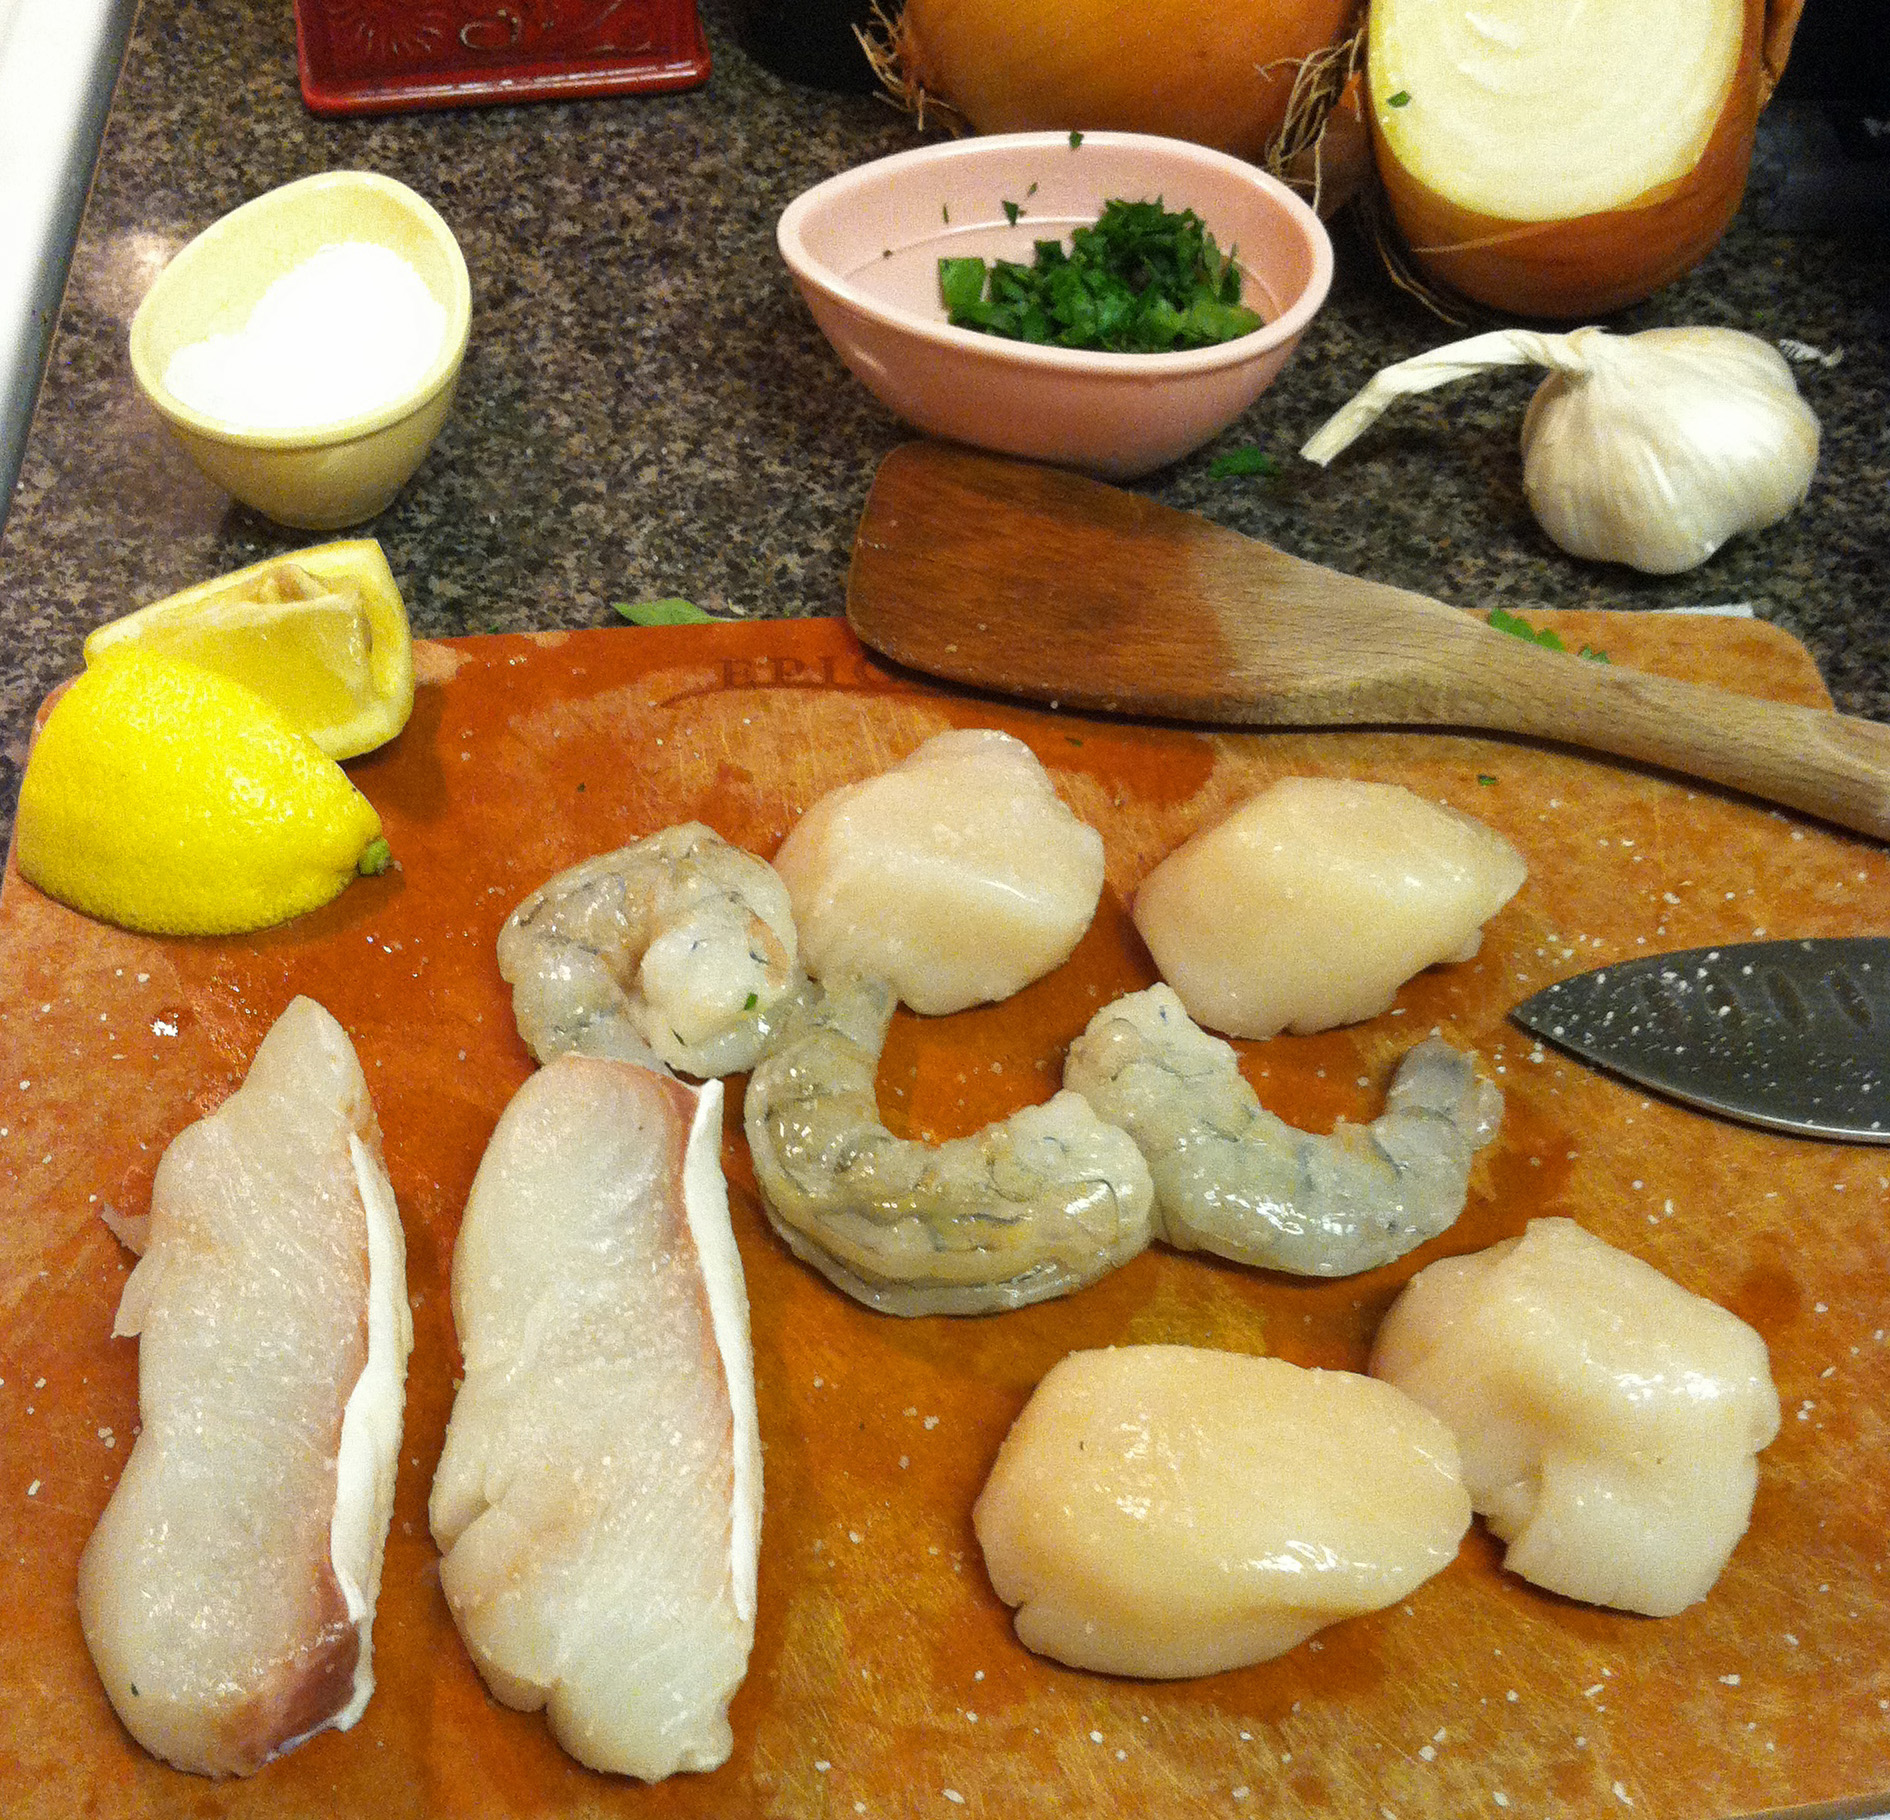
Seafood Prep
Things to Remember When Prepping Your Seafood:
Nobody wants to eat shrimp poo; so, clean and devein your shrimp after you unshell them.
Nobody wants to eat tough scallop muscle; so, remove that odd little tough piece that may be holding on to the scallop.
Nobody wants to eat scales and bones; even though the filet of Halibut from the fishmonger shouldn’t have either of these, just run over your Halibut closely to remove any unfriendlies.
Nobody wants to eat sand or grit; so, wash your tightly sealed clams to scrub off any debris.
Clams should be completely closed with no “give”. If they are already open or have “give”, throw them away. This is a killer Cacciucco recipe, but let’s not take that literally, shall we???
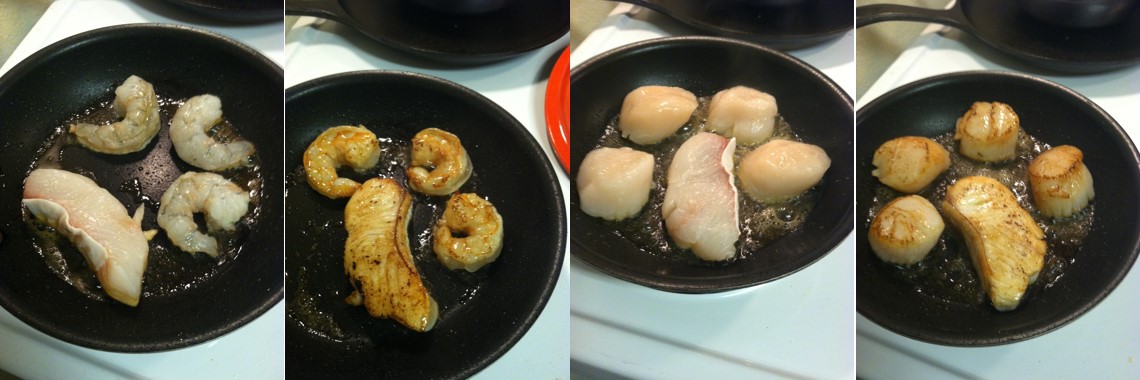
Okay, so after you’ve made sure people will be happy and more importantly, not dead, after eating your seafood, the next part is to do a quick sear. You don’t want to cook the seafood all the way through because you want it to finish off in your stew. What you do want is beautiful color on the seafood prior to placing into the Cacciucco base.
First, however, you will add your cleaned and tightly sealed clams to the stew and then cover the pot. Clams will take a bit longer to open and incorporate their beautiful flavors into the base. So, add those in first, cover and move on to the searing of the seafood. I had six of them in mine, as my recipe is just for 2-3 servings.
Seafood Sear
Seafood Sear
2 Halibut Filets, thick
4 Scallops, large
3 Gulf Shrimp, large
Cacciucco Combined
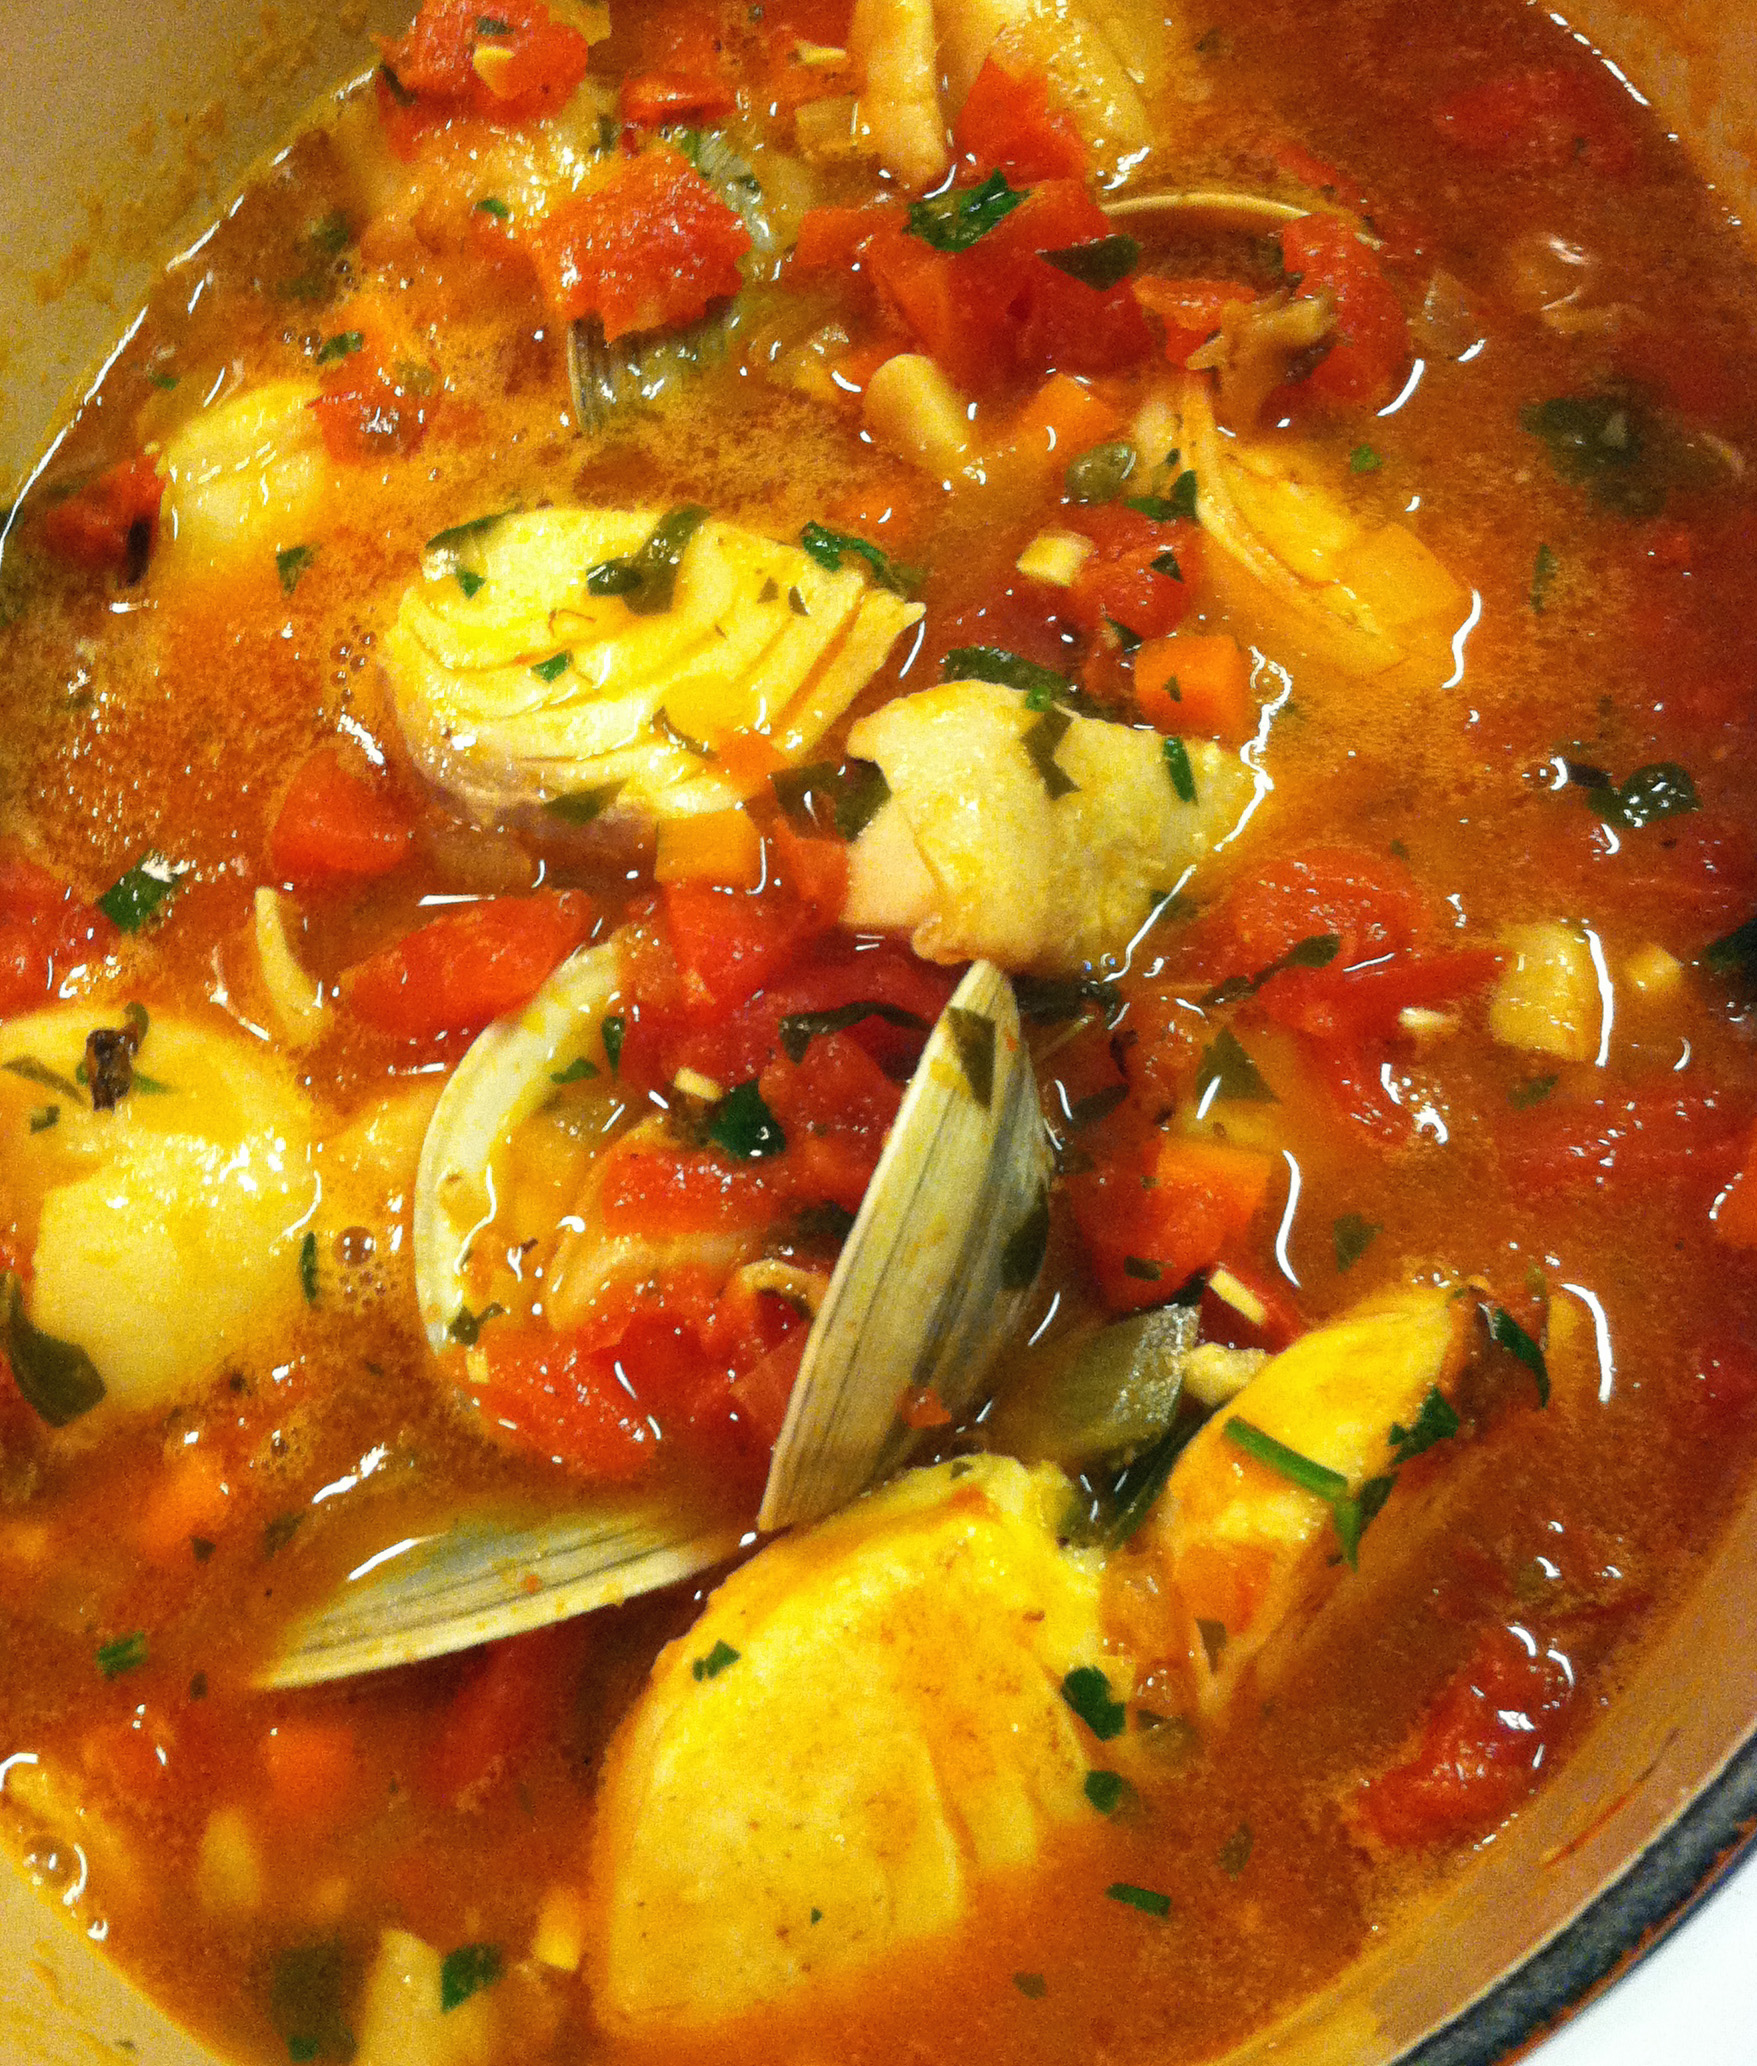
Take a touch of olive oil (and a bit of butter if you wish) to a frying pan and add the Halibut, Scallops and Shrimp to the pan without crowding them. You want to add “beautiful brown food” to your base, as Chef Anne would say, not steamed seafood. Crowding the pan won’t get anything brown. Once everything is quickly browned but not cooked through, transfer to the Cacciucco base which should now have some clams opening up. Allow everything to cook through, approximately 5 minutes, and then it’s time to serve up!
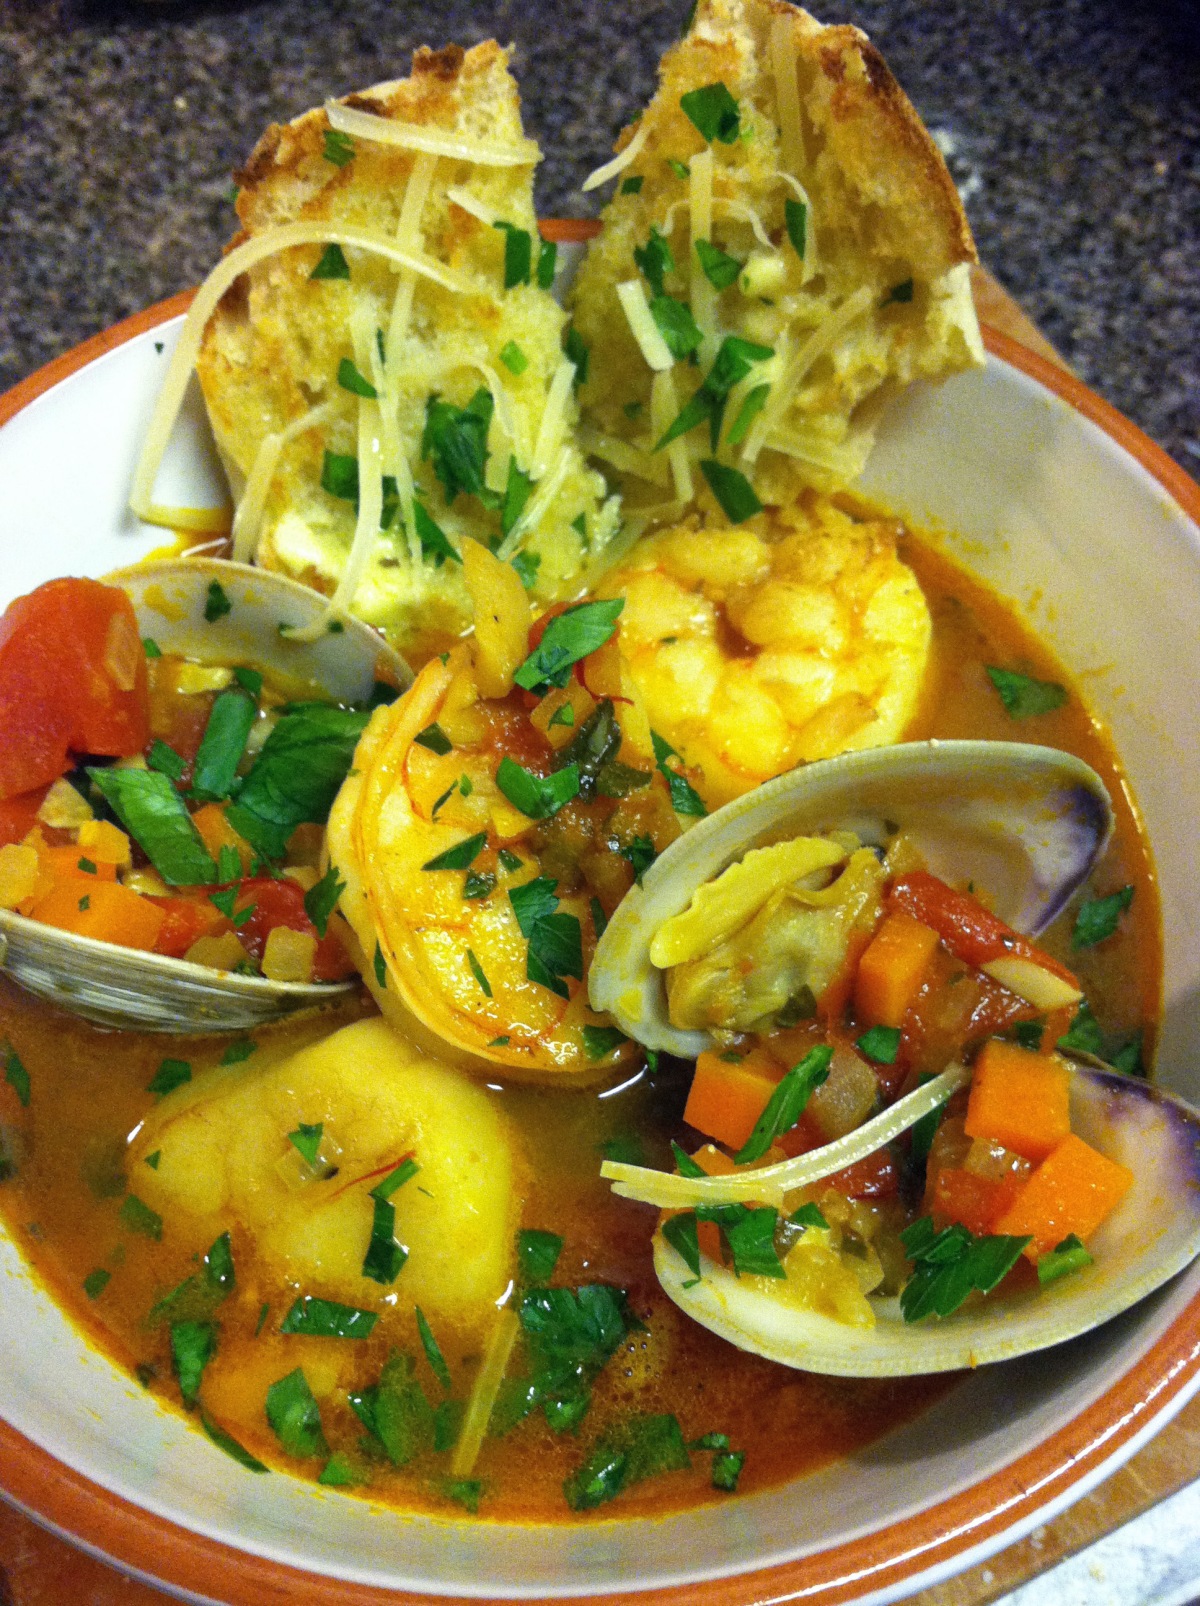
Cacciucco by OMG
Grab a nice, deep bowl and add the base, ladling the seafood into the bowl but reserving the clams. Once you’ve loaded the bowl, take the clams and top everything off, arranging the seafood to feature all of their glory. Add just a touch more of roughly chopped parsley to the party and serve with toasted, crusty bread that’s been drizzled with olive oil or butter and topped with parmesan cheese if you wish!
I have to tell you that this is probably one of my very favorite dishes I’ve ever made. It was definitely inspired by what Chef Anne did but completely my own, and it was awesome. I hope you make this at home. I know I will definitely be making this again!
This morning, as I was staring at the “end of the week” pantry contents with coffee in hand, trying to pep up and think of what to make for breakfast, I distinctly heard (okay, maybe imagined) Elvis talking to me…
“Listen here, little lady… what you need here is a peanut butter’n nana sandwich with bacon. Uh-huh-huh…………uh-huh-huh… ooooooohhhhh, yeeaaah.”
I am not necessarily known for my love of vegetables; although, I do love veggies when seasoned with bacon. And, while I am a lover of all food, I rarely have had the desire to venture into the land of the vegan. This all changed when I met “Eric”, a co-worker of mine whose named has been changed to protect the innocent, or in this case, just because I’m not sure he wants to be forever known as “The Vegan” in my blog.
So,everyone at work knows I bake, and when I have an audience, I feed the audience. Every birthday I offer to bake the birthday person’s dessert of choice, and having recently joined this team at work, I had a new group of individuals for whom I could provide delicious treats. Normally, we’re talking cakes, pies, cookies – things that involve milk, eggs and other mainstream ingredients. However, on my new team is Eric. He and his wife have been vegans for a few years now, and they made the switch to the vegan lifestyle for a number of reasons and have benefited greatly from this decision. I like Eric. He’s nice, and I knew when he told me he was vegan that I was going to both learn something and challenge myself to expand my foodie repertoire. Continue reading “How to Bacon… I Mean, BAKE VEGAN. Sorry, Hard Habit to Break…”
I love my Bear, as seen here unwilling to wait for the camera to click before diving into a Gray’s Papaya hot dog in NYC. Whether we’re on the road together, enjoying a fun trip, or relaxing at home during his time off from work, my husband, Bear, and I are always thinking up new creations for meals or thinking of new places to try! I was rummaging through all my food pics to decide what to write about next, and I discovered a theme… things we cook when Bear comes home!
So, I wanted to share a few of our latest kitchen concoctions. Bear works on the road a majority of the time and gets to come home for blocks of time, and he is an avid eater of my food, as well as an excellent Sous Chef and Executive Chef from time to time in our tiny kitchen. You guys saw how we make a great New Mexico Green Chile Won Ton. Now, here are some other adventures From the Kitchen…
First up, Bear’s Cola BBQ Dinner… now, I know what you’re thinking. Cola BBQ Dinner: this implies an entire meal made from cola products, correct??? Yeah… initially, I wasn’t all that excited about this meal either. :-\
Last year a very good friend of mine who owns a cooking school in Colorado asked me for my Pulled Pork in Roasted Tomatillo Poblano Sauce recipe to share with her students / customers. I quickly wrote everything out and forwarded it on its way. Recently, I ran across my email, and I decided it fit perfectly with what I’m doing now and decided to share. Below is the email I sent to Katy – the recipe is a work of love, and I’m inspired to make it again… maybe I’ll post some pics.
2 or 3 pounds of pork (tenderloin or pork roast – whatever tickles your fancy)
12 Tomatillos (medium)
4 Tomatoes (large)
4 Poblano Peppers (large)
2 Red Bell Peppers (large)
2 Onions (large)


 bells by lining them up parallel to the grill lines without falling through. Use your judgement, and if your grill is too wide, use foil on the grill to avoid any peppers from falling through.